Update Time: May. 2026
About This Manual
This manual is intended for the installers who need to manage the community, building, apartment, residents, devices, remote maintenance service, and more on the Akuvox SmartPlus platform (Version: 7.4.1).
For more information, please visit http://www.akuvox.com/ or consult Akuvox technical support.
What’s New in SmartPlus 7.4.1:
System Overview
Akuvox SmartPlus is a cloud-based platform on which the installer can conduct integrated management of buildings, apartments, residents, devices, and relays for communities, as well as the remote maintenance service for all the devices deployed.
Installers using this platform will be able to:
Add, edit, and delete the community, buildings, apartments, devices, and residents.
Deploy and set up devices and relays for access control.
Check and upgrade device firmware.
Check and manage the MAC library.
Conduct remote operations such as Auto-provisioning, device reboot, transmission type modification, and remote maintenance.
Download the related technical manual and get access to the Akuvox ticket system for technical support.
Subscribe and renew Akuvox SmartPlus.
Manage sub-installer accounts.
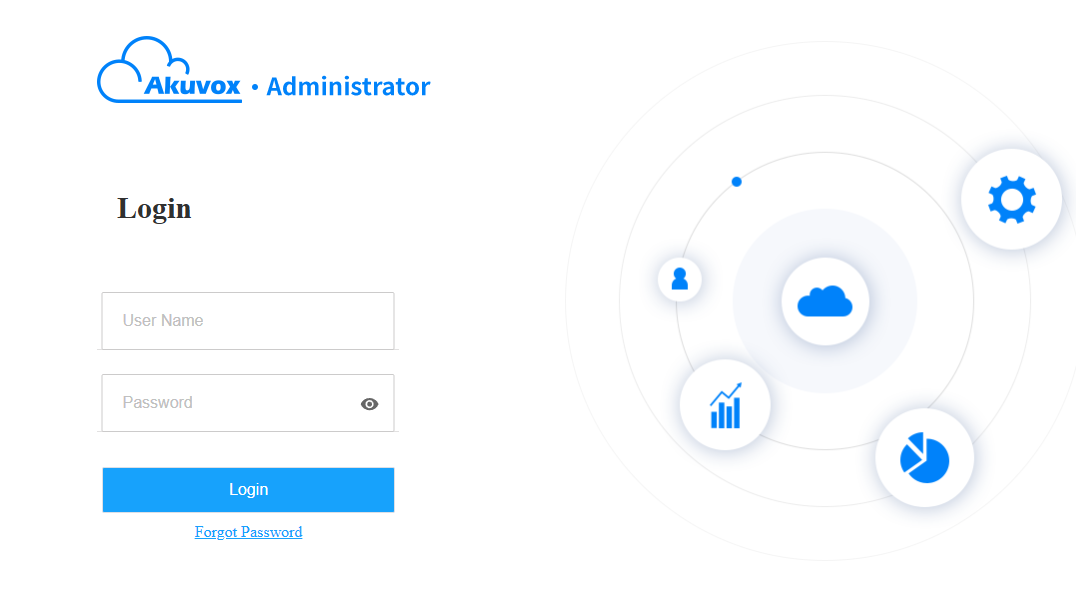
Login
Log in to the SmartPlus platform with the account obtained from your distributor.
Open the web browser, enter the address (URL) of the SmartPlus server location in your area, and press Enter.
Enter your username and password.
Click on Login.
Note
Enter a verification code for login when your distributor enables two-factor authentication.
Click on Log out in the upper right corner to exit the system.

Email Confirmation
You are required to enter an email address when you log into the SmartPlus platform for the first time.
The email address is used to reset your login password and to receive notifications from Akuvox.
You can change the email address and turn off the notification push on the Setting > Notification interface.

Note
Click here to view how to reset the SmartPlus login password using the email address.
Prior to the Management
It is advised that you go through what is listed below before starting management.
Check if all device MAC addresses have already been registered by your distributor.
Check if the device firmware supports cloud mode with no connection to SDMC.
Check if the device is powered on and is connected to the internet, and make sure that the network is normal.
Check and make sure that your resident information and device information are correct.
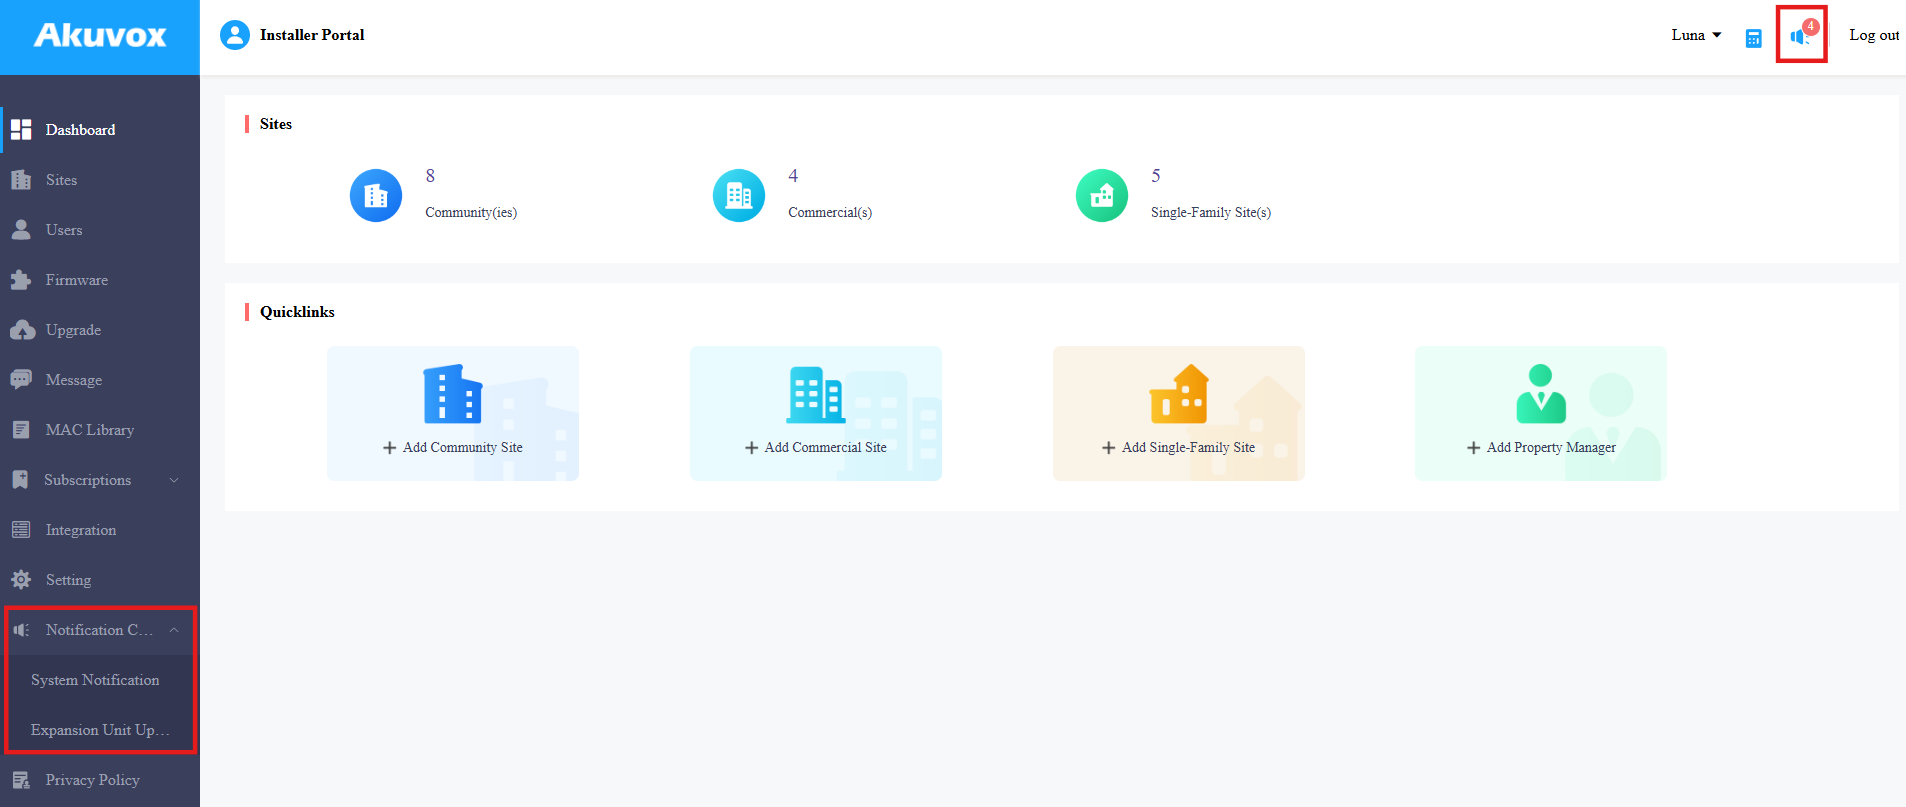
Dashboard
The functional column allows you to manage sites, users, devices, and account settings in an organized manner.
(1).png)
Module Description:
Modules | Description |
Dashboard | Have quick access to create projects and property manager accounts, and a quick view of devices and SmartPlus App account status. |
Sites | Click to go into specific project management. |
Users | Add, edit, and delete property managers and sub-installer accounts. |
Firmware | Check the available firmware versions and their information. |
Upgrade | Upgrade the firmware version for a specific device. |
Message | Create messages and send them to target users. |
MAC Library | Check the device MAC registered by your distributor. You can remove the desired MAC. |
Integration | Display the third-party locks where you can also add the lock and assign it to users. |
Setting | Check coupon details, credit logs, set up time, billing information, account settings, etc. |
System Notification
Akuvox will send you notifications of the SmartPlus Cloud update and any changes that happen to the expansion unit(MD06/12).
Click the notification icon in the upper-right corner to check the messages.
Or, click Notification Center on the left column.
Community Management
Create Community
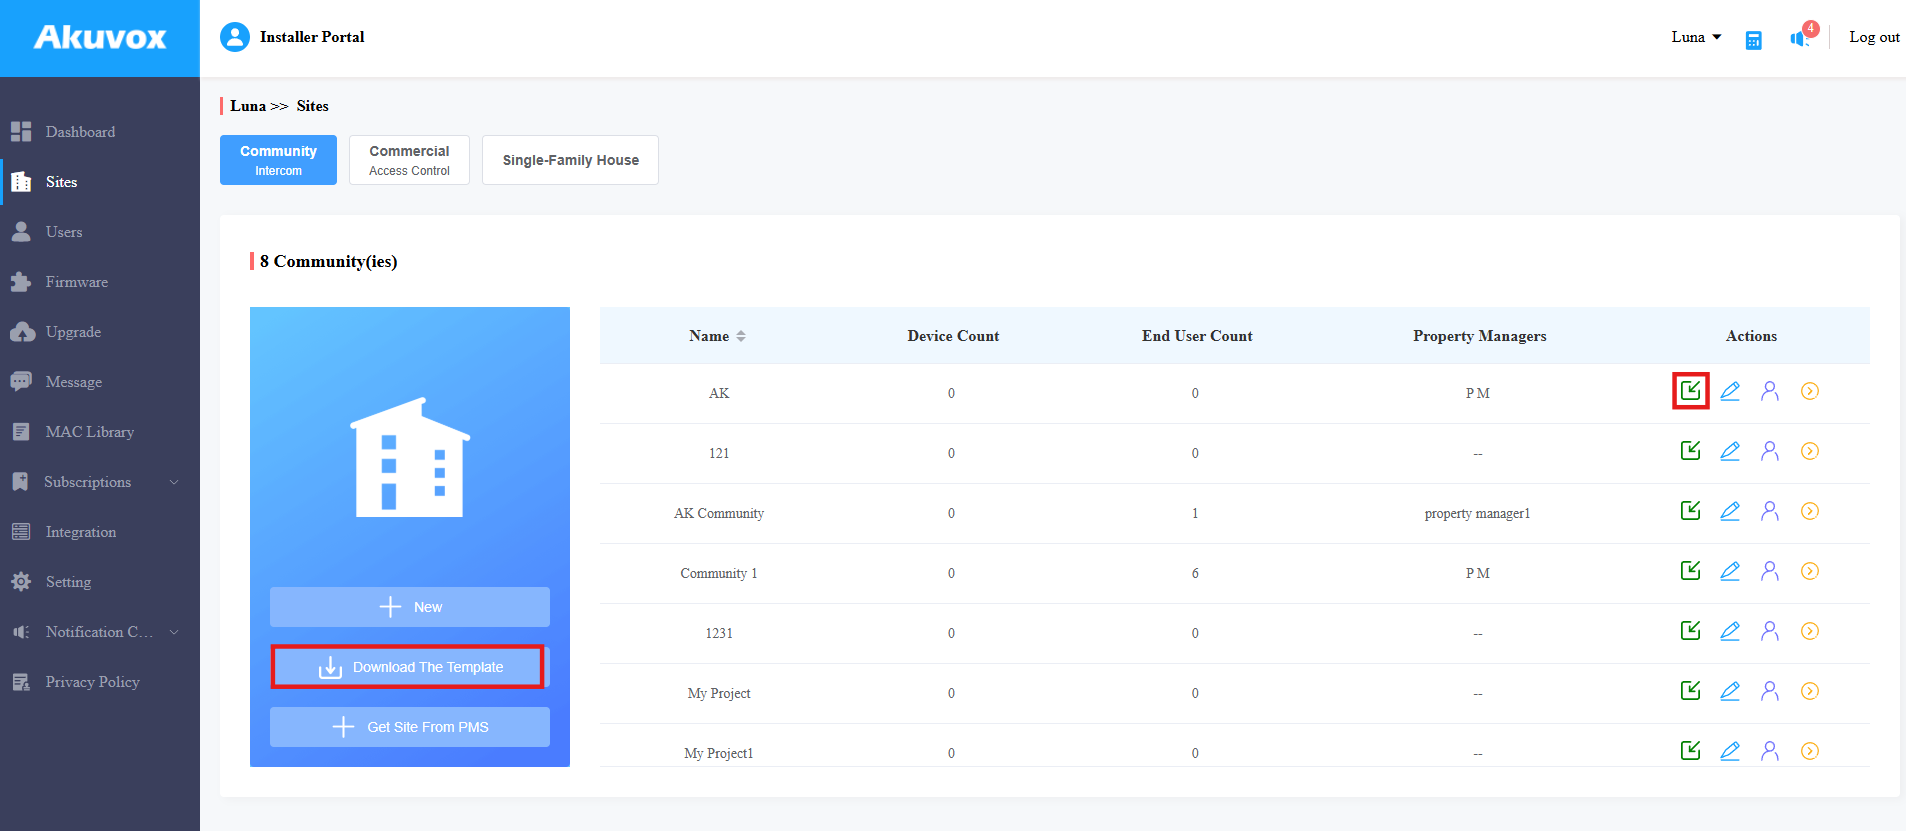
A community must be created first on the dashboard before proceeding to the other management involving devices, residents, etc.
1. Click +Add Community Site on the dashboard for quick creation.
Or, click Sites on the left column and click +New.
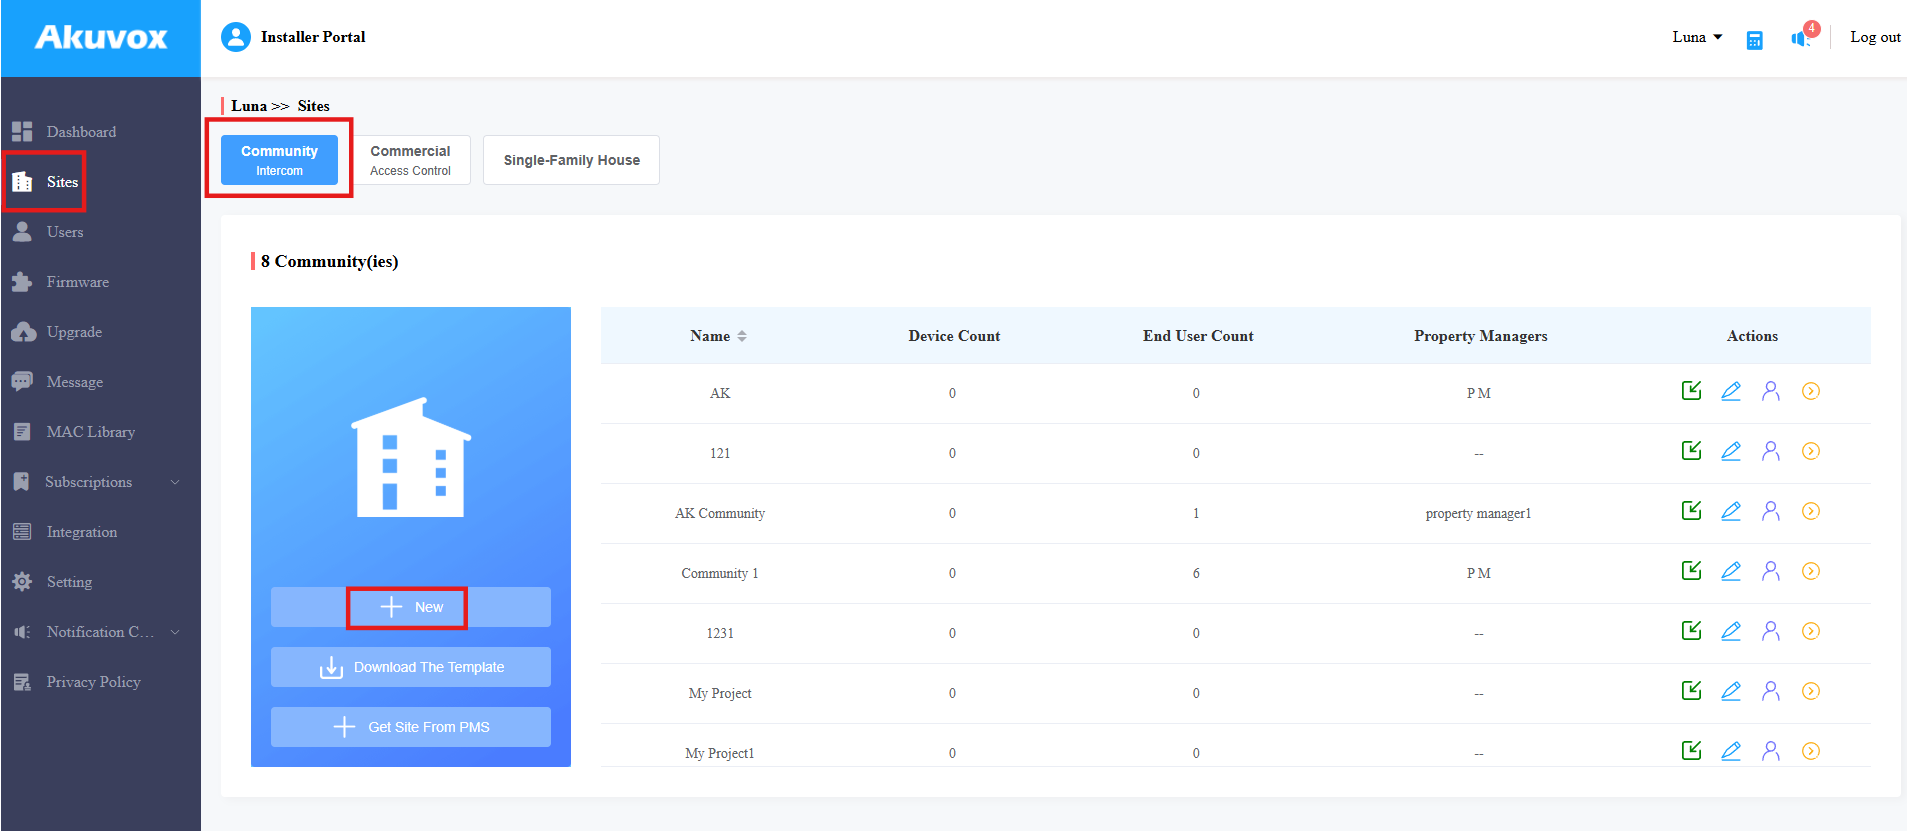
2. Set up a community by filling in the related community information. See the item descriptions in the chart below.
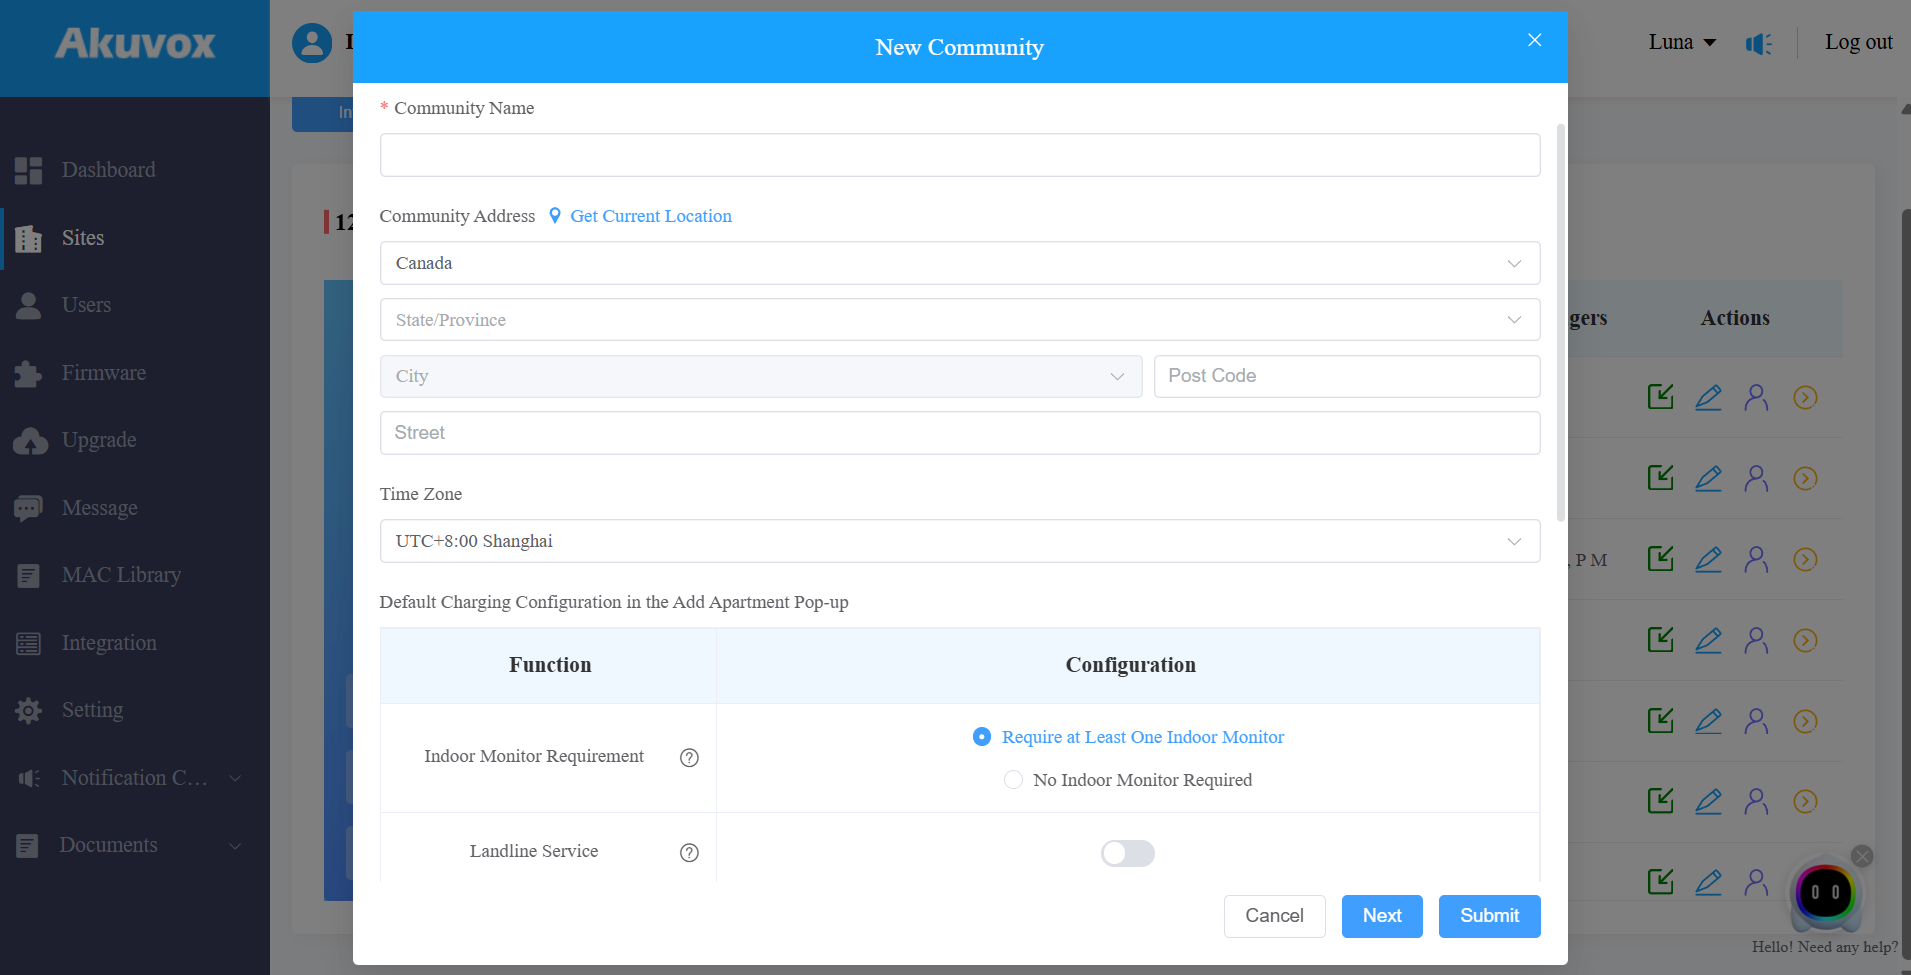
Community Setting Description:
Item Name | Description |
|---|---|
Community Name | Enter the community name. |
Community Address | Enter the community address (Street, City, Post Code, State/Province) based on which the indoor monitor can access local weather conditions. The temperature and weather conditions will be displayed on the device's home screen. Click here to see the models that support displaying weather conditions and detailed configuration. |
Time Zone | Select the time zone of the community. |
Default Charging Configuration in the Add Apartment Pop-up | Indoor Monitor Requirement:
Landline Service: Enables communication between telephones/mobile phones and intercom devices. It is off by default. |
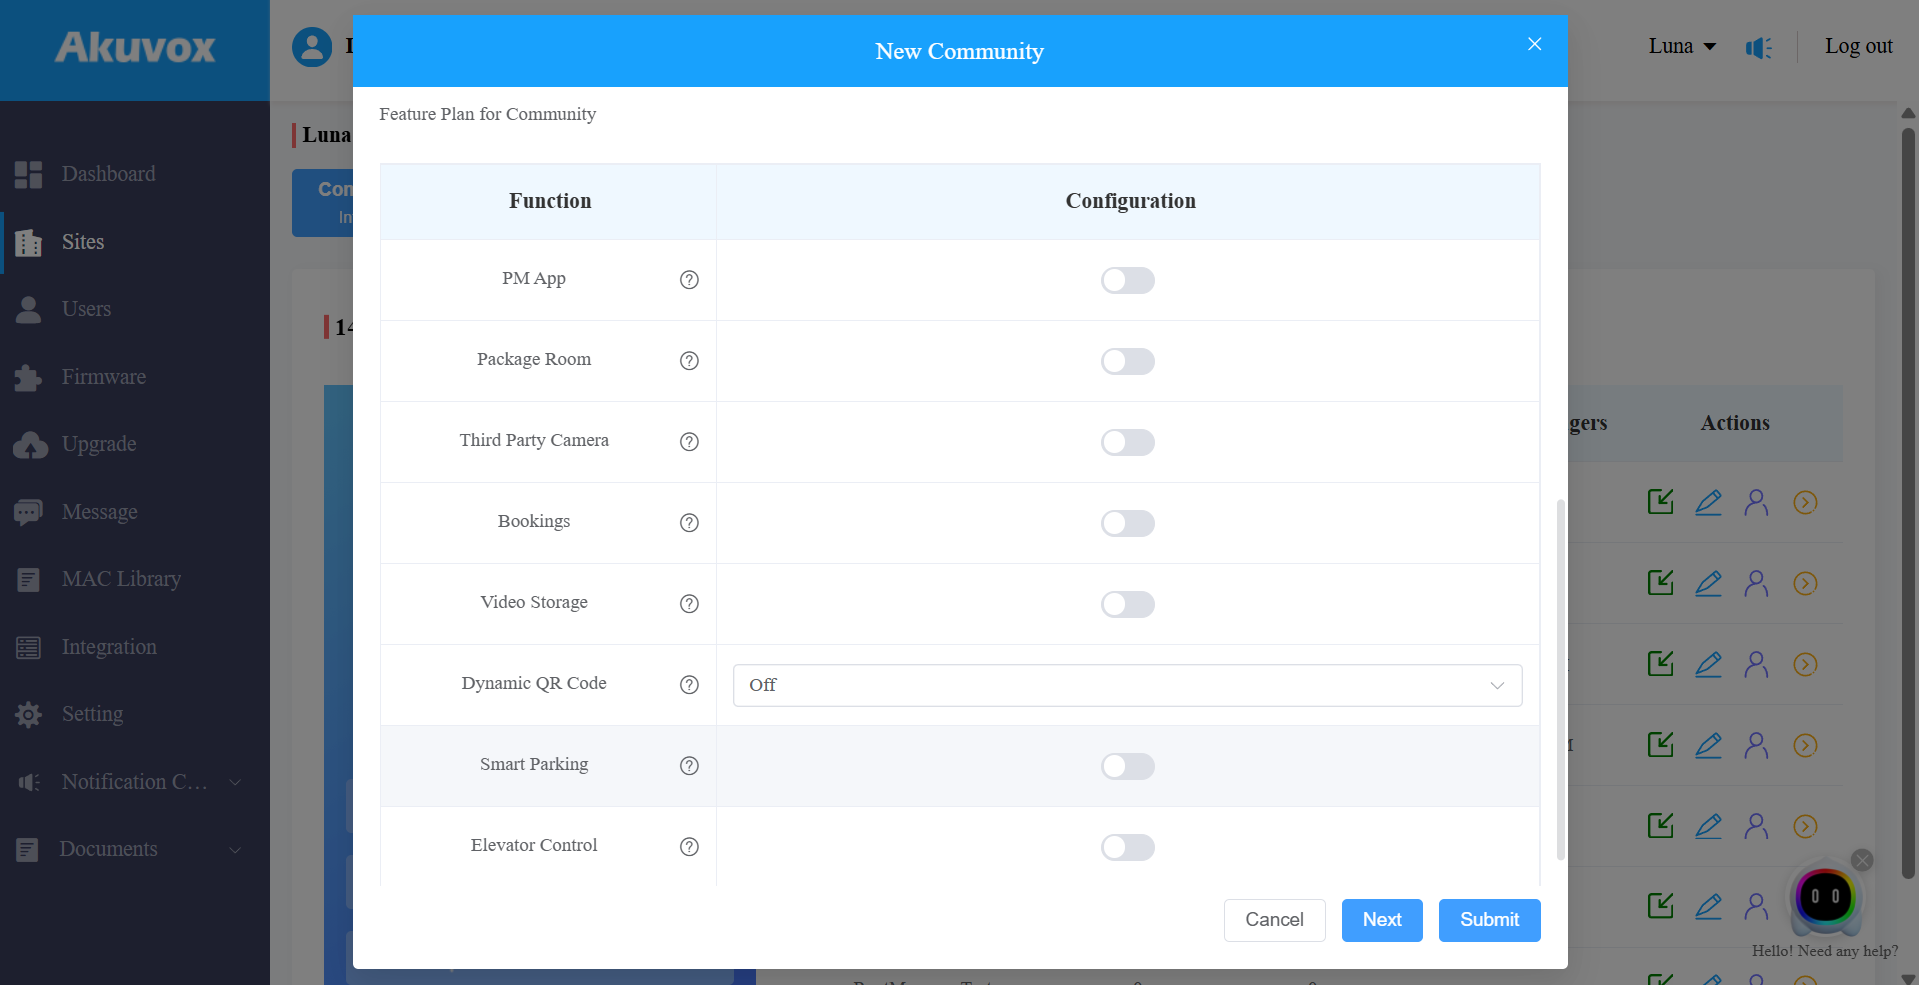
Feature Plan for Community | Enable services as needed to enhance user experience and community management capabilities. Click here to view the description of each service. |
3. Click Submit to finish creating the project or click Next to further set up the project. See the item descriptions in the chart below.

Item Name | Description |
|---|---|
Time Format | Select the preferred time format. |
Date Format | Select the preferred date format. |
Community Calls | Enable it if you allow residents in a community to call each other between SmartPlus apps and between indoor monitors and SmartPlus apps. Note: This feature will only be displayed when your distributor enables this function for you. |
Permission of Access Control Management |
|
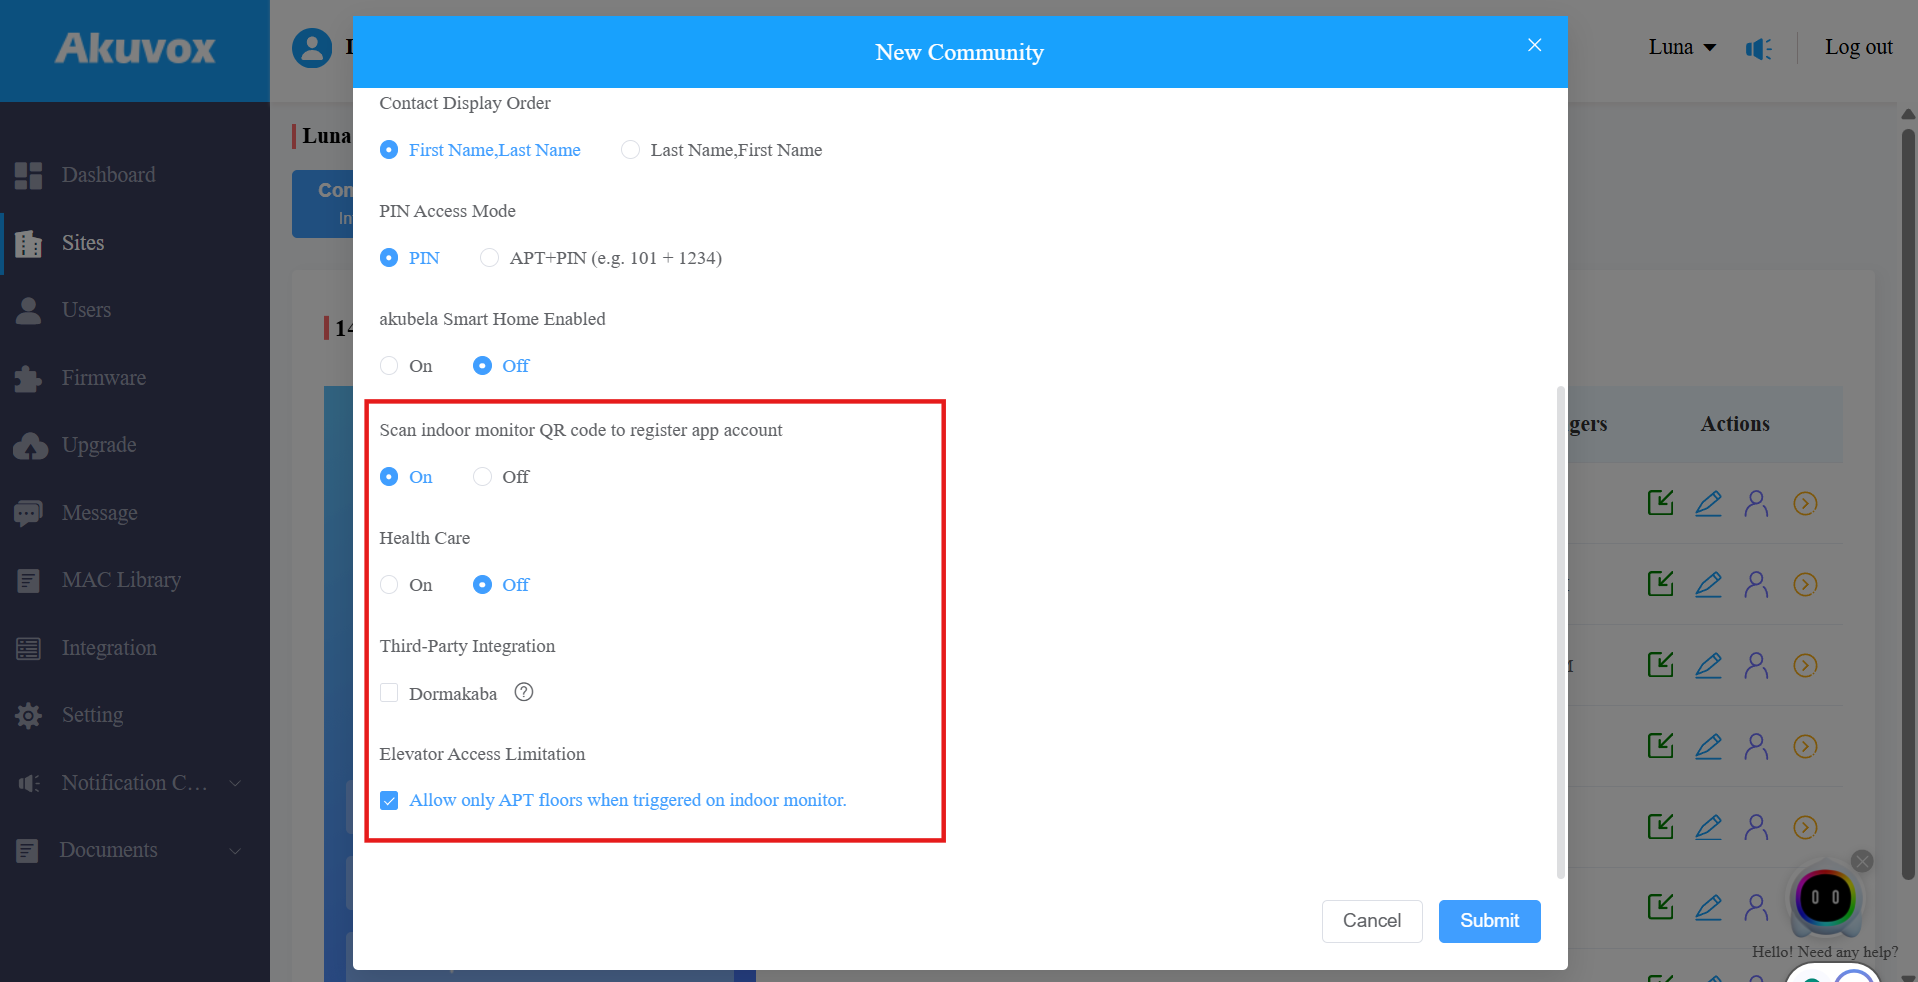
Contact Display Mode | Select First Name, Last Name, or Last Name, First Name that determines the display order of user names on the device contact list. |
PIN Access Mode | Select PIN Mode ( PIN for direct PIN code access, APT+PIN for apartment No.+ PIN code). |
akubela Smart Home Enabled |
|
Scan indoor monitor QR code to register app account | This function is used for the installer kit. It is enabled by default. |
Health Care | This option is designed for communities that provide elderly care or assisted living services. Once enabled, the Akuvox MR01 radar sensor can be added to the project for fall and bed-exit event detection, helping caregivers respond more quickly to emergencies. |
Third-Party Integration | Check the Dormakaba option to enable the integration. This is used to synchronize the community project to your Dormakaba account. |
Elevator Access Limitation | Enabled by default. In Elevator Control scenario, the indoor monitor can only trigger the resident's apartment floor (APT floor). When disabled, the indoor monitor can trigger all accessible floors for the resident. |
Edit/Delete Community
After a community is created, you can edit or delete it. To easily find the desired community, click the icon ![]() next to the Name to reorder them.
next to the Name to reorder them.
1. Click  of the desired community to edit the information.

2. Click Delete at the bottom to remove the community.
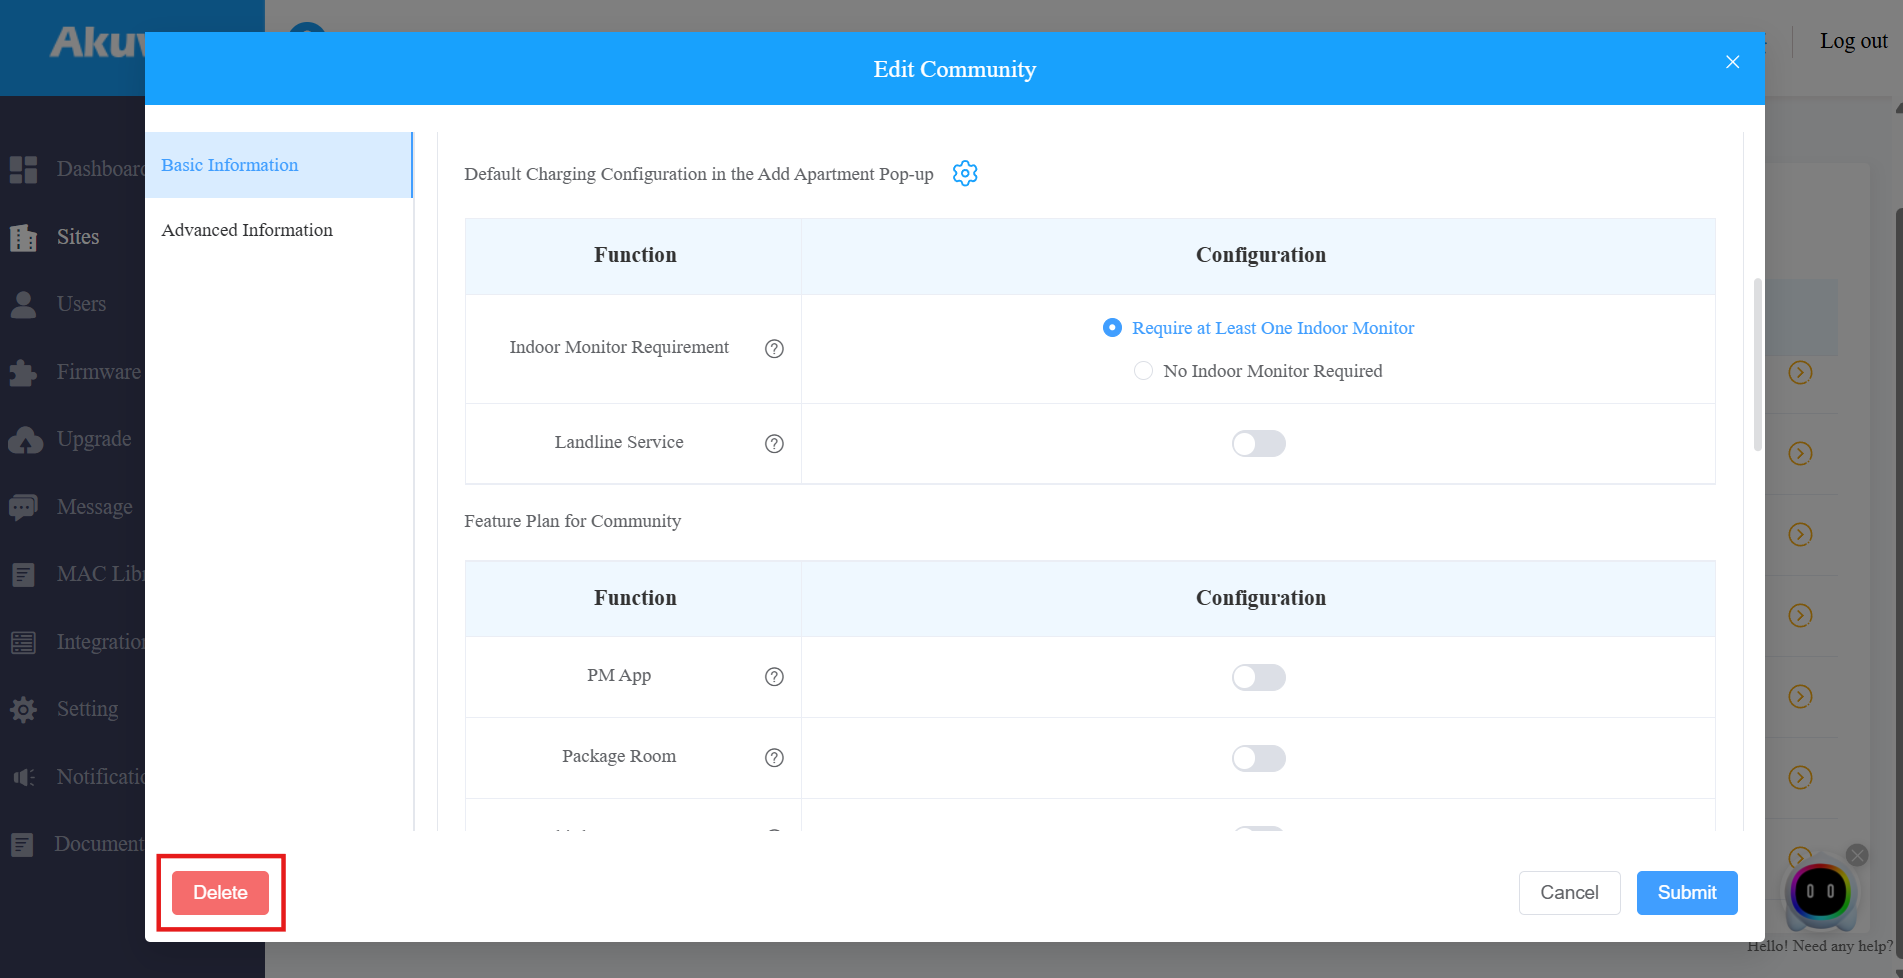
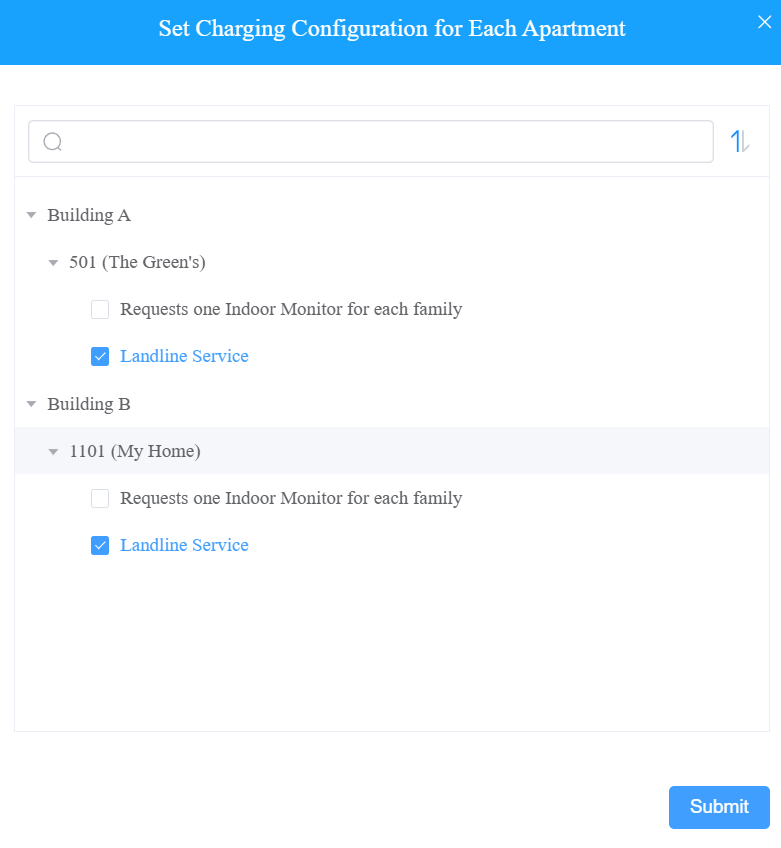
Additional Settings
When modifying the settings, you can click to enable/disable With Indoor Monitor and Landline Service options for specific apartments.
Note
The icon
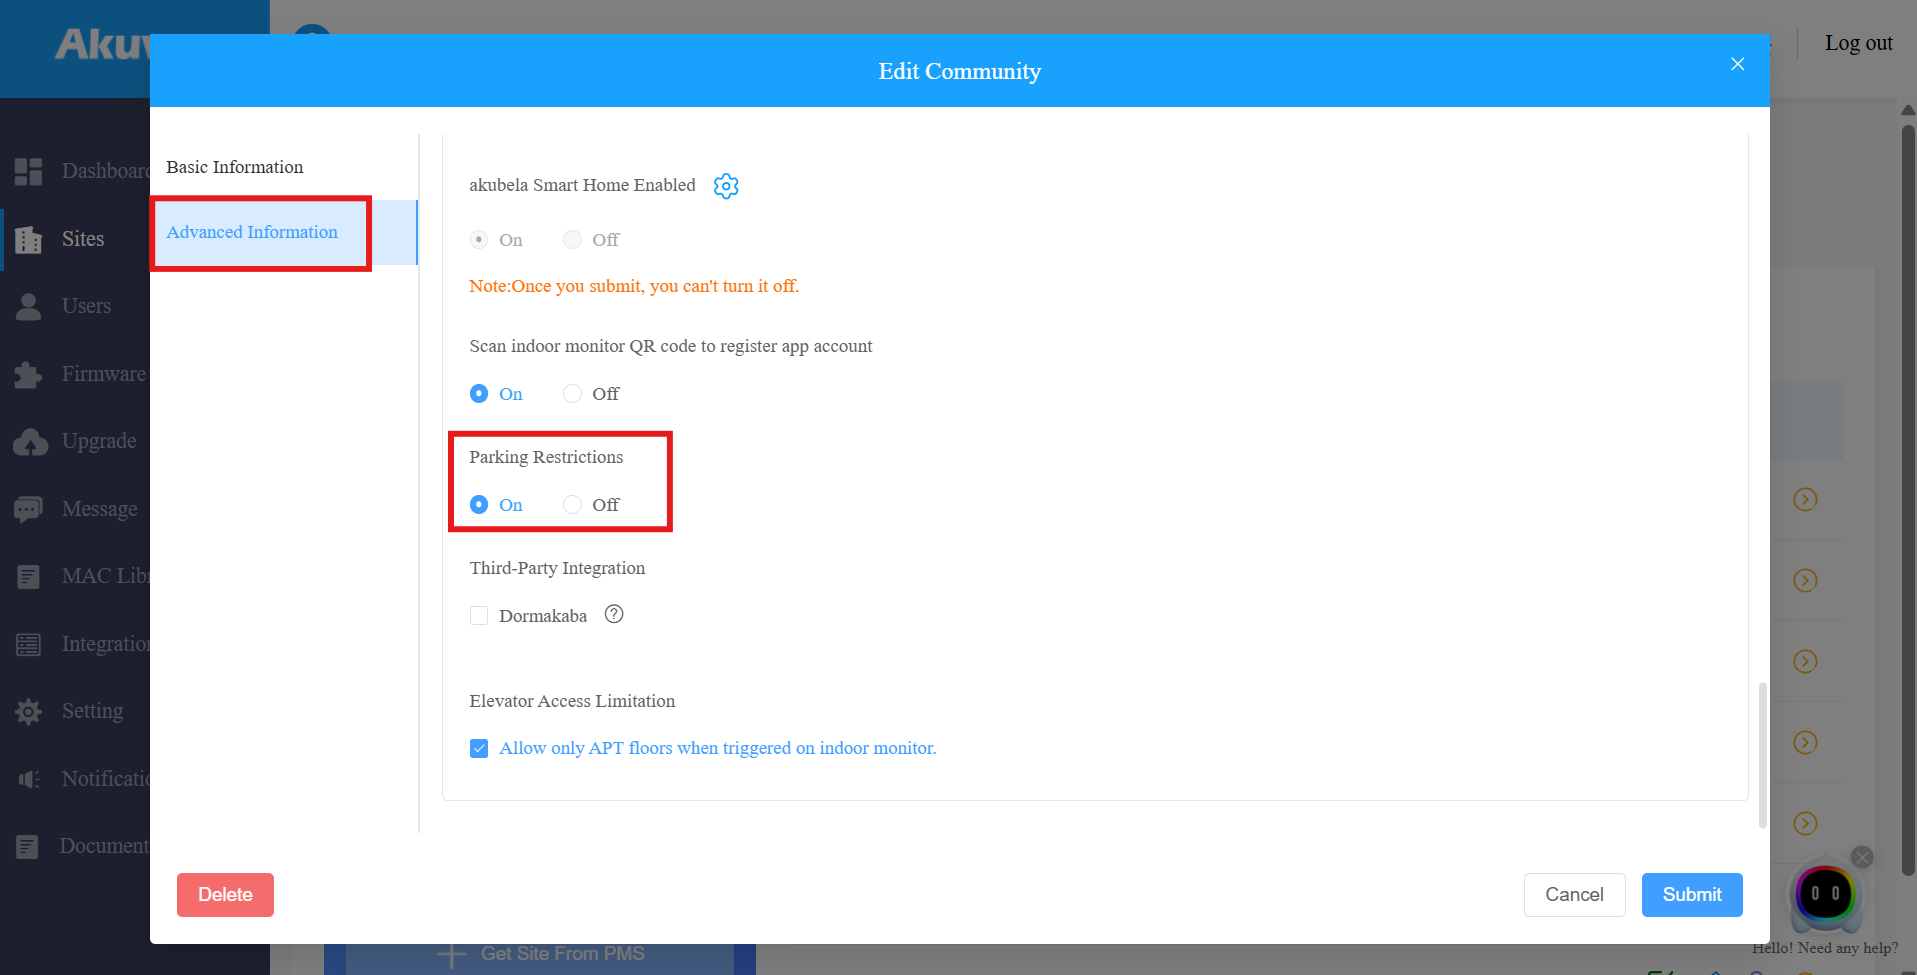
The Parking Restrictions feature is available when you edit the project. It is used to define the actual number of spaces rented or purchased.
With it enabled, you can specify the parking spaces for each apartment.
Click here to view the detailed configuration.
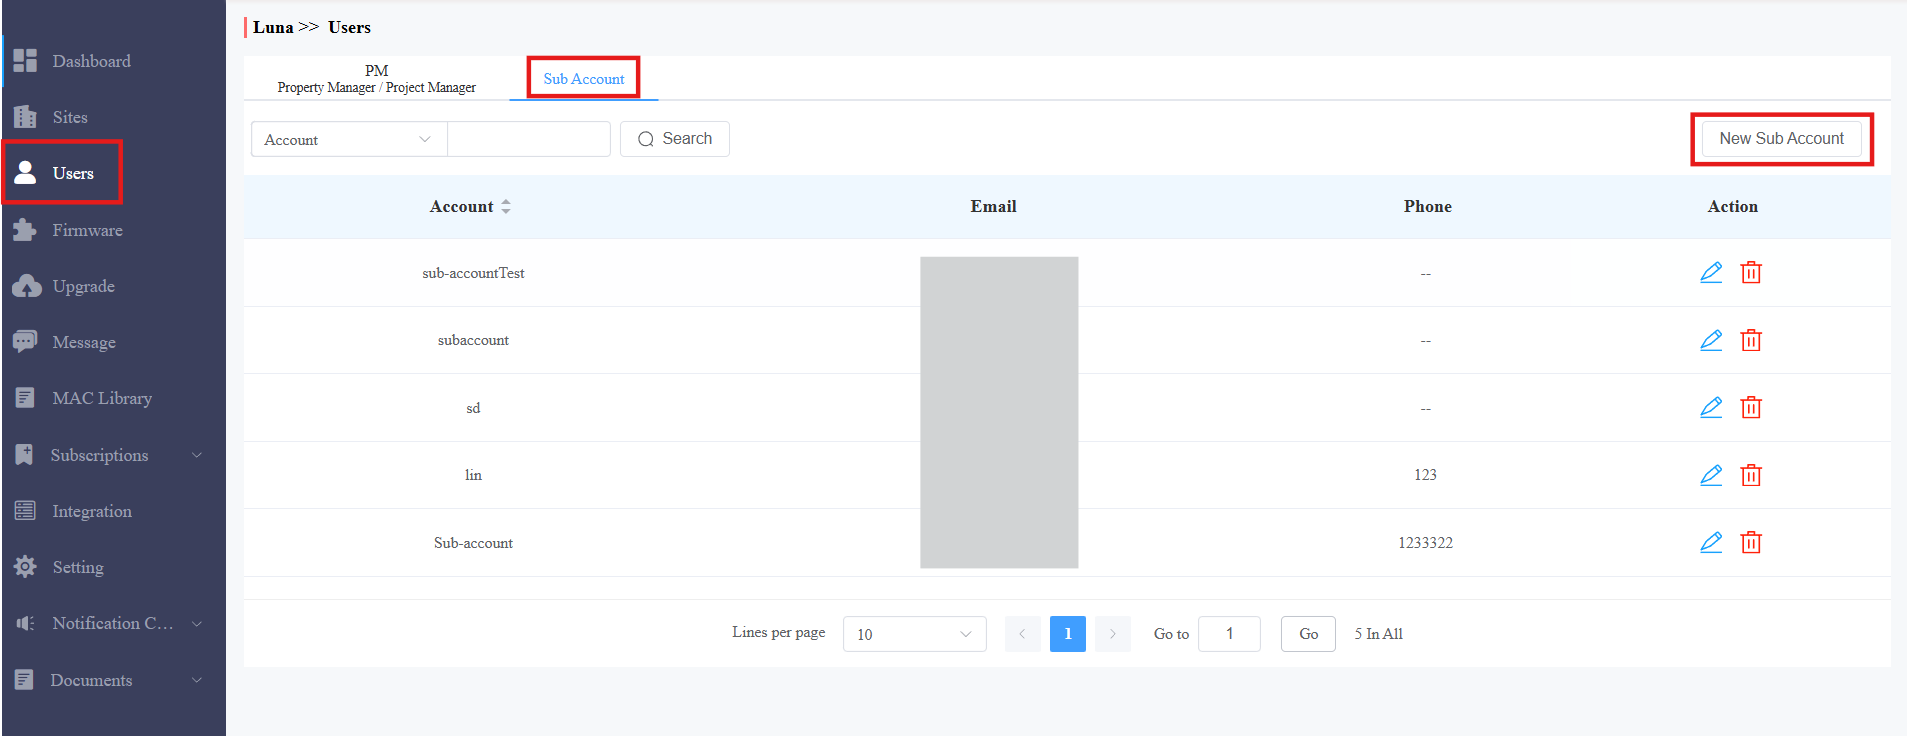
Sub-installer Account
When several people are responsible for one project, you can create and log in to different sub-installer accounts of the same main account at the same time. The data shown are the same.
Add Sub-installer Account
1. Click Users > Sub Account.
2. Click New Sub Account on the right.
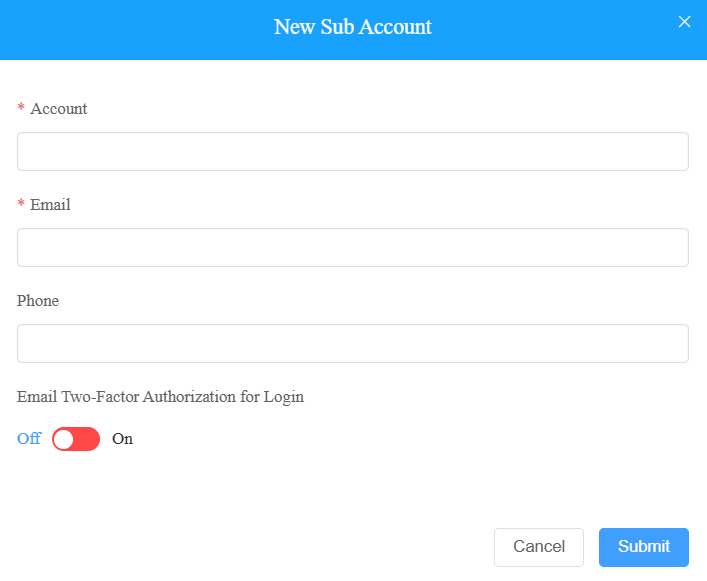
3. Enter the account's information. The SmartPlus portal login password will pop up after you create the account. You can copy and send it to the sub-installer. They can use the email address and password for login.
Email Two-Factor Authorization for Login: Disabled by default. If enabled, when the sub-ins log in to the SmartPlus Cloud platform, they need to fill in a verification code for login.
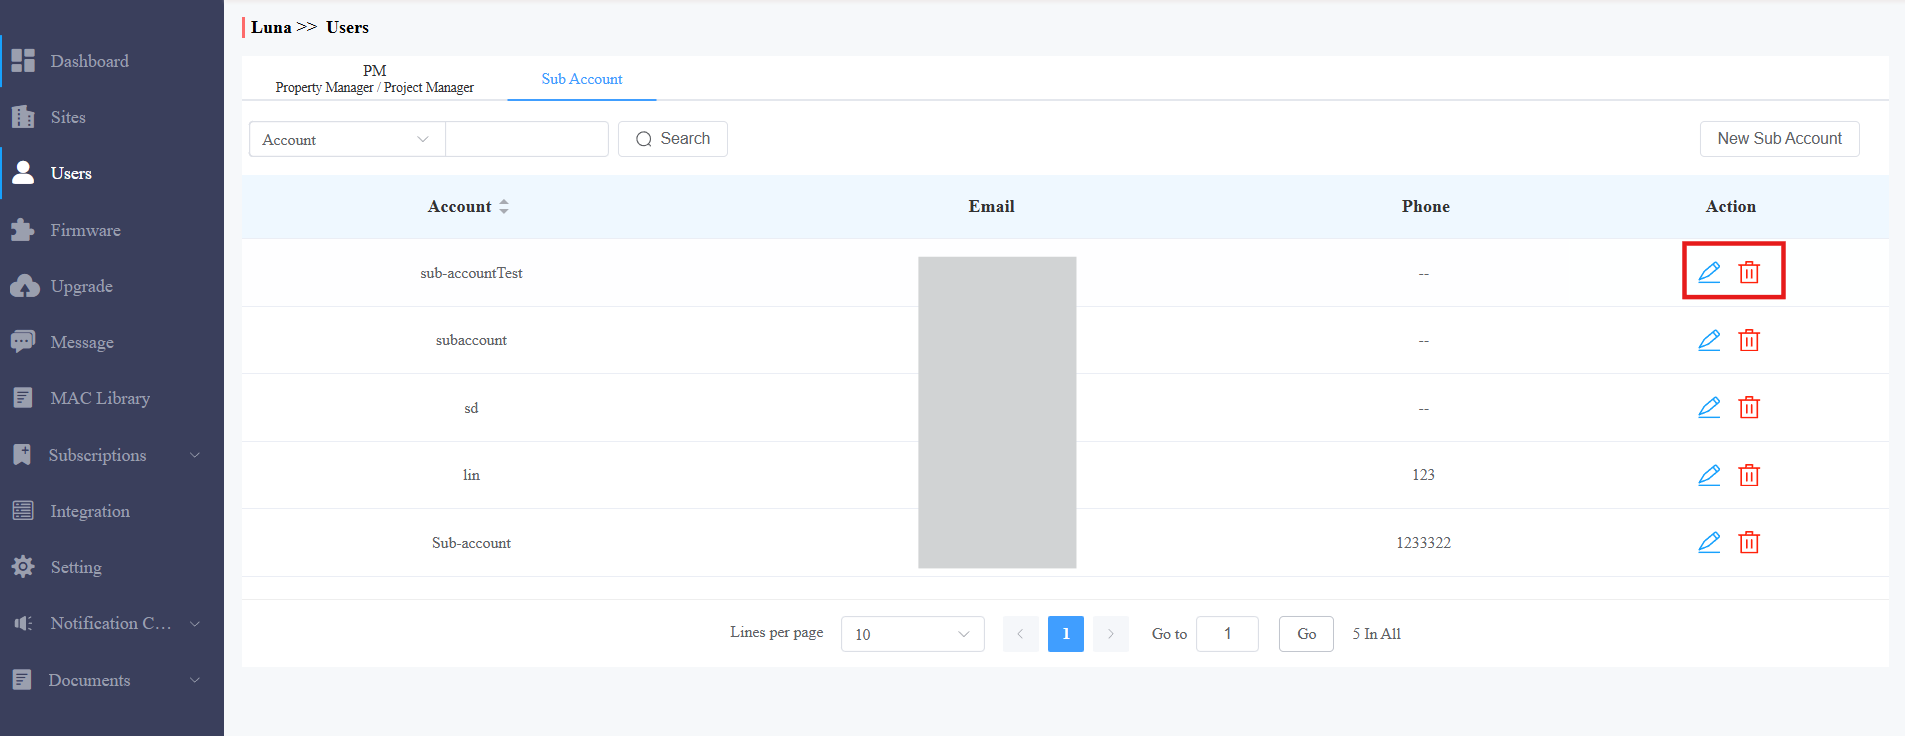
Edit/Delete Sub-Installer Account
1. Click ![]() to edit the sub-account information and reset the password.
to edit the sub-account information and reset the password.
2. Click ![]() to delete the account.
to delete the account.
User Management
You are required to go to the specific community for the management of the users by moving them into the specific building and apartment.
Create Buildings
After the community is created, you are required to add buildings to the community before adding residents.
Click
 of the target community on the Sites module.
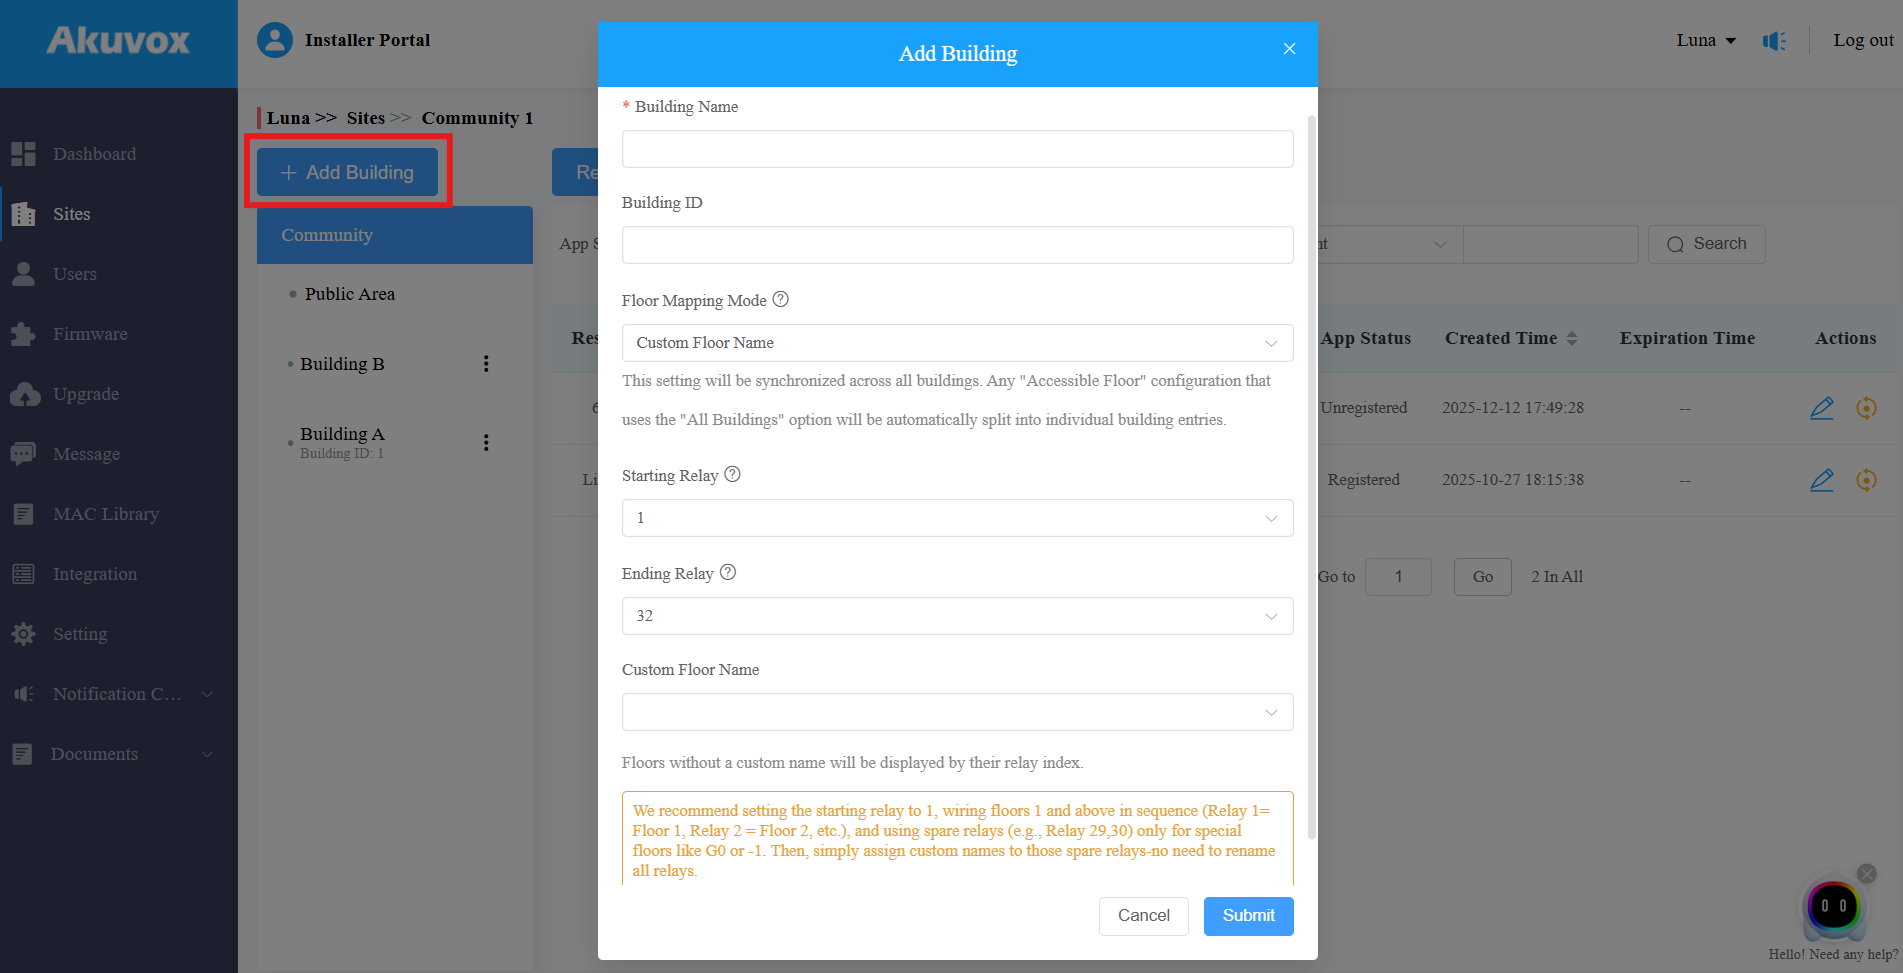
Click + Add Building to add a building.
Enter the Building Name.
Set the Building ID ranging from 1 to 99[Optional]. It is used to differentiate apartments with the same number across different buildings. Users can press Building ID#Apartment Number on the door phones to call the target apartment.
The remaining settings are for Akuvox EC33 Elevator Control. If this device is not deployed in your project, you can skip these settings and submit directly.
To learn more about Floor Mapping Mode configuration, click here.
Note
The following device models with specific firmware version or higher support using Building ID to call.
R20K V5: 320.30.11.45
R25K: 25.30.10.117
R28 V2: 228.30.10.233
R29: 29.30.10.609
S532: 532.30.10.265
S538: 538.30.10.705
S539: 539.30.10.509
X916: 916.30.10.405
X915 V2: 2915.30.10.631
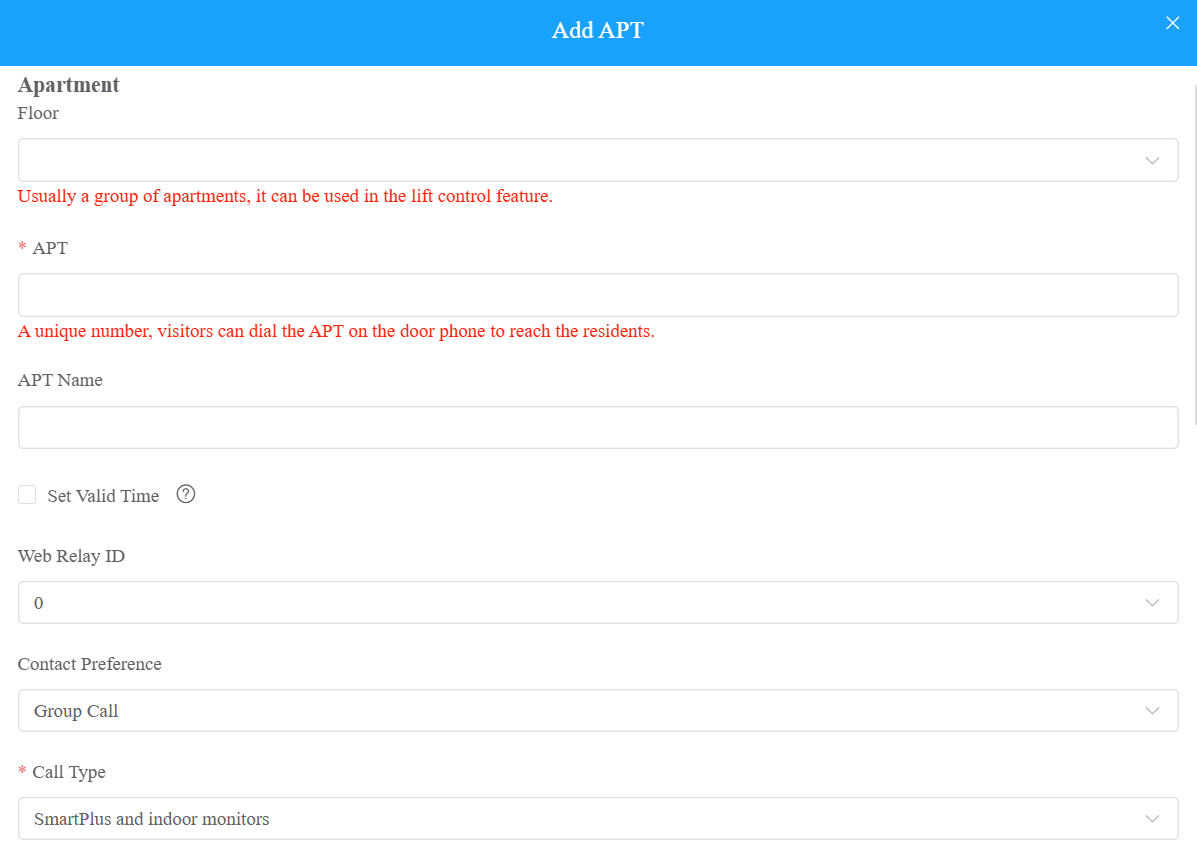
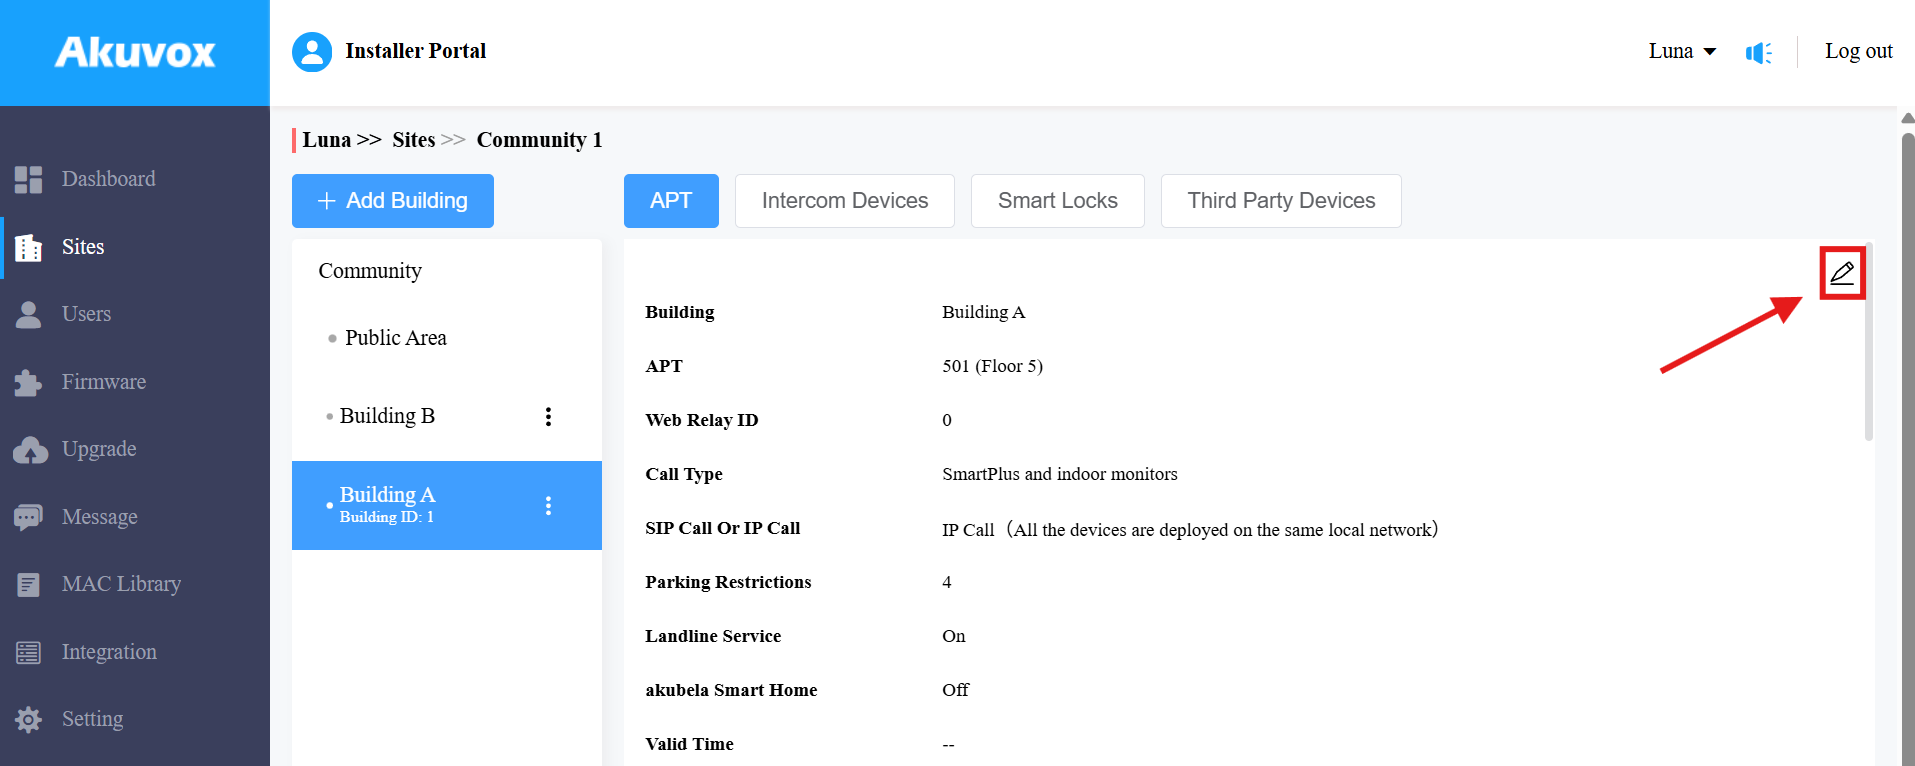
Add an Apartment
Select the desired building and click New to add an apartment.
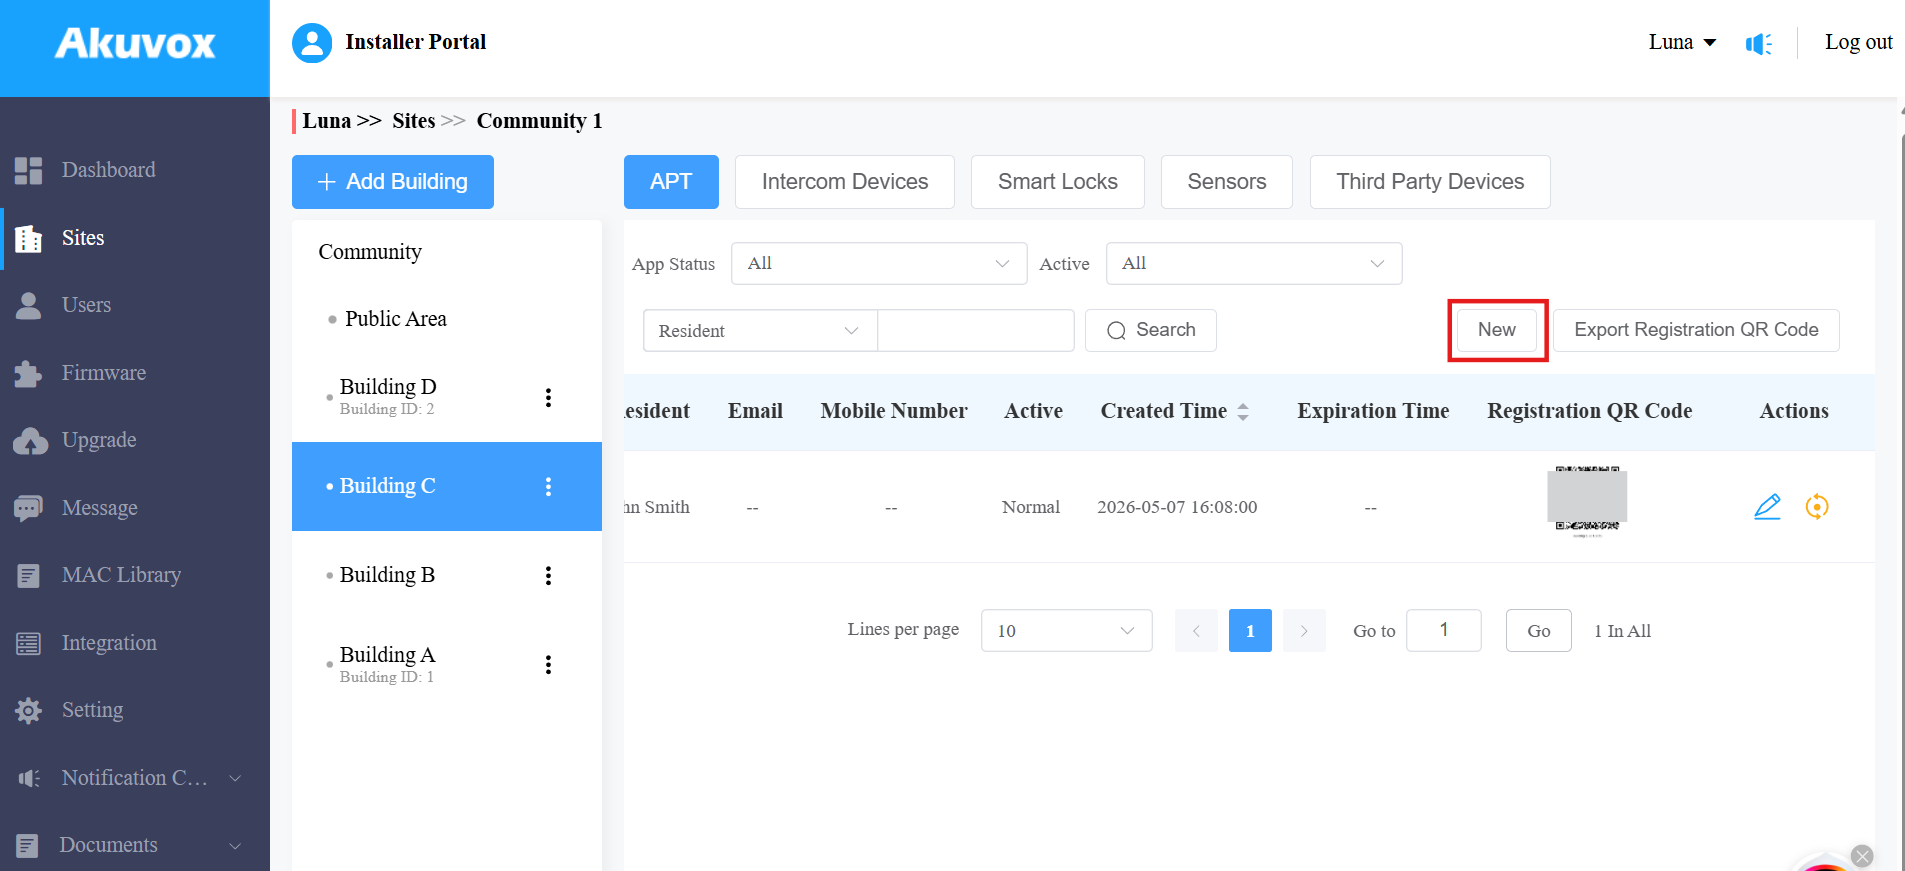
Fill in the apartment’s information and set up features. See the setting description in the chart below.
You can add a resident right after setting up the apartment, or add later.

Setting Description:
Field Name | Description | ||||||||||||||||||||||||||||||||||||
|---|---|---|---|---|---|---|---|---|---|---|---|---|---|---|---|---|---|---|---|---|---|---|---|---|---|---|---|---|---|---|---|---|---|---|---|---|---|
Floor | Fill in the apartment's floor number. With this filled in, the elevator will take the residents to the exact floor they live on. The number ranges from -10 to 128 and includes G0, G1, and G2, which represent ground floors. The floor setting works with the Akuvxo EC33 elevator controller. | ||||||||||||||||||||||||||||||||||||
APT | Fill in the resident’s apartment number. Support entering numbers, letters, and "#", e.g., 2#123A. Note:
| ||||||||||||||||||||||||||||||||||||
APT Name | Fill in the resident’s apartment name. | ||||||||||||||||||||||||||||||||||||
Set Valid Time | This option is designed for the rental scenario, disabled by default. With it enabled, specify the time for the tenant to use the SmartPlus App and open doors. Beyond the time, the SmartPlus App and all access methods will be restricted. | ||||||||||||||||||||||||||||||||||||
Auto-Delete Family Accounts on Expiry | This option is available when Set Valid Time is enabled. With it enabled, when the lease ends, the accounts in the apartment will be automatically deleted. | ||||||||||||||||||||||||||||||||||||
Web Relay ID | Enter the Web Relay Action ID number. You select the specific web relay action ID to carry out a specific action. Note: Web relay must be set up on the door phone’s web interface first. | ||||||||||||||||||||||||||||||||||||
Contact Preference | Select Group Call or Sequence Call.
Note: Click here to view the model and version that support sequence call feature. | ||||||||||||||||||||||||||||||||||||
Call Type | Select the desired call type. For example, the indoor monitors with SmartPlus as backup option means that when visitors call, the indoor monitors will first receive the call. Without it answered, SmartPlus App will receive the call. | ||||||||||||||||||||||||||||||||||||
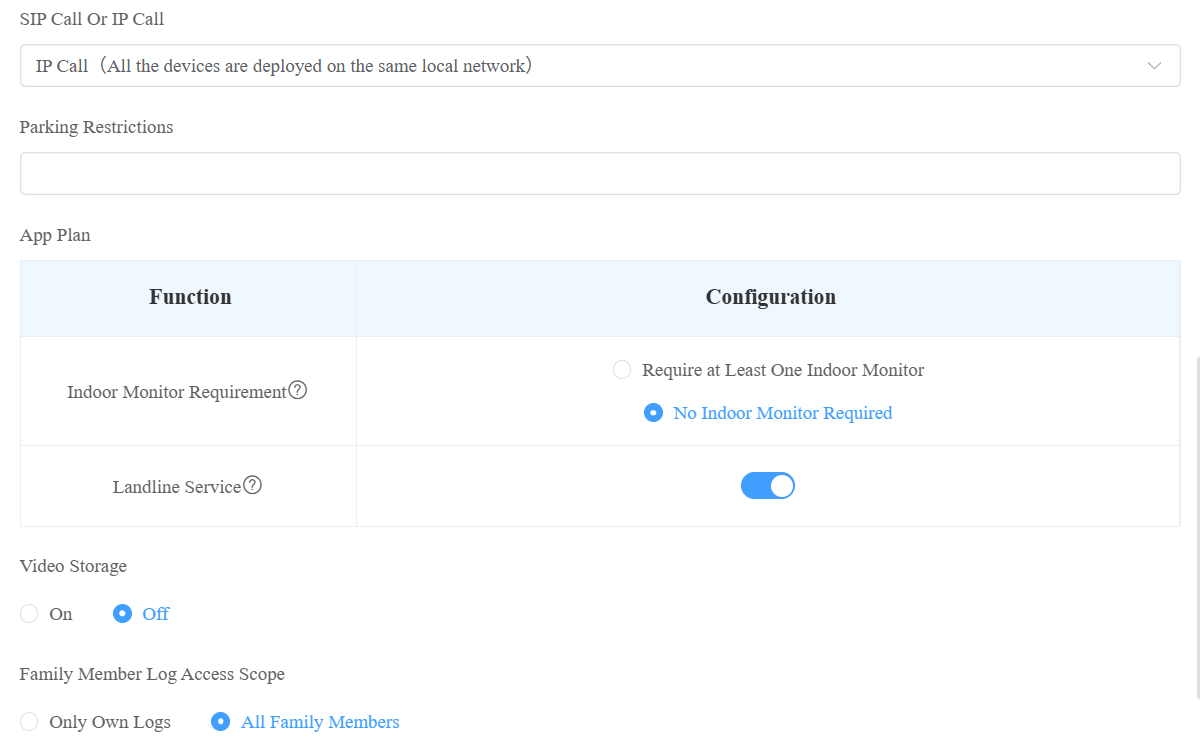
SIP Call or IP call | Select “All my devices were installed in the same place (villa or house)” for IP call if all of the user’s intercom devices are in the same LAN (Local Area Network). If not, select “Some of my devices were installed in the different place (villa or house)” for SIP call. | ||||||||||||||||||||||||||||||||||||
Parking Restricions | Available when the project has the Parking Restrictions feature enabled. Enter the number of parking spaces(0~9999) assigned to this APT. Vehicles will be denied entry once the allocated parking capacity is exceeded. | ||||||||||||||||||||||||||||||||||||
App Plan | This section is available when you have permission to set it up for specific apartments.
| ||||||||||||||||||||||||||||||||||||
Video Storage | When enabled, Akuvox devices can automatically record 10 seconds of video when opening doors, calling, and detecting motions and package movement(For X910). End users can also record videos with their SmartPlus Apps. Click here to view the detailed configuration of this feature. | ||||||||||||||||||||||||||||||||||||
Family Member Log Access Scope | Set family members’ permission to view logs.
| ||||||||||||||||||||||||||||||||||||
akubela Smart Home |
|
Add a Resident
You can add a resident right after creating an apartment.
If you skip the step, click
 of the target apartment.
Click
 on the right.
Click Add Resident. See the setting description in the chart below.
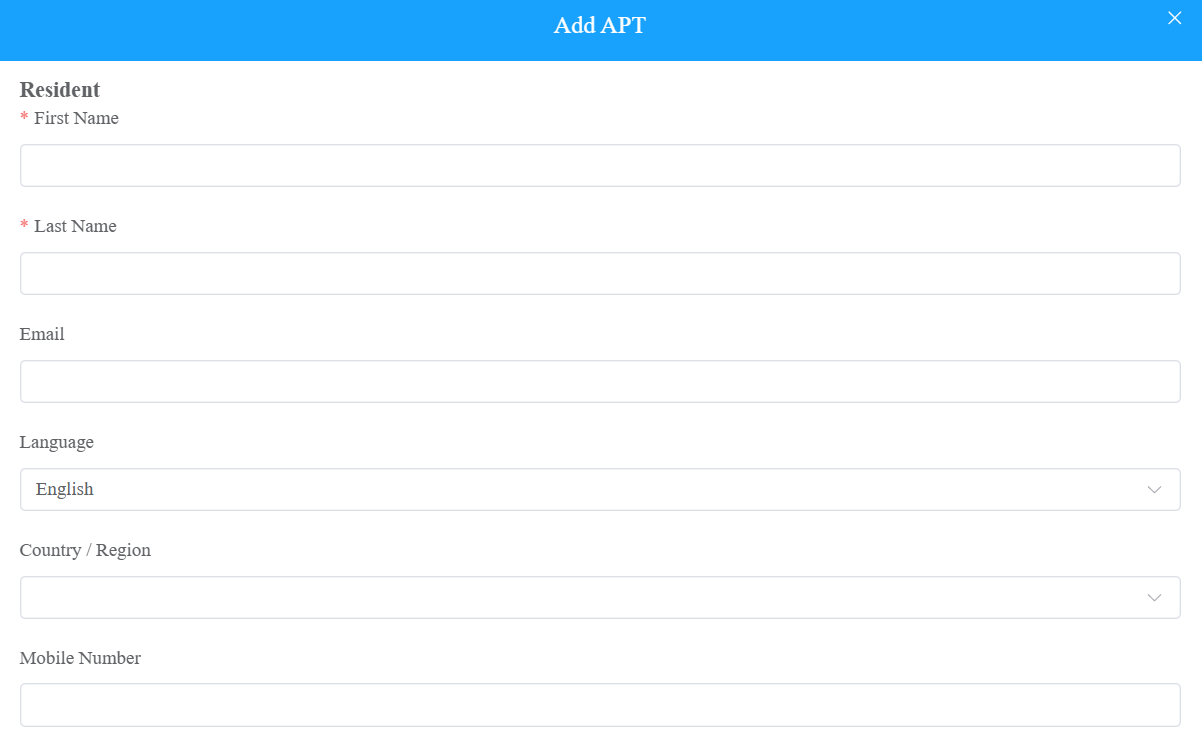
Setting Description:
Field Name | Description |
First Name | Fill in the resident’s first name. |
Last Name | Fill in the resident’s last name. |
Fill in the resident’s email. | |
Language | Select the desired language. All information sent to the user will be displayed in the language. The following languages are supported:
|
Country/Region | Select the user's country or region code. |
Mobile Number | Enter the resident’s mobile phone number. The country/region code will be displayed before the mobile number. |
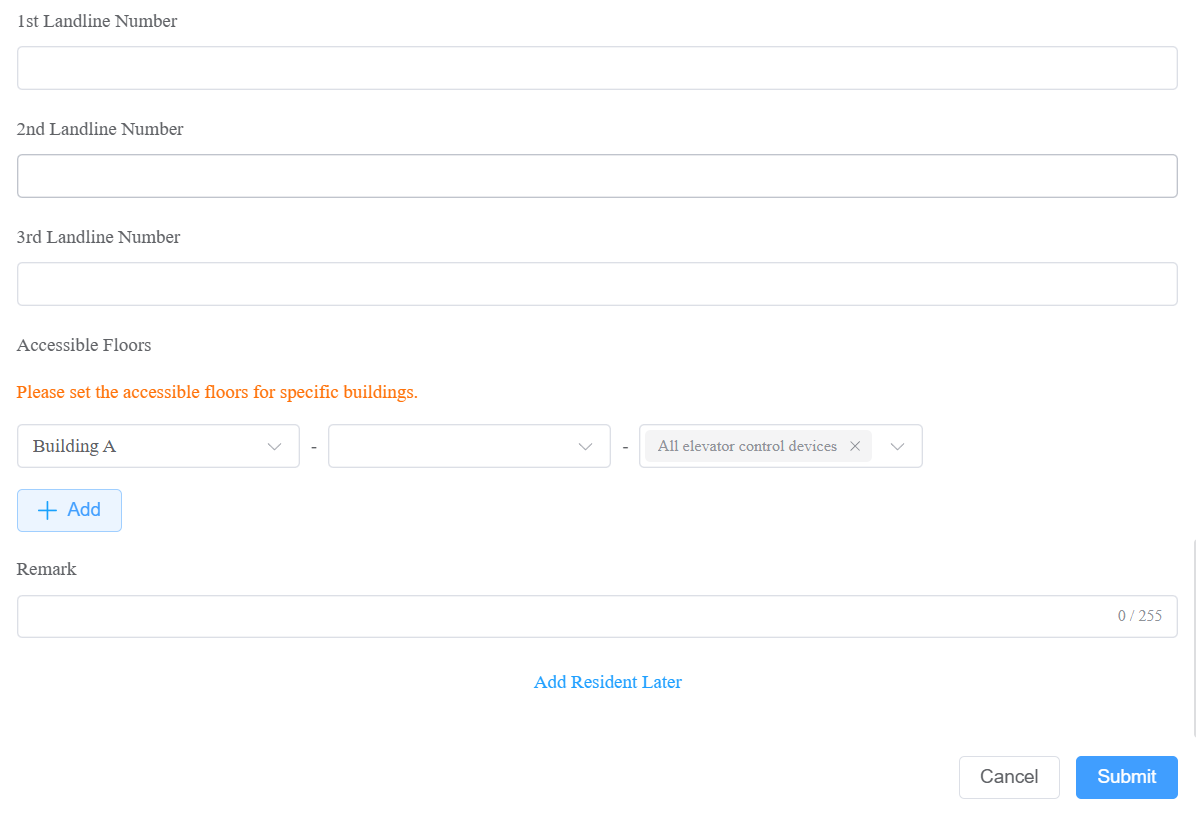
Landline 1/2/3 | Fill in the user’s landline numbers, e.g., mobile phone numbers or telephone numbers. Three landline numbers are supported. The area code will be displayed before the mobile number. |
Accessible Floors |
|
Remark | You can add remarks for users to indicate their identity, such as "tenant" or "resident." |
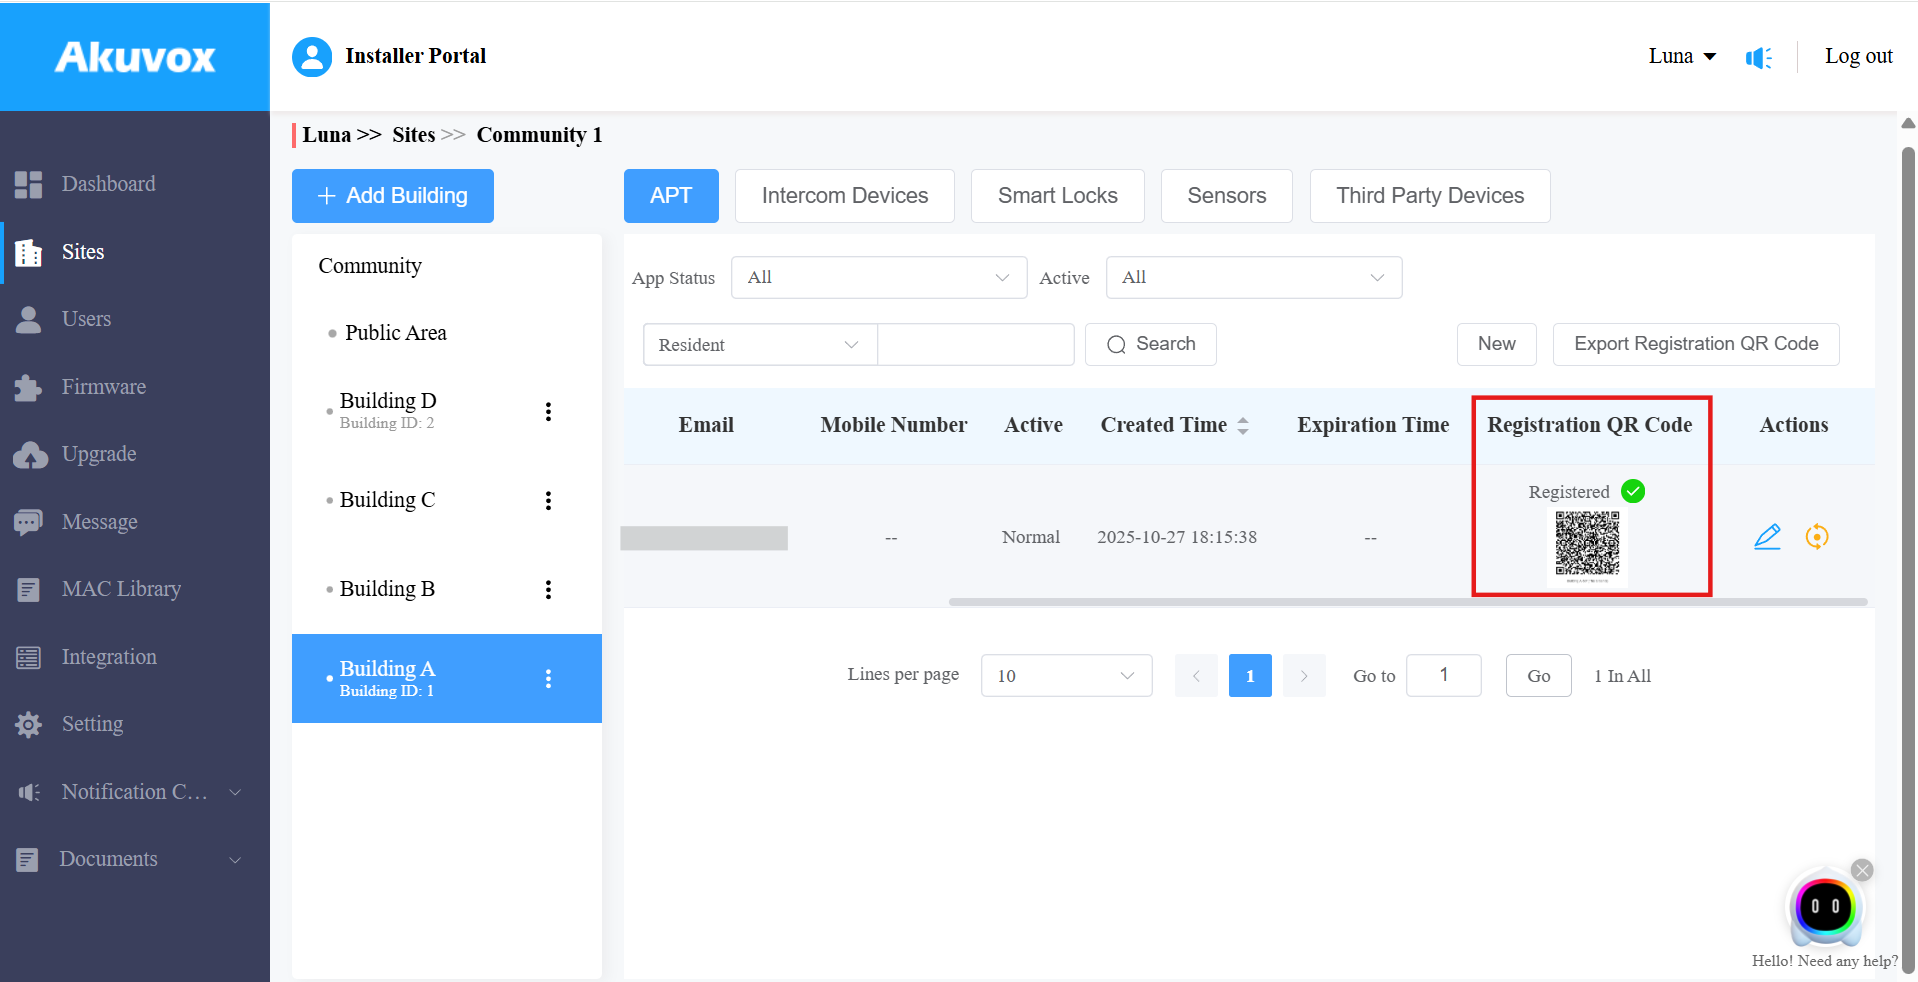
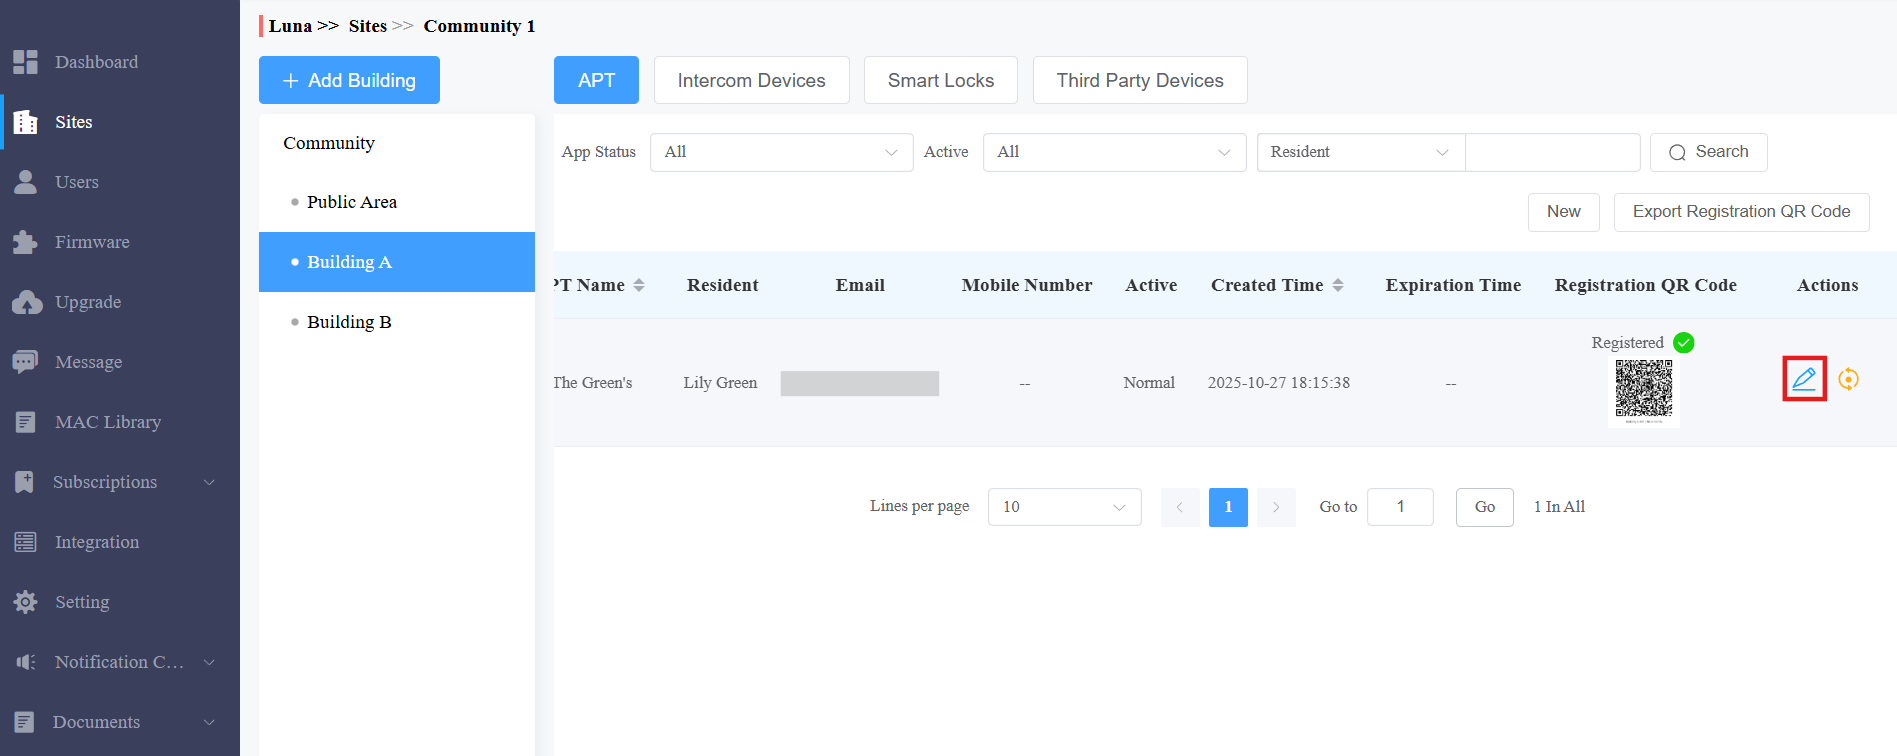
Edit, Reset, and Delete Community Residents
Edit and Delete Apartment and Resident
You can edit and delete apartments and residents.
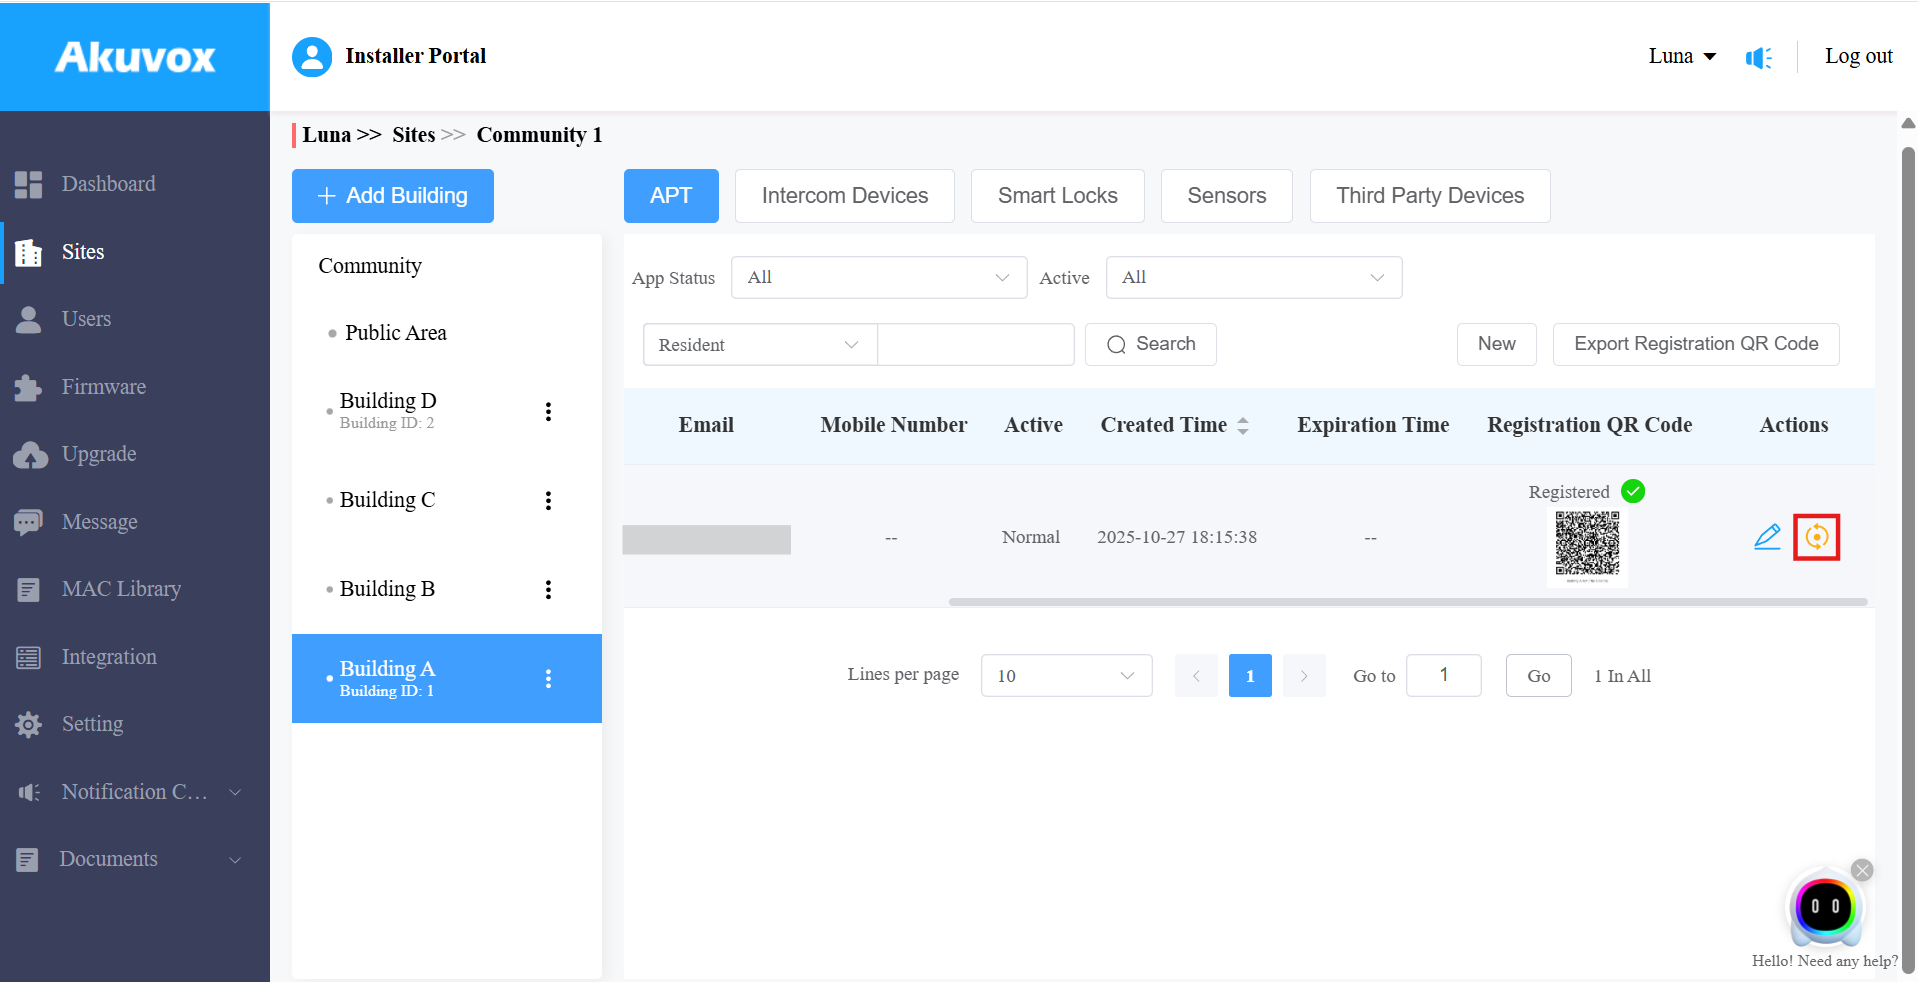
Navigate to the desired community by clicking
.Select the building and apartment of the resident. You can click Resident, Created Time, or the icon
 next to them to reorder the residents.
Check the Registration QR Code. When the account is registered, Registered will display above the QR code. Click here to view the feature details.
Do any of the following on the next page:
Click
.png) and
and .png) to edit the apartment and the resident's information.
to edit the apartment and the resident's information.
On the editing interface, click Delete APT on the bottom to delete the apartment.
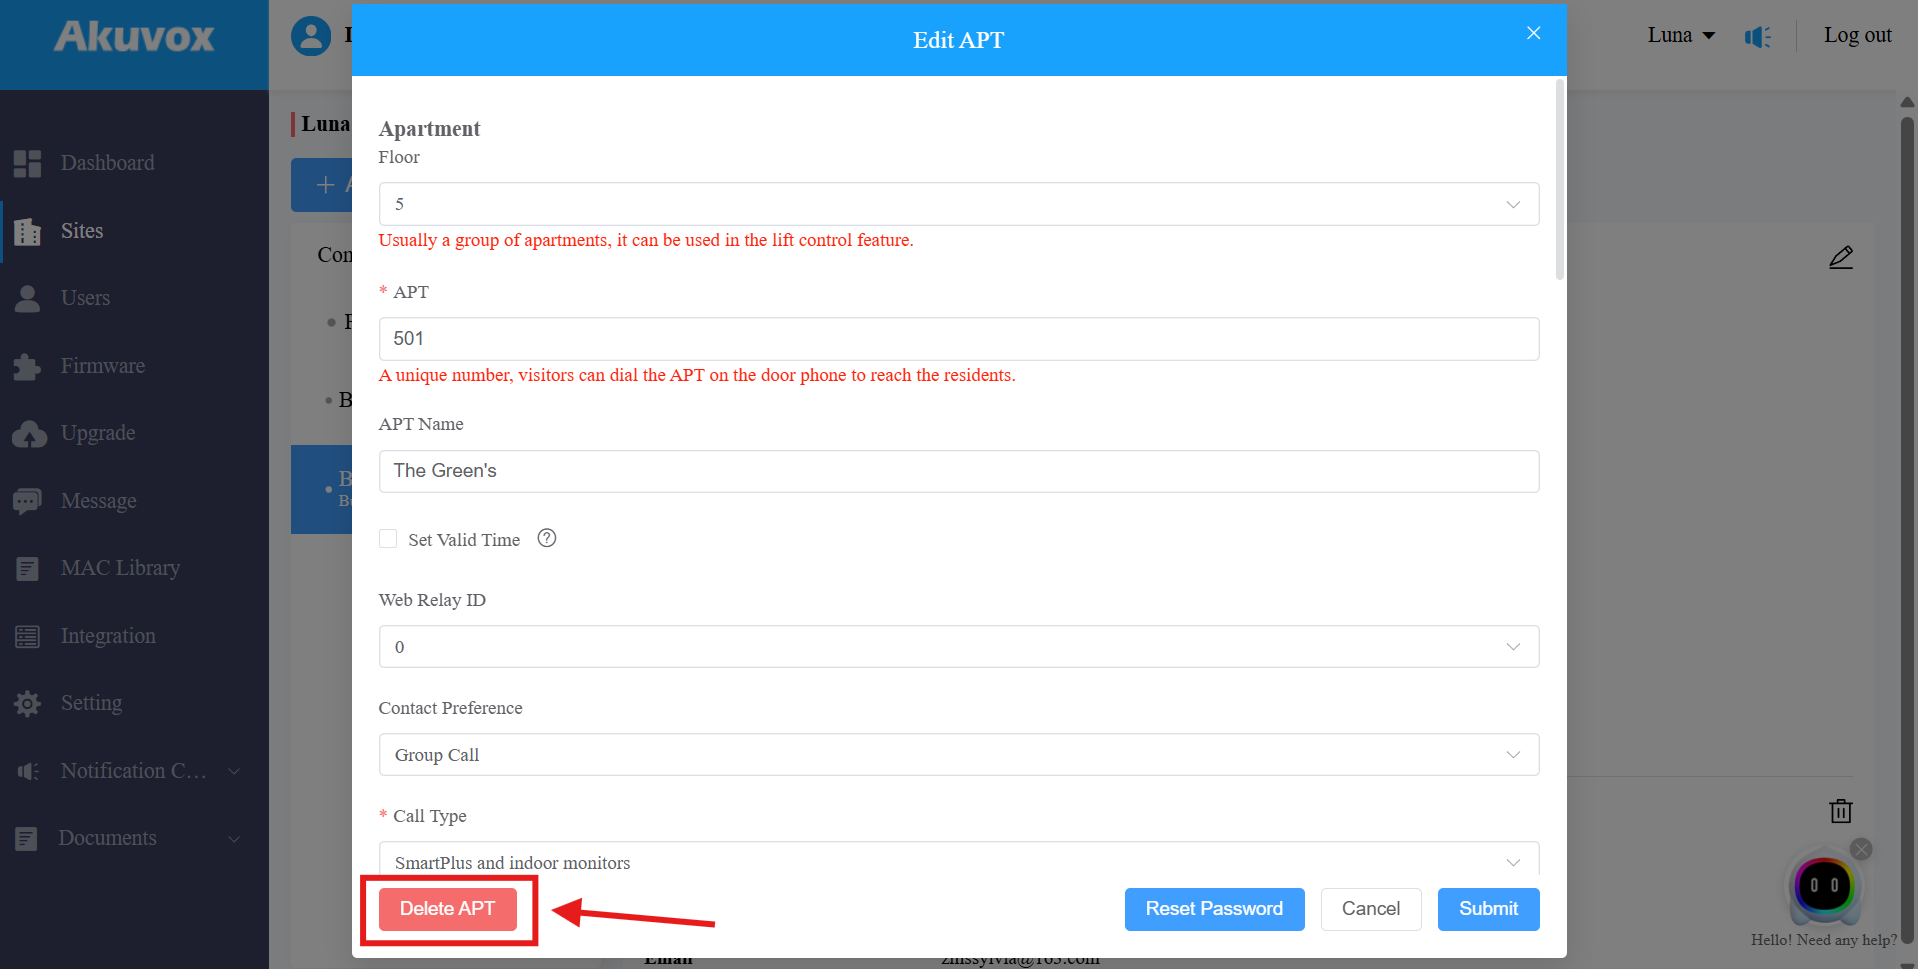
Note
You cannot edit the mobile phone number, email address, and area code of the user accounts that have linked sites.
Reset Apartment and Resident Account
The resetting feature is suitable for rental scenarios. You can empty the accounts after the tenants move out and create accounts for the new ones.
Navigate to the desired community by clicking
, and click .png) of the desired apartment.
of the desired apartment.Click OK to confirm the reset.
Once you agree to reset, some information or data in this apartment will be removed, while some will not:
Data to be removed includes:
Family member accounts.
Emails, mobile numbers, country/region, and landlines.
Logs (audit logs excluded) and histories.
Messages and alarms, and
Accessing settings, including PIN, face data, NFC, Bluetooth, and QR Codes.
Data to be kept include:
Subscription information of the family master account, such as inactivation and expiration.
The number of free sub-accounts.
Audit logs.
Settings include SIP Call Or IP Call, time zone, language, home automation, premium plan, and the With Indoor Monitor feature.
Other changes include:
The user’s app changes to unregistered and needs to be reinitialized.
The user’s login credentials are reset, and the user is not going to receive the reset email.
Note
It is free to create a new account in the family after resetting, while it charges after deleting.
Add/Edit/Delete Family Member Accounts
After you add the residents, you can start adding family member accounts for the SmartPlus app. Family member accounts can be edited and deleted afterward.
Click
of the desired community.Select your building and apartment, then click
 .
.

Find the Family Member section. You can check the maximum number of family member accounts, which varies by project. Using more accounts requires activation fees.
Click New to create the family account.

After creating the account, clickto edit it, and click ![]() to delete it.
to delete it.
Search/Edit/Delete Resident at Community Level
You can manage all residents in the community without navigating to specific buildings or apartments.
1. Click ![]() of the desired community.
of the desired community.
2. Click Community.
3. Search for the resident by their app status, the resident's name, email address, and APT name.
4. Edit or reset the resident's account.

Import Residents and Devices Using a Template
The template can improve your efficiency in the management of the residents and devices.
Download the template on the Sites module.
Fill in the information in the template.
Import the template into the desired community.
Template Sample
Move your mouse cursor to specific columns to view instructions for filling in values.


Template Description:
Settings | Description |
Building | Fill in the building number or name. Note: Should not be more than 128 characters in length. |
Floors | Fill in the apartment's floor number. Note: When the Floor Mapping Mode in this building is Custom Floor Name, the floor field matches the customized floor name instead of the relay ID. |
Apt | Fill in the apartment number. Support entering 1-6 digit integral number(s), letters, and "#", e.g., 2#123A. Note:
|
Apt Name | Fill in the apartment name. |
Landline Service |
|
With Indoor Monitor |
|
Device |
Multi-tenant door phone=0 Single-tenant door phone=1 Indoor Monitor=2 Guard Phone=3 Access Control=50 Elevator Control=51 Sensor=52
“Device name, Device type, Device MAC”. E.g. Gate2,0,0C11050B9814; Living Room,2,0C11050893C6 Note: Every two devices need to be separated by “;”. Note: Device MAC must be added first in the MAC library of the community to which you want to import the data. |
First Name | Fill in the resident’s first name. Note: Should not be more than 64 bytes in length. |
Last Name | Fill in the resident’s last name. Note: Should not be more than 64 bytes in length. |
Fill in the resident’s Email. | |
Mobile Number | Fill in the resident’s mobile phone number. |
Telephone Calling Code | Fill in the resident’s country code. |
Phone1/2/3 | Fill in the resident’s mobile phone number. |
Call Type | Call Type Code:
For example, “Indoor monitors with SmartPlus as backup, finally phone=5” means the call will be received in sequential order, first by indoor monitor, then by SmartPlus app, and last by the mobile phone. |
Web Relay ID | Enter the We Relay Action ID number. You select the specific web relay action ID to carry out a specific action. Note: Web relay must be set up on the door phone’s web interface. |
akubela Smart Home |
|
Analog Handset | Enter the analog handset's name and number. Separate multiple handsets with ";". The Akuvox analog handset is used with the door phone S532. |
Video Storage | Set up the video storage feature by entering the device number and device name and setting whether Video Recording with Audio During Calls. Multiple devices separated by “;”. For example, 2 Devices, door1;door2, On. |
Device Management
You can manage the devices deployed in communities. For community devices, you are required to go to the specific community and the specific building to manage the device.
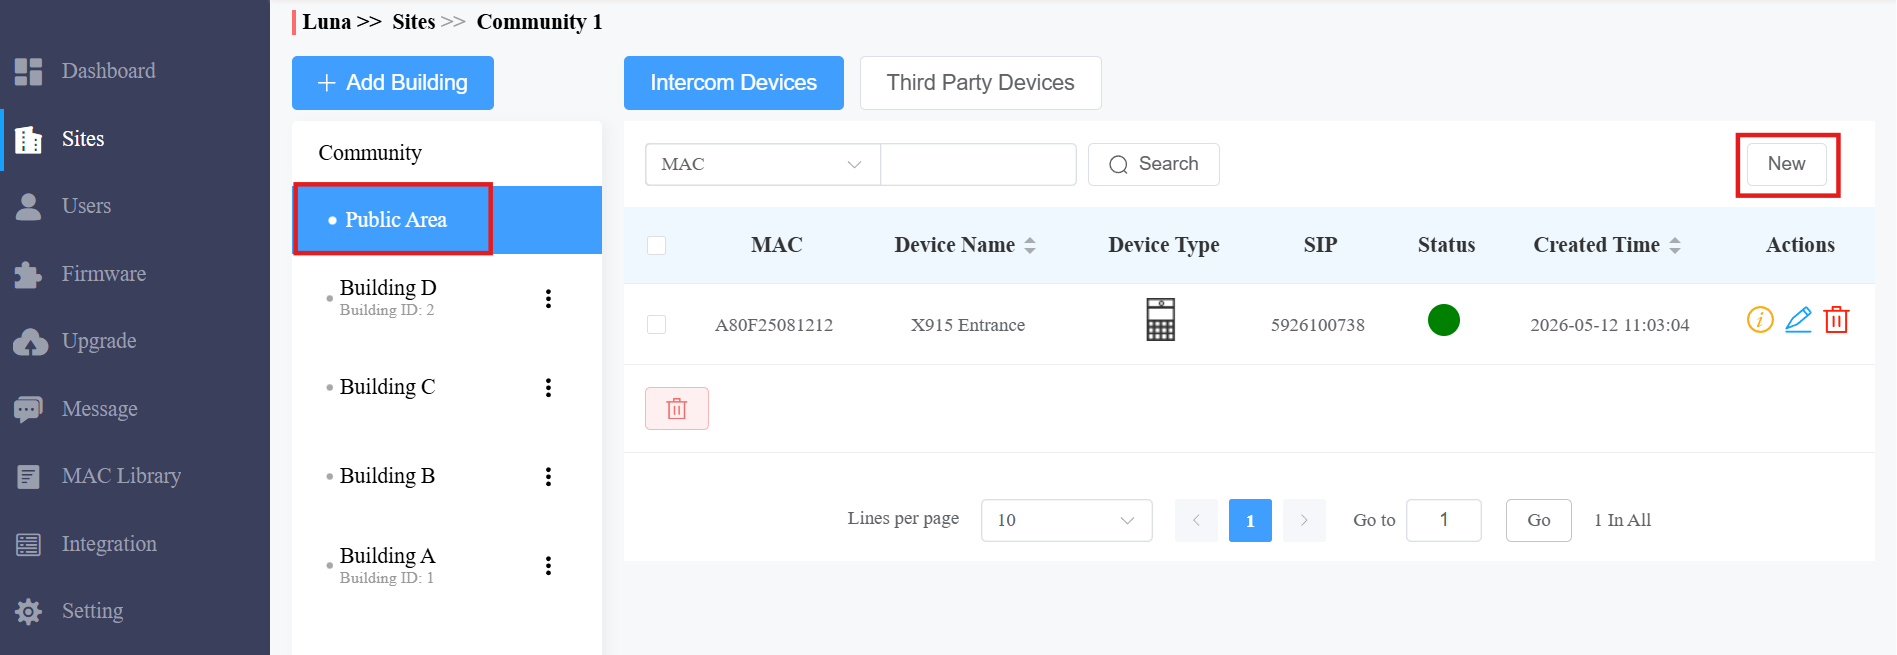
Add Intercom Devices to Public Areas
You can add intercom devices to the public areas of the community. After adding the devices, property managers and end users can monitor the camera surroundings.
Note
Adding A095 requires its version to be 95.30.10.125 or higher.
1. Click![]() of the target community.
of the target community.
2. Click Public Area or the desired buildings. For example, if you select Building A, it means the device is installed in the public area of Building A.
3. You can click +Add Building to create new buildings and right-click to change the building name or delete it.
4. Click Intercom Devices and click New on the right.
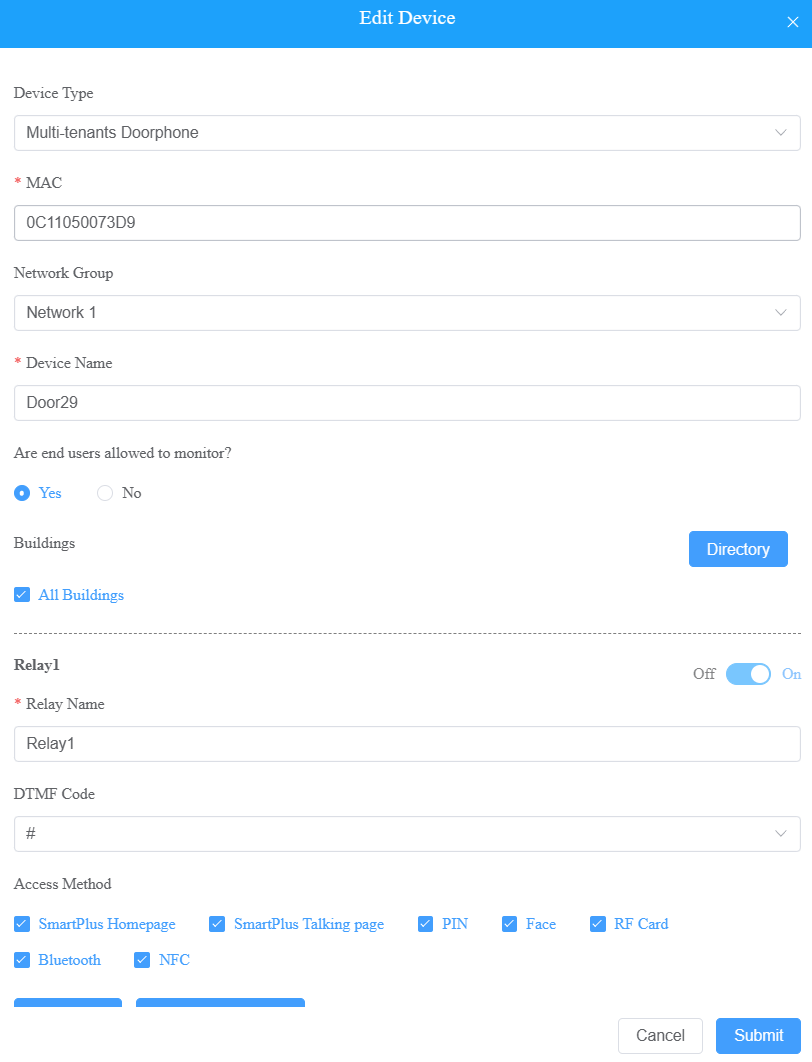
5. Fill in the device's information.
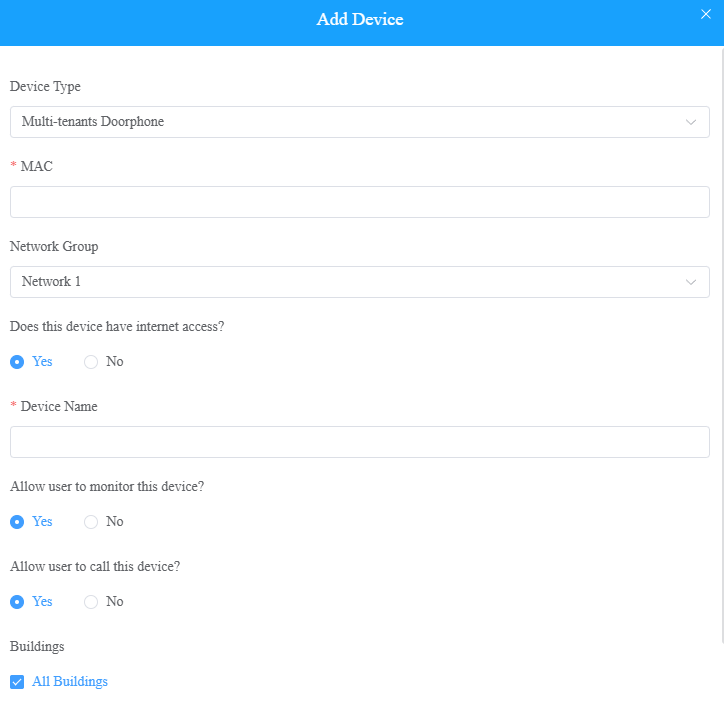
Regardless of what type of device it is, device type, MAC address, network group, and device name need to be set up. | ||||||||||||||||||||||||||||||||||||||||||||||
No. | Field Name | Description | ||||||||||||||||||||||||||||||||||||||||||||
1 | Device Type | Select your device type. Note:
| ||||||||||||||||||||||||||||||||||||||||||||
2 | MAC | Type in the device's MAC address. | ||||||||||||||||||||||||||||||||||||||||||||
3 | Network Group | Based on how devices communicate, select the network group.
| ||||||||||||||||||||||||||||||||||||||||||||
4 | Device Name | Name the device to distinguish it from others. | ||||||||||||||||||||||||||||||||||||||||||||
To add a door phone or an access control terminal, the following options should be additionally configured. | ||||||||||||||||||||||||||||||||||||||||||||||
1 | Allow users to monitor this device |
| ||||||||||||||||||||||||||||||||||||||||||||
2 | Allow user to call this device? |
| ||||||||||||||||||||||||||||||||||||||||||||
3 | Does the device have internet access? | This option appears only after the super manager enables Doorphone Offline Solution for your distributor.
| ||||||||||||||||||||||||||||||||||||||||||||
4 | IP Address | When No is selected in Does the device have internet access, you need to enter the static IP address of the door phone so that its calls can be transferred. | ||||||||||||||||||||||||||||||||||||||||||||
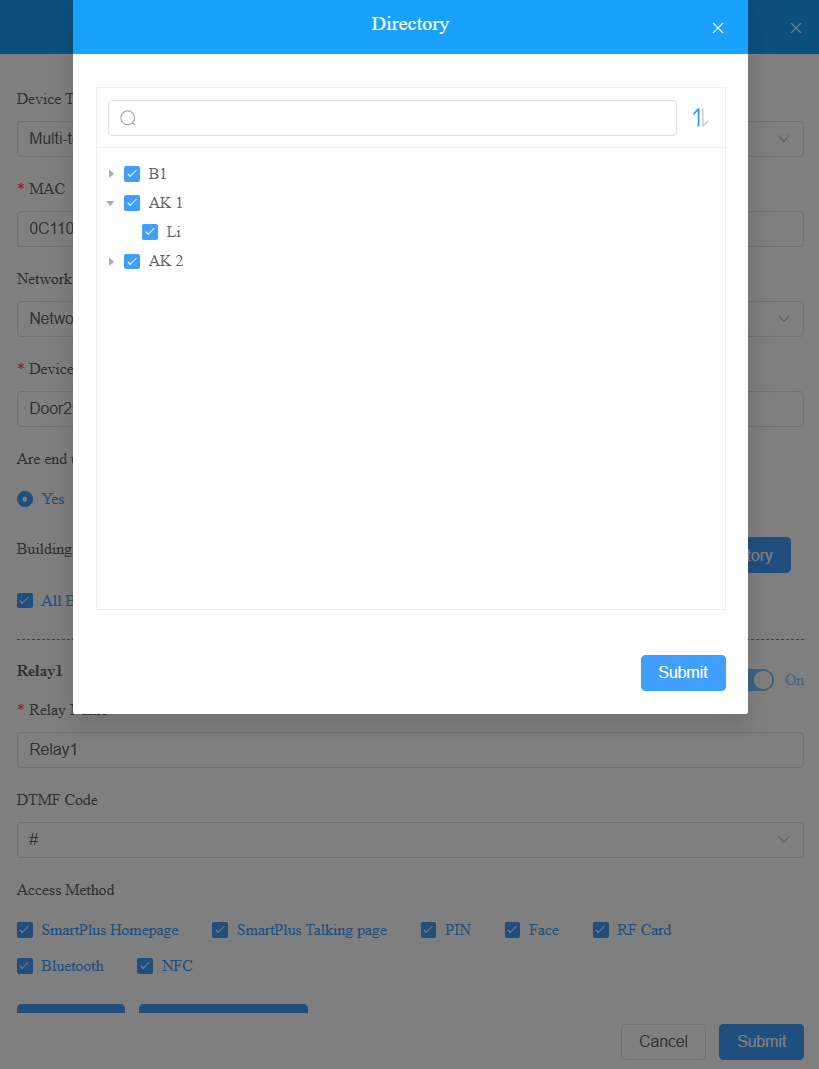
5 | Buildings | The option is only for the devices installed in the Community Public Area.
| ||||||||||||||||||||||||||||||||||||||||||||
6 | Contact Display Settings | The option is available for devices installed in the public area of specific buildings, and the device type is Multi-tenants Doorphone. Choose what to be displayed on the device’s directory screen. | ||||||||||||||||||||||||||||||||||||||||||||
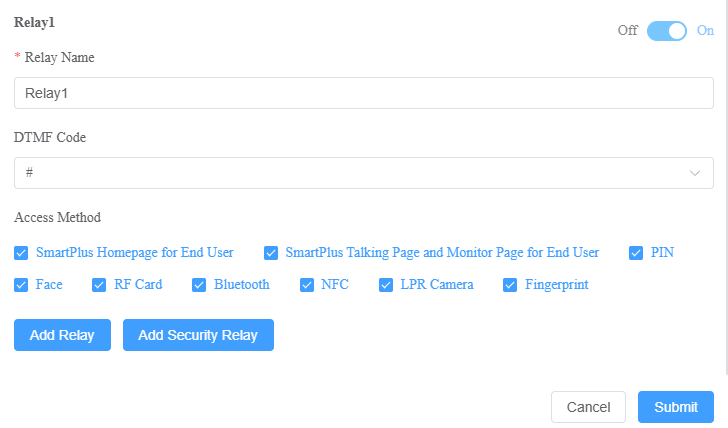
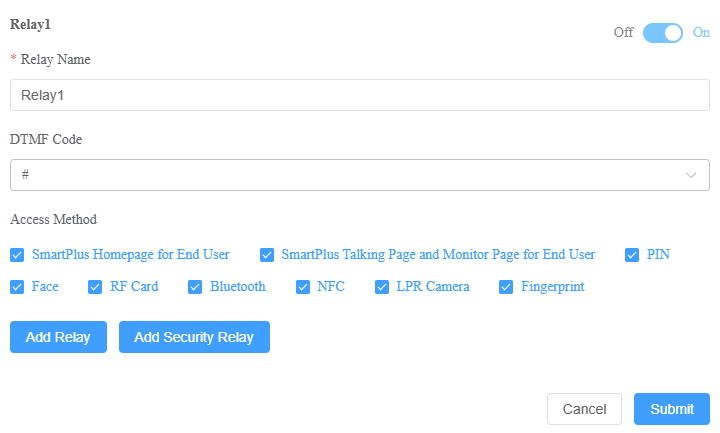
7 | Relay Name | Fill in the relay name, which can be the device location. | ||||||||||||||||||||||||||||||||||||||||||||
8 | DTMF code | Enter the DTMF code for the door access. | ||||||||||||||||||||||||||||||||||||||||||||
9 | Access Method | Select specific unlock methods to trigger the desired relay. For example, if you select PIN in Unlock type for Relay1 and select RF Card for Relay2 when users enter PIN codes on the door phone, only Relay1 will be triggered and vice versa. The following models with specific firmware versions or higher support this feature:
Note: If the SmartPlus Homepage or SmartPlus Talkingpage is not checked, the corresponding icons will not appear on the app home page. | ||||||||||||||||||||||||||||||||||||||||||||
10 | Add Relay | You can add more relays if needed. To add an A095, you can continue adding AUX OUT after 4 relays (doors) have been added. | ||||||||||||||||||||||||||||||||||||||||||||
11 | Add Security Relay | Add the security relay if the door phone is connected to an Akuvox SR01 security relay for the door unlock control. | ||||||||||||||||||||||||||||||||||||||||||||
To add an indoor monitor, the following options should be additionally configured. | ||||||||||||||||||||||||||||||||||||||||||||||
1 | Arming Function | When enabled, the arming icon will be available on users' SmartPlus Apps for arming and disarming. | ||||||||||||||||||||||||||||||||||||||||||||
2 | Relay | Turn on or off the device's built-in relay and name the relay. When the relay is enabled, specify its function from Door, Light, or Other. | ||||||||||||||||||||||||||||||||||||||||||||
3 | External Device | When the device is connected to an external relay controller, enable this option. | ||||||||||||||||||||||||||||||||||||||||||||
4 | External Device Type | Select the device type. Akuvox-MK485-G2R-8J8C V3.0 supports up to 8 relays, HF-8000 up to 4, and akubela RSAC-C1-R8 up to 16. | ||||||||||||||||||||||||||||||||||||||||||||
5 | External Device Mode |
| ||||||||||||||||||||||||||||||||||||||||||||
6 | IP Address | When Ethernet is selected as the external relay mode, enter the IP address. | ||||||||||||||||||||||||||||||||||||||||||||
7 | Port | When Ethernet is selected as the external relay mode, enter the port. | ||||||||||||||||||||||||||||||||||||||||||||
8 | Relay Name | Name the external relay to distinguish it from others. | ||||||||||||||||||||||||||||||||||||||||||||
9 | Relay Function | Define the relay function according to the device connected to the relay. | ||||||||||||||||||||||||||||||||||||||||||||
Add Intercom Devices to Residents' Apartments
After you create an apartment for a resident, you can add the resident’s private intercom devices.
Note
The akubela Hypanel Ultra(PH81-PoE-ST) can be added to the cloud as an indoor monitor to achieve smart home devices control on the SmartPlus App.
After adding the device, you can click
to view the Zigbee devices connected to it.
Click here to learn detailed configuration and supported device version.
1. Select the resident’s building and apartment.
2. Click ![]() of the desired apartment.
of the desired apartment.
3. Scroll to the Intercom Devices/Analog Handset section and click New on the right.
Note
The Akuvox analog handset is used with the door phone S532.
Click here to view how it works with S532.
4. Enter the device's information.
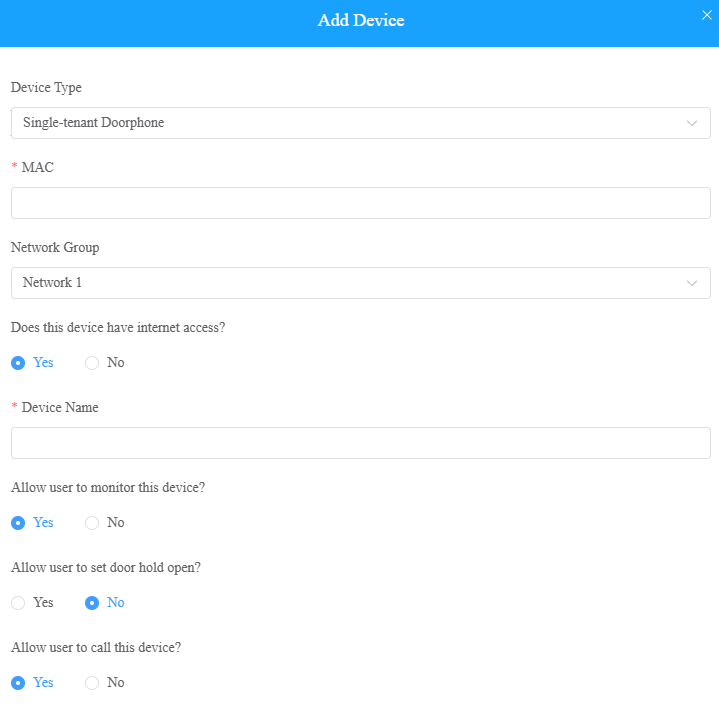
Regardless of the type of device you are adding, device type, MAC address, network group, and device name need to be set up. | ||
No. | Field Name | Description |
1 | Device Type | Select your device type. |
2 | MAC | Type in the device's MAC address. |
3 | Network Group | Based on how devices communicate, select the network group.
|
4 | Device Name | Name the device to distinguish it from others. |
To add a door phone or an access control terminal, the following options should be additionally configured. | ||
1 | Does the device have internet access? | This option appears only after the super manager enables Doorphone Offline Solution for your distributor.
|
2 | IP Address | When No is selected in Does the device have internet access, you need to enter the static IP address of the door phone so that its calls can be transferred. |
3 | Allow users to monitor this device |
|
4 | Allow user to call this device? |
|
5 | Allow User to Set Door Hold Open? | This option is only available when you are adding or editing users' private door phones. When it is enabled, users can set the door to open at a certain period on their SmartPlus Apps with SmartPlus master accounts. Click here to learn about the supported models and configuration details. |
6 | Relay Name | Fill in the relay name, which can be the device location. |
7 | DTMF Code | Enter the DTMF code for the door access. |
8 | Access Method | Select specific unlock methods to trigger the desired relay. For example, if you select PIN in Unlock type for Relay1 and select RF Card for Relay2 when users enter PIN codes on the door phone, only Relay1 will be triggered, and vice versa. The following models with specific firmware versions or higher support this feature:
|
9 | Add Relay | You can add more relays if needed. To add an A095, you can continue adding AUX OUT after 4 relays (doors) have been added. |
10 | Add Security Relay | Add the security relay if the door phone is connected to an Akuvox SR01 security relay for the door unlock control. |
To add an indoor monitor, the following options should be additionally configured. | ||
1 | Works offline | When enabled, the device will transfer calls from offline door phones to the SmartPlus App. |
2 | Arming Function | When enabled, the arming icon will be available on users' SmartPlus Apps for arming and disarming. |
3 | Relay | Turn on or off the device's built-in relay and name the relay. When the relay is enabled, specify its function from Door, Light, or Other. |
4 | External Device | When the device is connected to an external relay, enable this option. |
5 | External Device Type | Select the device type. Akuvox-MK485-G2R-8J8C V3.0 supports up to 8 relays, HF-8000 up to 4, and akubela RSAC-C1-R8 up to 16. |
6 | External Device Mode |
|
7 | IP Address | When Ethernet is selected as the external relay mode, enter the IP address. |
8 | Port | When Ethernet is selected as the external relay mode, enter the port. |
9 | Relay Name | Name the external relay to distinguish it from others. |
10 | Relay Function | Define the relay function according to the device connected to the relay. |
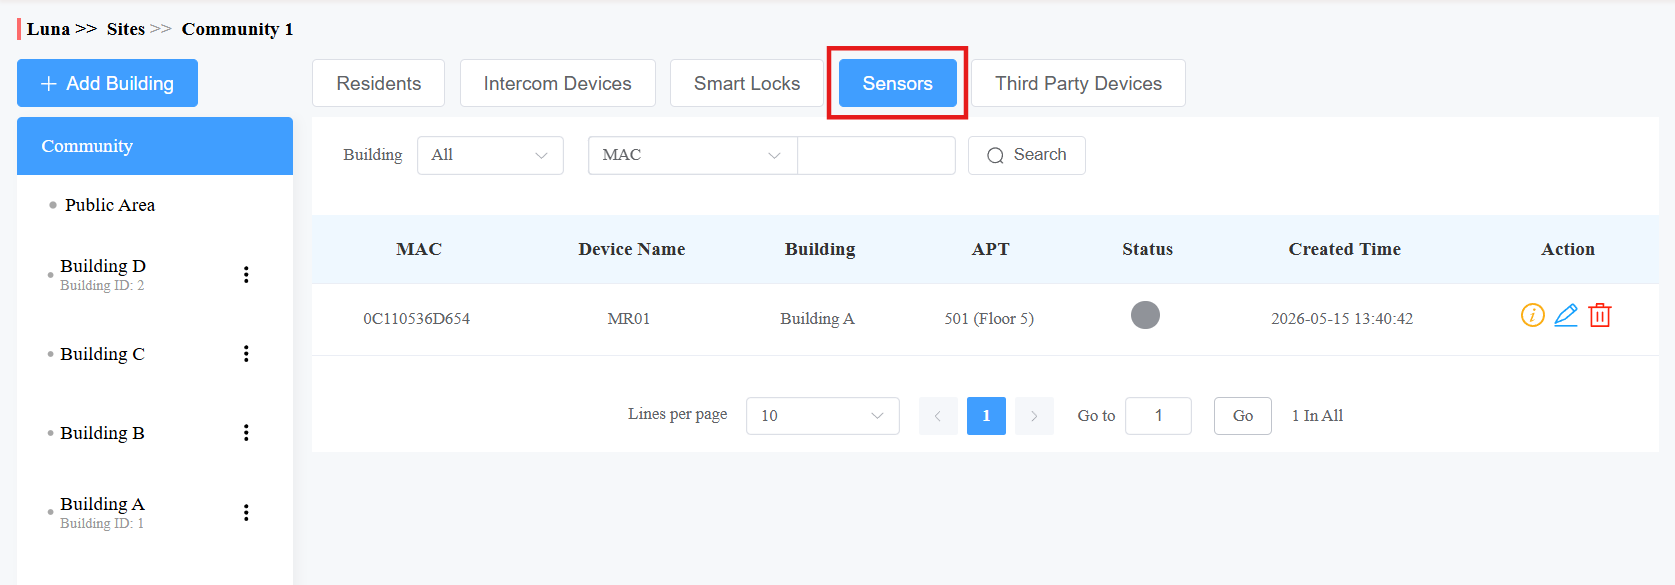
Manage MR01 Radar Sensor
You can add the MR01 radar sensor to the target apartment once the Health Care feature is enabled when you create/edit the project.
It supports fall and bed-exit detection, uploading alarms to the cloud, and more.
Select the resident’s building and apartment.
Click
.png) of the desired apartment.
of the desired apartment.
Scroll to the Sensors section and click New on the right.
Enter the device MAC and name.
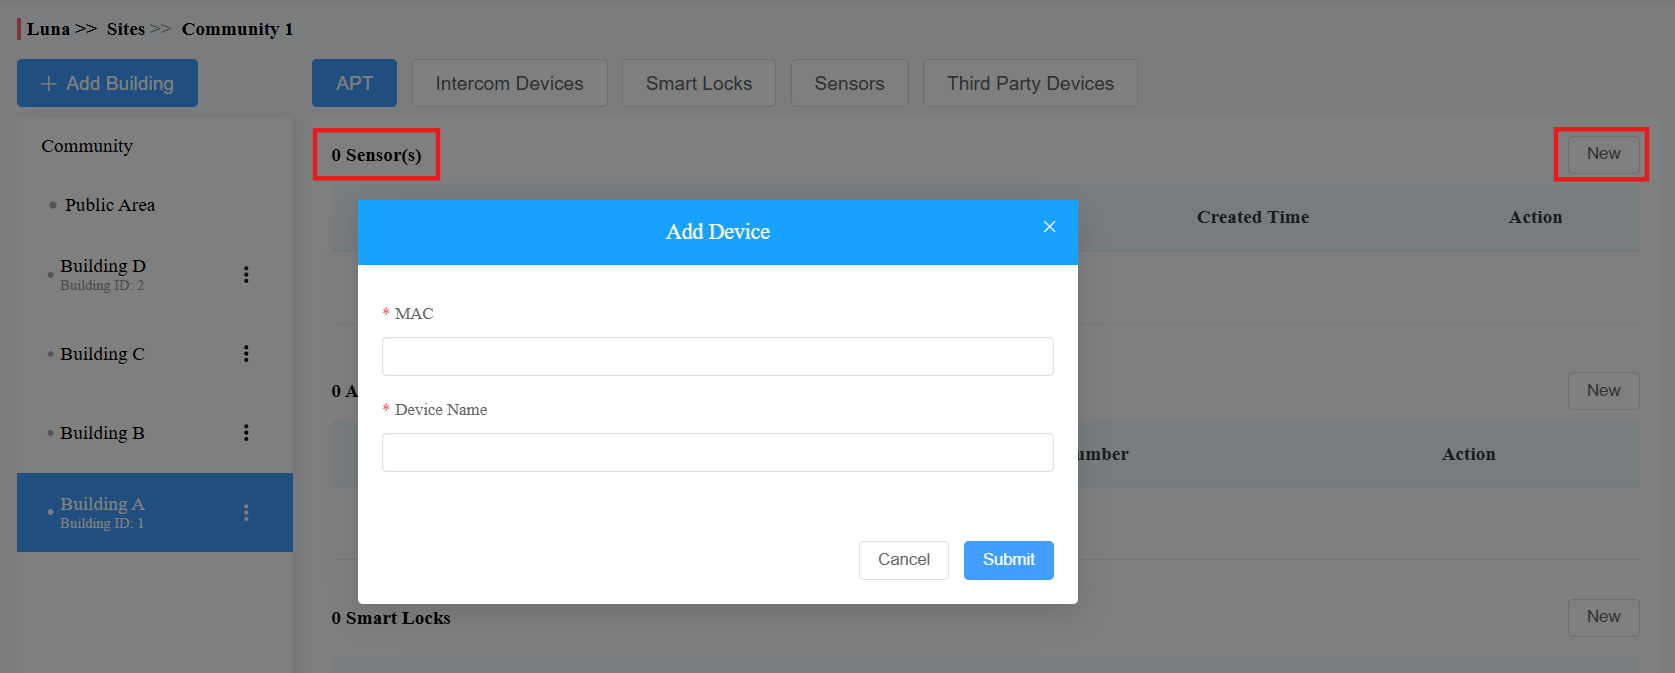
Click Submit.
Once added, you can check all MR01s under the Sensors section. Use the Action column icons to view the device information, modify its MAC and name, and delete the device.
Sensor Detection Call Alert
Once the MR01 is added to the apartment, you can configure the Sensor Detection Call Alert under apartment settings. This feature allows configured numbers to receive a call alert when a fall or bed-exit event occurs.
Note
This is a premium feature that requires payment.
Click
 in the upper-right corner.
 Locate the Sensor Detection Call Alert option. Enable it if needed.
See item descriptions in the chart below.
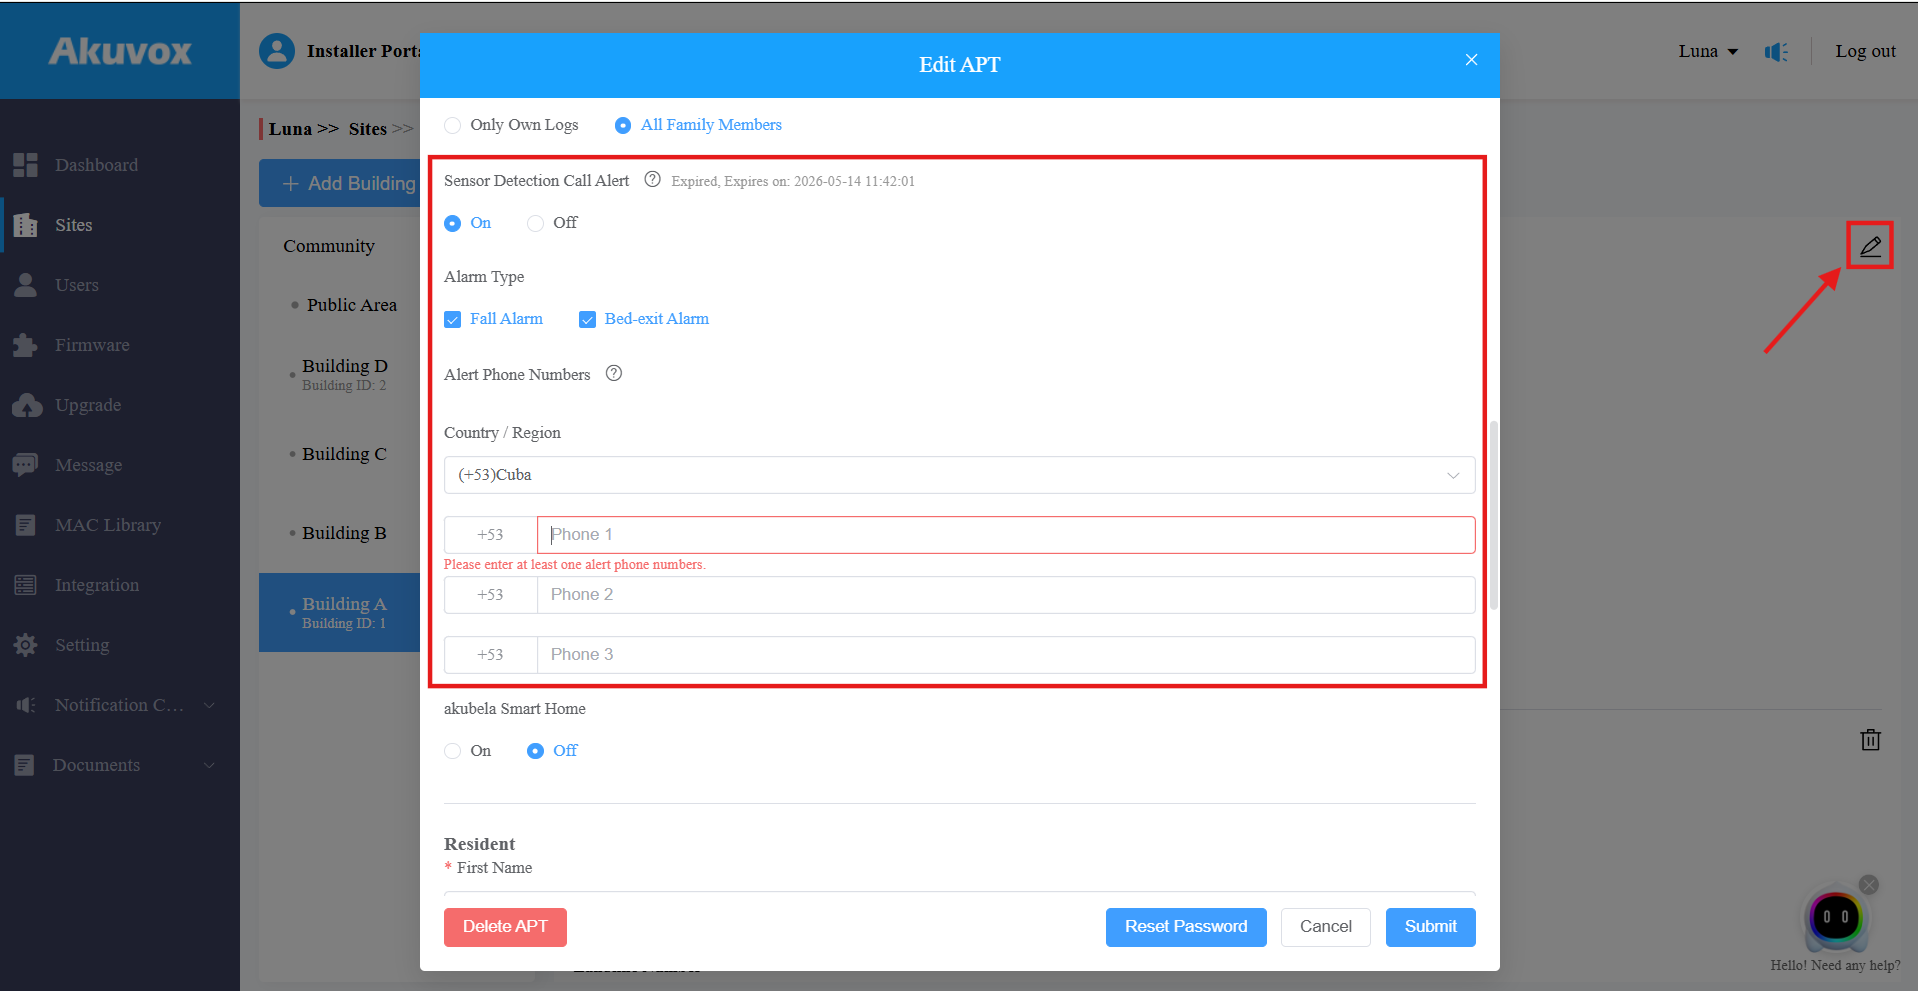
Item | Description |
|---|---|
Alarm Type | Select the alarm type that triggers the call alert. |
Country/Region | Select the correct country/region. This determines the phone number country code. |
Alarm Phone Numbers | Enter up to 3 phone numbers that will receive the call simultaneously.
|
Manage akubela Smart Locks
Akuvox SmartPlus supports the integration with akubela locks.
You can:
Add akubela SL21 smart locks. Click here to view the detailed steps.
Edit and delete SL20 and SL50 locks added by users.
Click
 of the target apartment.
Scroll to the Smart Locks section.
Click
 to view the lock information, to change its name, and
  to delete it.

Add Third-Party Devices
You can add third-party devices(camera, NVR, and locks) to public areas of the community or residents' apartments.
Add Third-Party Cameras
Note
Click here to see the supported brands of third-party cameras and detailed integration steps.
In Public Areas
By adding third-party cameras to the public areas, property managers and end users can monitor the camera surroundings. Also, you can link the camera to the door phone, allowing users to switch between the door phone and the third-party camera for monitoring.
Click Public Area or the desired building.
Click Third-Party Devices and Camera.
Click New on the right.
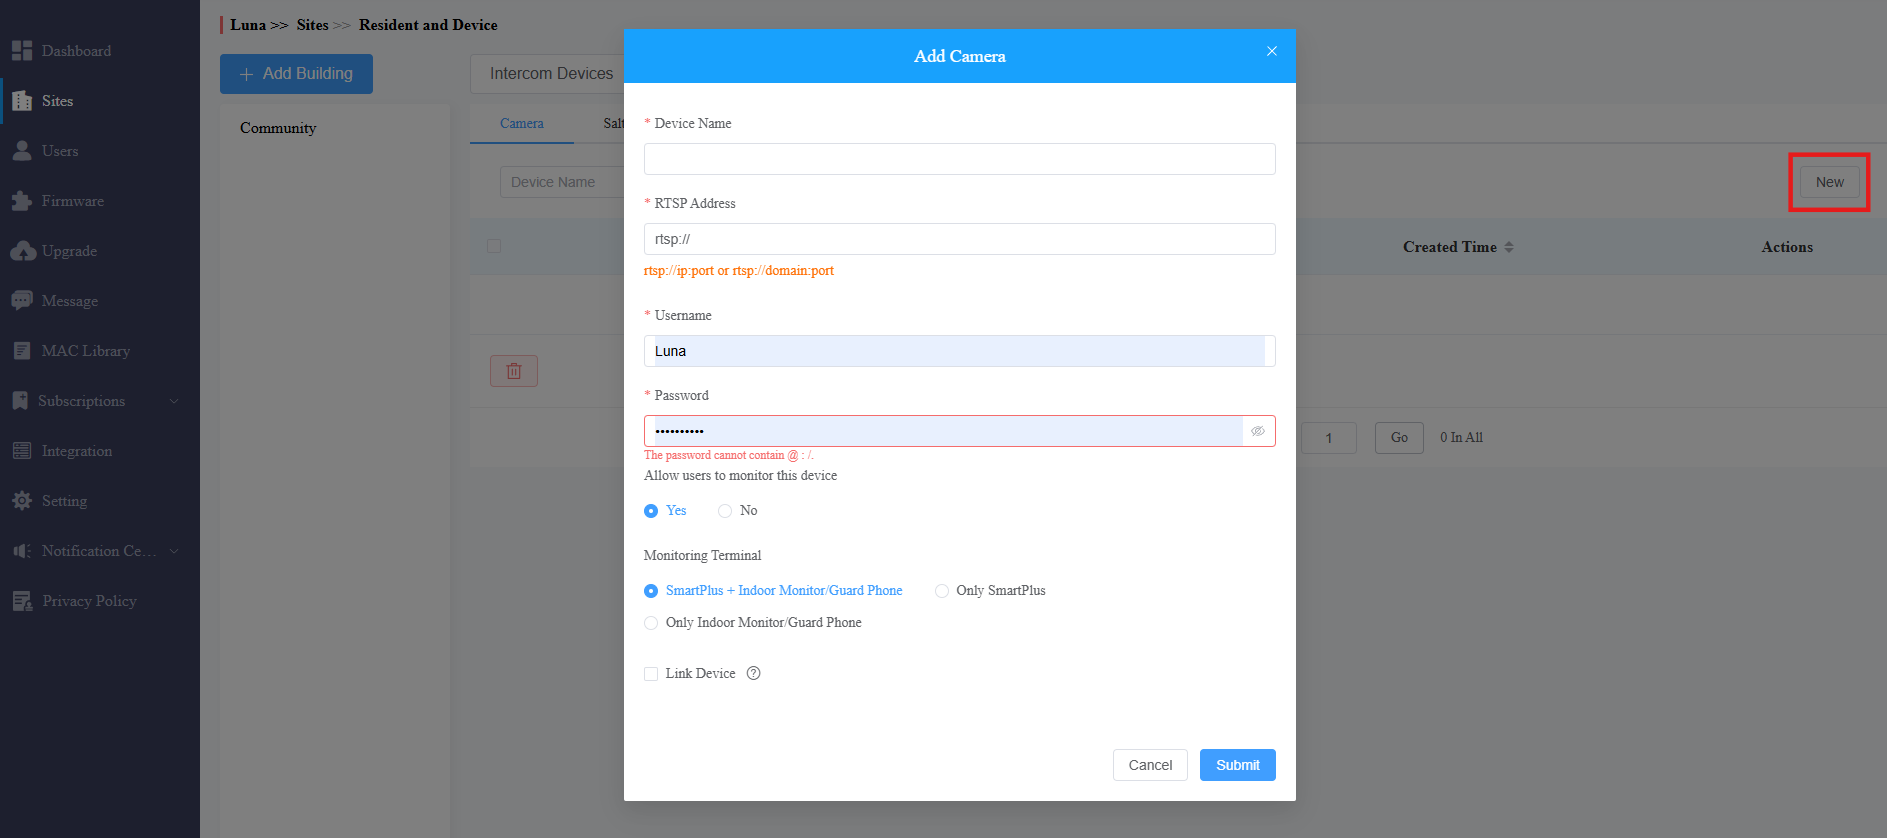
In Residents' Apartments
By adding third-party cameras, end users can monitor the camera surroundings. Also, you can link the camera to the door phone, allowing users to switch between the door phone and the third-party camera for monitoring.
1. Click![]() of the desired resident.
of the desired resident.
2. Scroll to the Third Party Devices section and click New on the right.

3. Enter the device's information and click Submit.
Field Name | Description |
Device Name | Name the device to distinguish it from others. |
RTSP Address | Type in the third-party RTSP URL in the Format: rtsp://ip:port or rtsp://domain:port. It is used to obtain the camera image. Note: RTSP URL formats may vary by third-party camera manufacturers. |
User Name | Enter the authentication username provided by a third-party camera manufacturer. |
Password | Enter the authentication password provided by a third-party camera manufacturer. |
Allow users to monitor this device | Set whether users can view the monitoring stream through their indoor monitors and SmartPlus Apps. |
Monitoring Terminal | If Yes is selected for the Allow users to monitor this device option, specify through which devices users can monitor. |
Snapshot | Available when Link Device is selected. Specify which method is used to obtain snapshots from third-party cameras. The snapshots will display in the door log of the linked device.
|
Link Device | You can link third-party cameras with intercom devices such as an R29 door phone in the building. When linked, users can tap the door phone camera icon on the SmartPlus app, then switch between the door phone camera view and the third-party camera view. And the third-party camera icon will not be displayed on the app. |
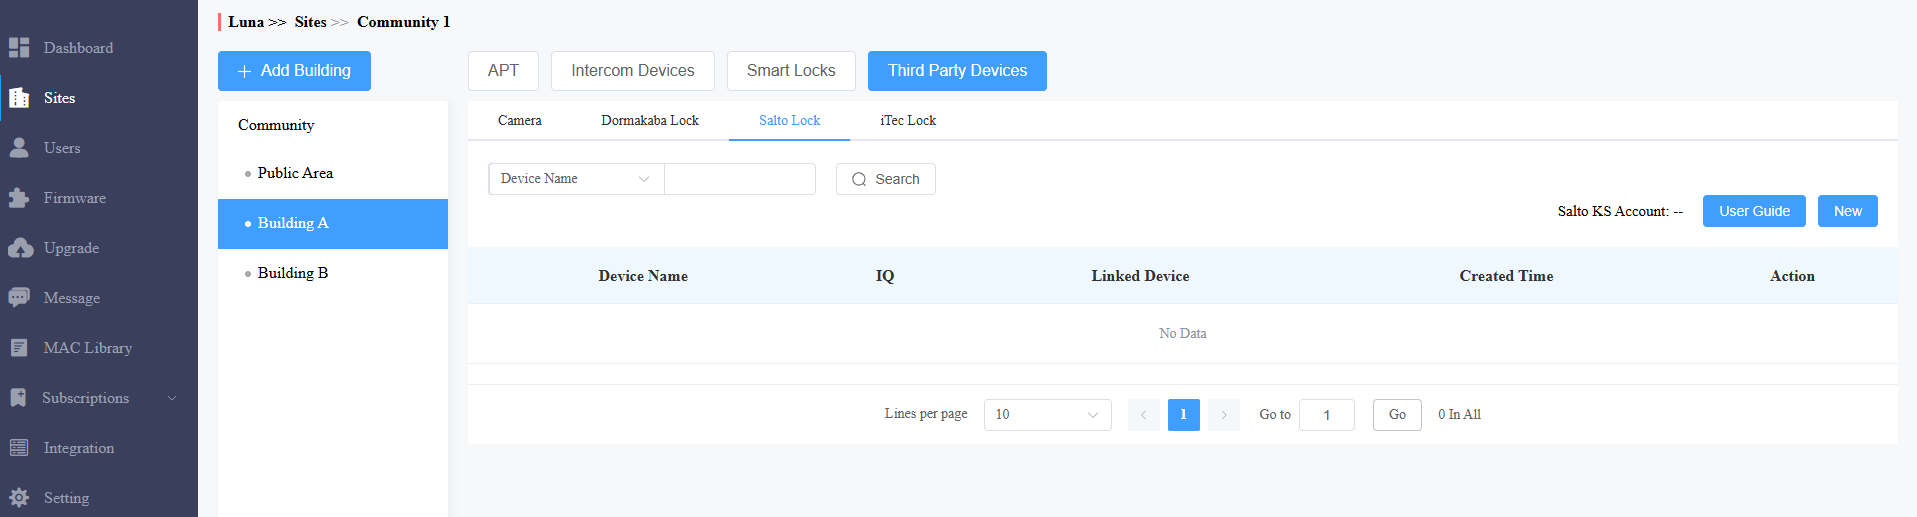
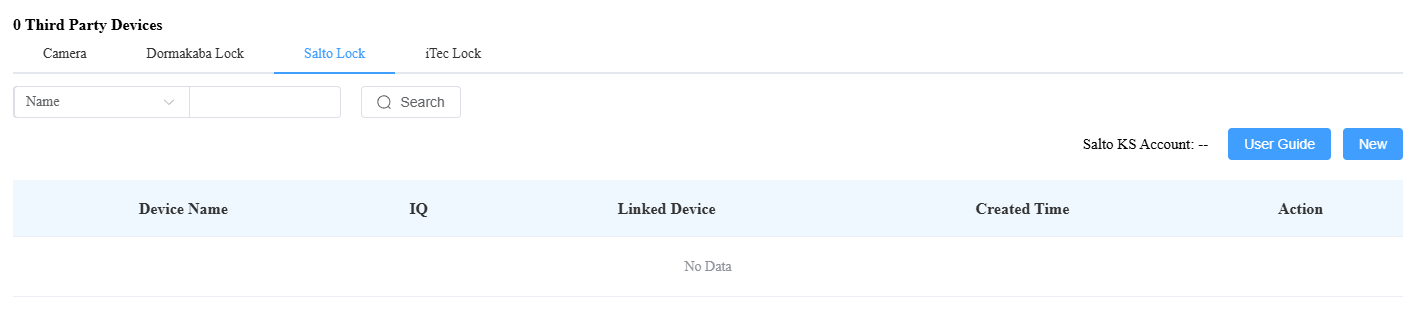
Add Third-Party Locks
You can add Dormakaba, Salto, and iTec locks to the SmartPlus Cloud, which allows users to unlock the locks conveniently on their SmartPlus Apps.
Note
Currently, ONLY SmartPlus Ucloud(American Cloud) supports the Dormakaba lock integration.
Please click the following articles to view how to add and assign third-party locks:
1. Click Integration on the left column.
2. Select the lock brand: Dormakaba, Salto, or iTec.
3. Click User Guide to view the instructions.
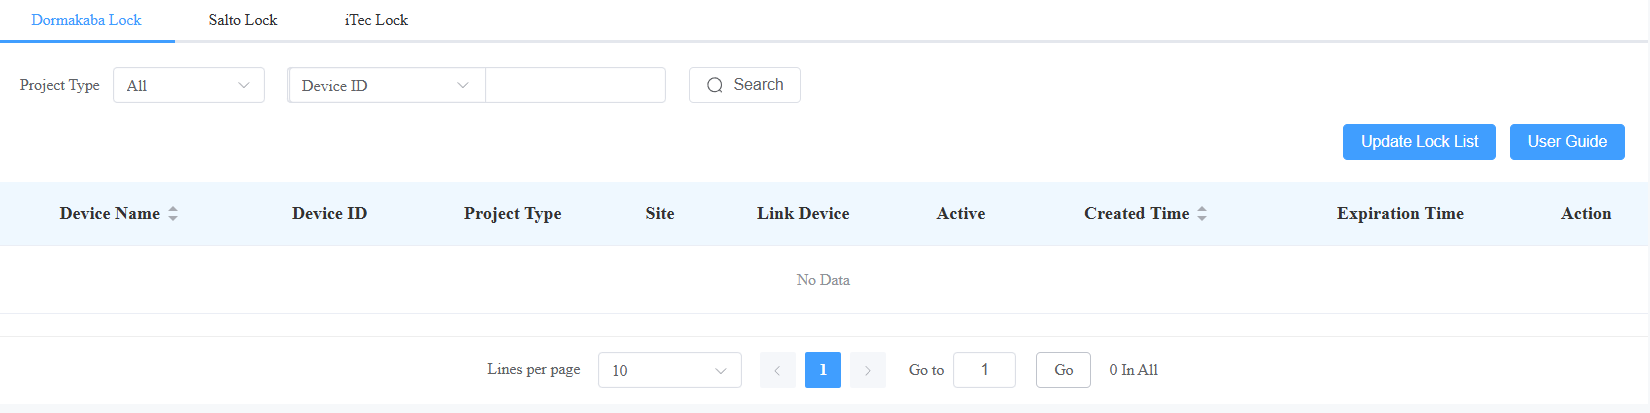
You can also navigate to the place where the lock is installed and assign the lock.
In Public Areas
1. Click Public Area or the desired building.
2. Click Third-Party Devices and select the lock brand.
3. Click New on the right to assign the desired lock or click User Guide to view the instructions.
In Residents' Apartments
1. Click![]() of the desired resident.
of the desired resident.
2. Scroll to the Third-Party Devices section and select the lock brand.
3. Click New on the right to assign the lock or click User Guide to view the instructions.
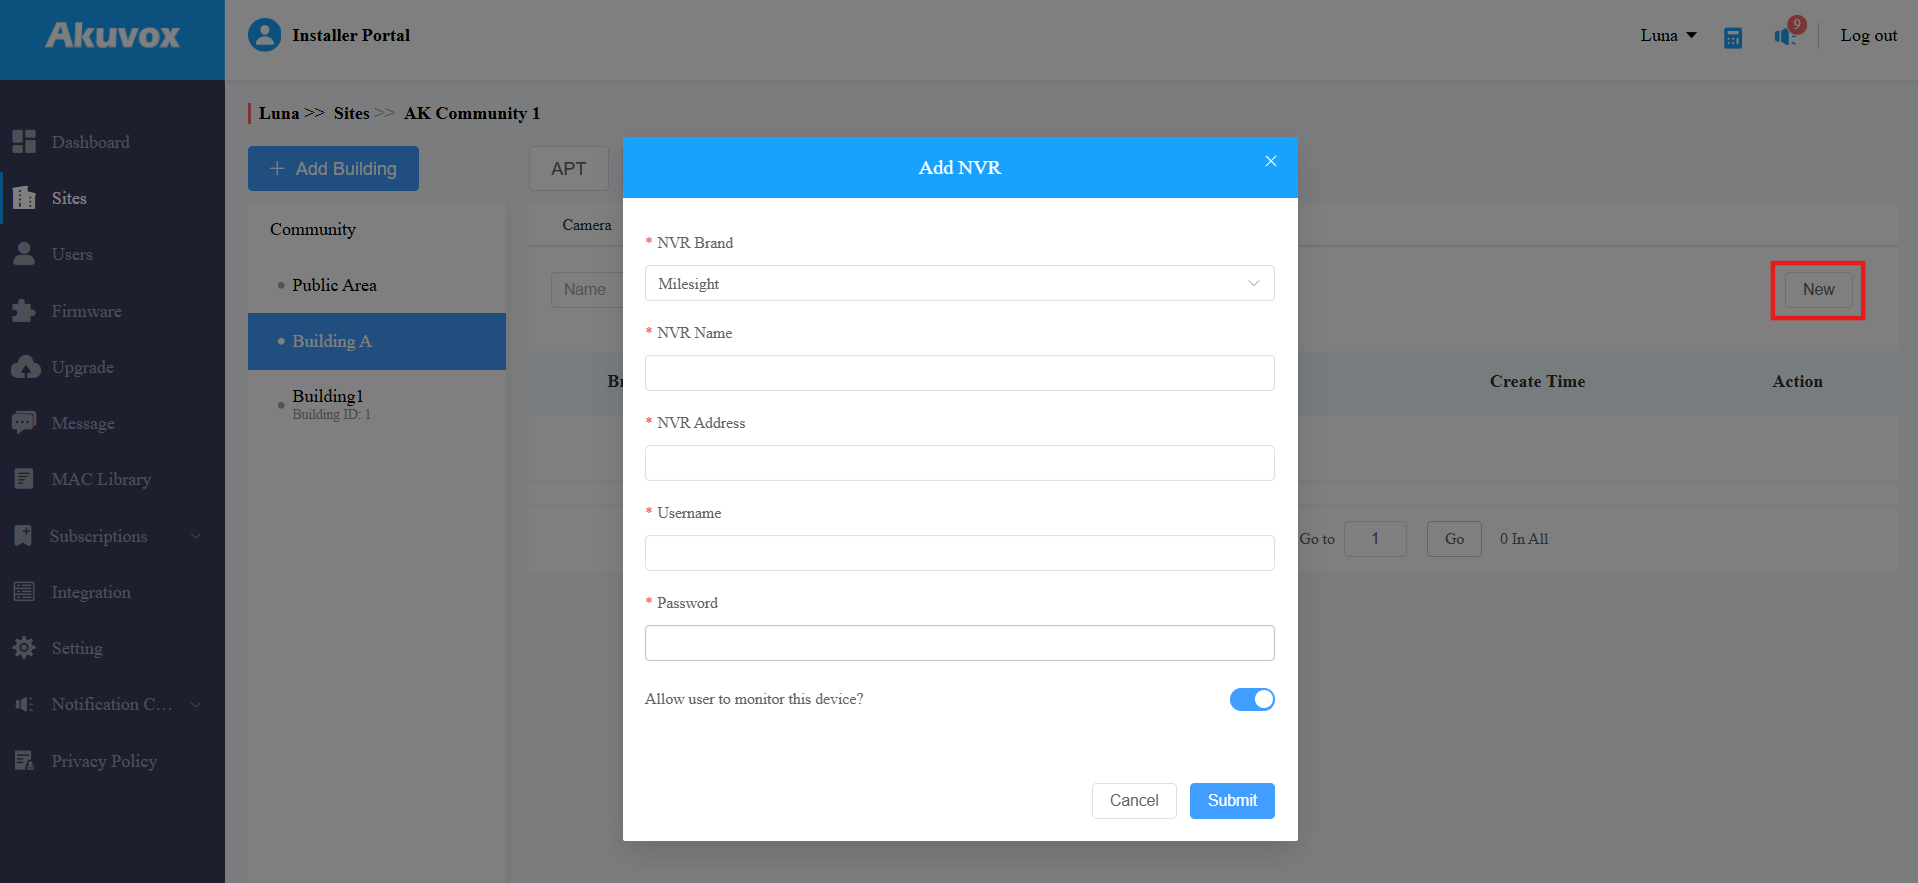
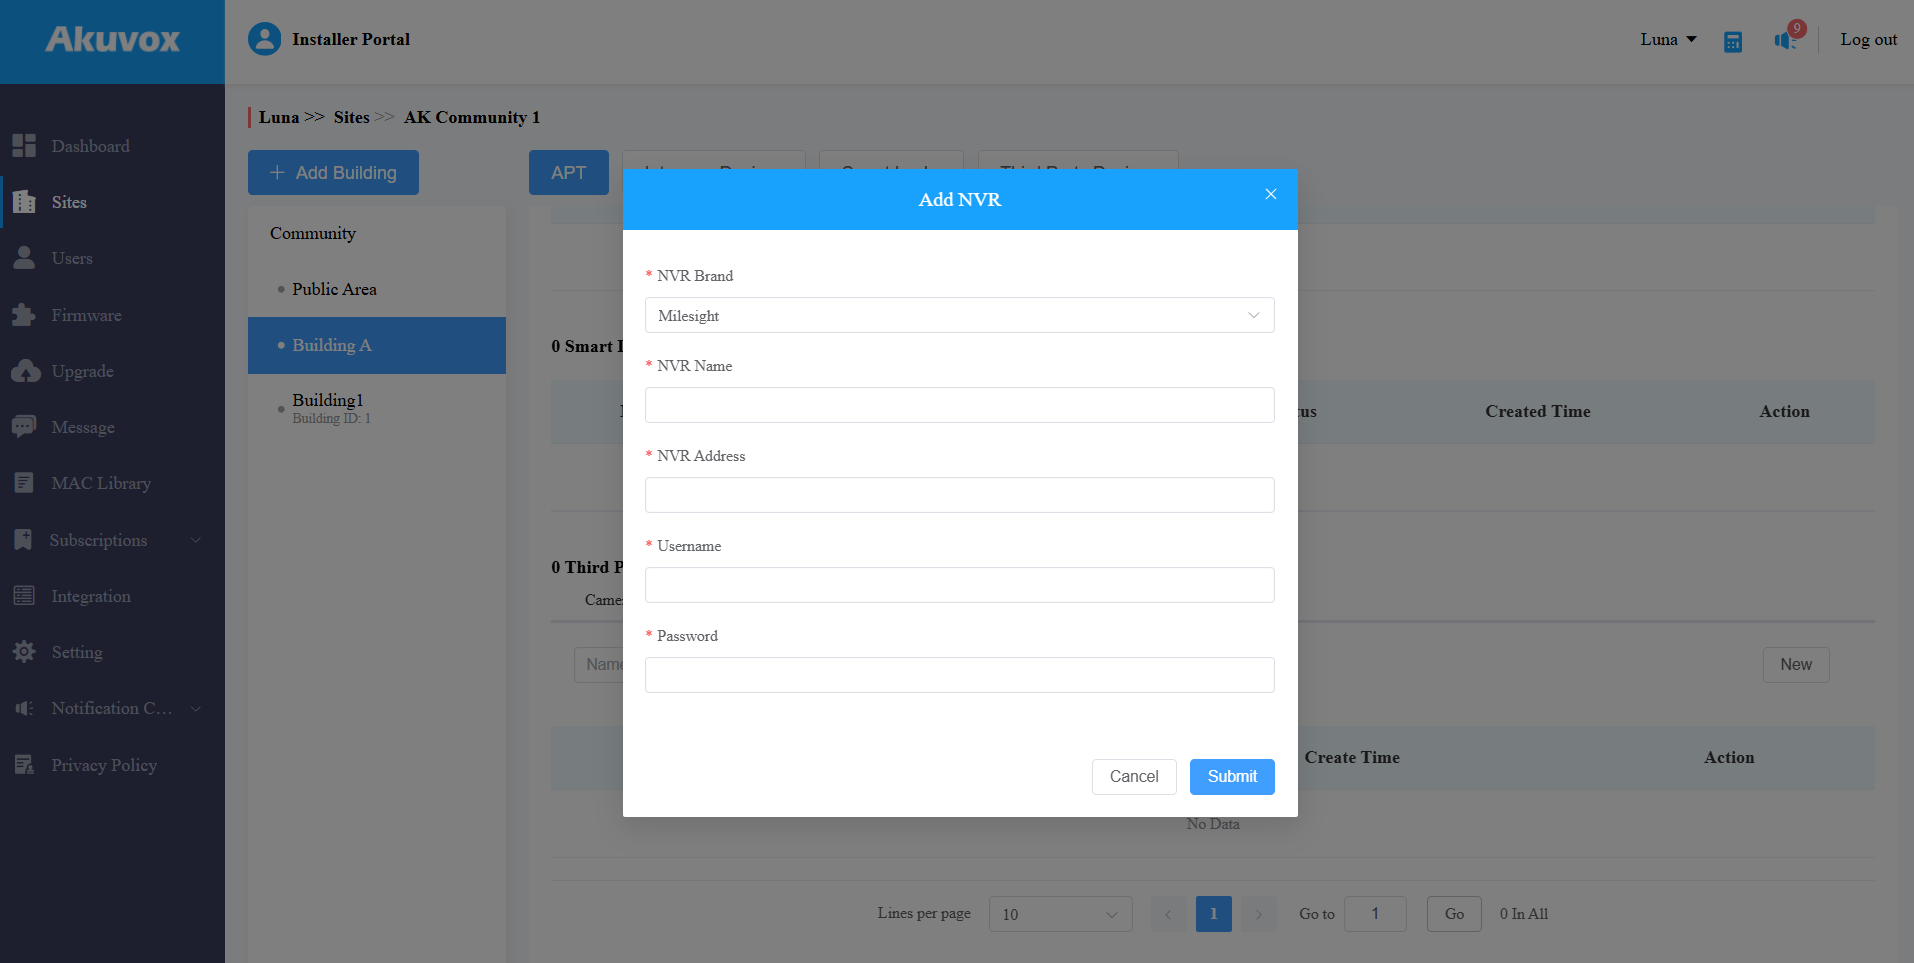
Add Third-Party NVR
You can add the Milesight and Hikivision NVR to the family. With their SmartPlus apps, residents can view the live stream and playback of the device.
In Public Areas
Click Public Area or the desired building.
Click Third-Party Devices > NVR > New.
Select the NVR brand and enter the NVR name, address, username, and password.
Enable/disable Allow user to monitor this device. This decides whether end users can view the monitoring stream of the NVR with their SmartPlus Apps. It is enabled by default.
In Residents’ Apartments
Click
of the desired resident.Scroll to the Third-Party Devices section and select NVR.
Click New.
Select the NVR brand and enter the NVR name, address, username, and password.
Edit/Delete the Device
You can edit and delete the device.
Edit Devices in Community Public Area
1. Click ![]() of the target community on the Sites module.
of the target community on the Sites module.
2. Click Public Area and select Intercom Devices or Third-Party Devices. You can search the device by its MAC, Device Name, or SIP, and click the icon  next to them to reorder them to conveniently find the desired device.
3. Click![]() to modify the device's settings.
to modify the device's settings.
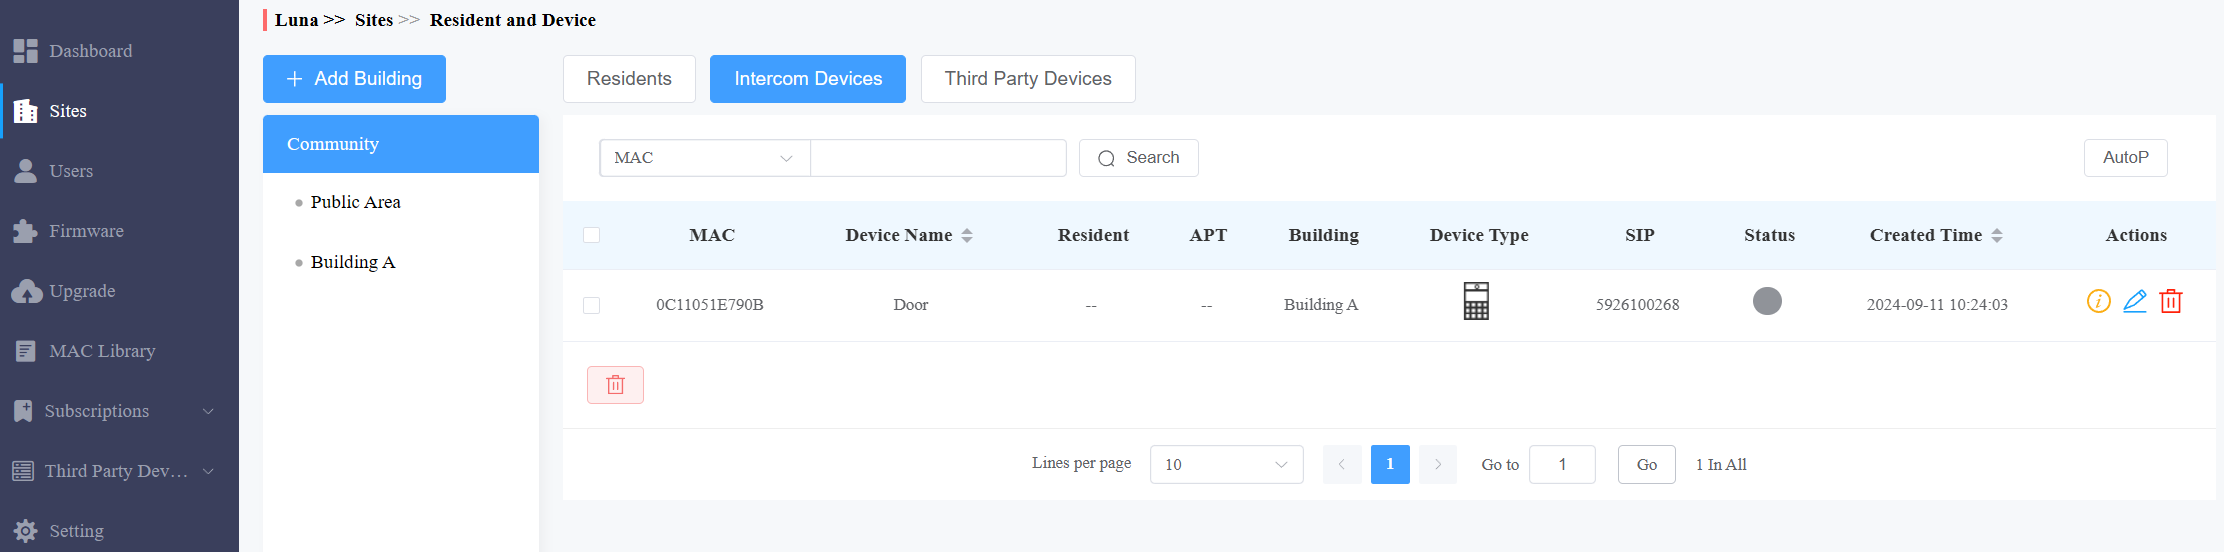
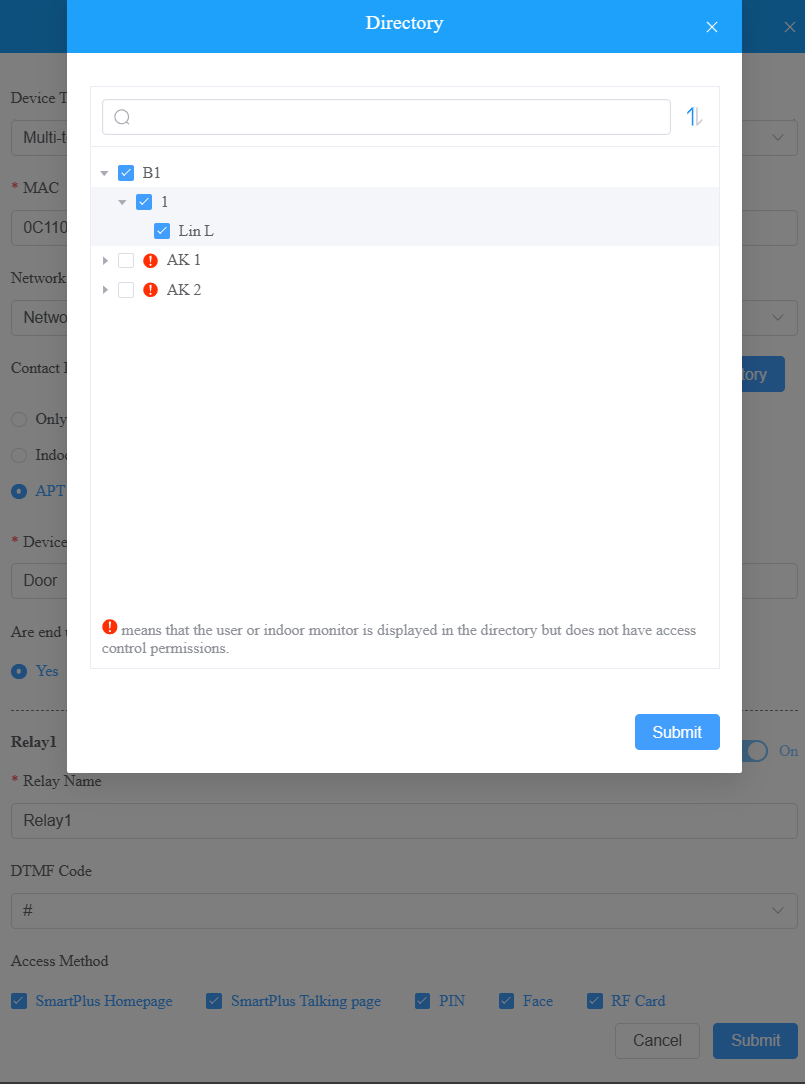
For Intercom Devices, if it is a multi-tenant door phone or a single-tenant door phone, the option.png) will be available for re-selecting the residents and indoor monitors that can be displayed as contacts on the door phone's Contacts screen.
will be available for re-selecting the residents and indoor monitors that can be displayed as contacts on the door phone's Contacts screen.
Note
The following models with specific firmware versions or higher support the Directory selection feature:
E16 V2: 216.30.10.109
E18: 18.30.10.236
R29 : 29.30.10.205
R28 V2: 228.30.10.139
X912: 912.30.11.49
X915 V2: 2915.30.10.205
X916: 916.30.10.212
S532: 532.30.10.228
S535: 535.30.10.233
S538: 538.30.10.705
S539: 539.30.10.231
Edit/Delete Device in Building Public Area
1. Click ![]() of the target community on the Sites module.
of the target community on the Sites module.
2. Select the target building and select Intercom Devices or Third Party Devices. You can search the device by its MAC, Device Name, or SIP, and click the icon to reorder devices for quick access.
3. Click  to modify the device's settings.
For Intercom Devices, when it is a multi-tenant door phone or a single-tenant door phone, the optionwill be available for re-selecting the residents and indoor monitors that can be displayed as contacts on the door phone's Contacts screen.
Note
The following models with specific firmware versions or higher support the Directory selection feature:
E16 V2: 216.30.10.109
E18: 18.30.10.236
R29 : 29.30.10.205
R28 V2: 228.30.10.139
X912: 912.30.11.49
X915 V2: 2915.30.10.205
X916: 916.30.10.212
S532: 532.30.10.228
S535: 535.30.10.233
S539: 539.30.10.231

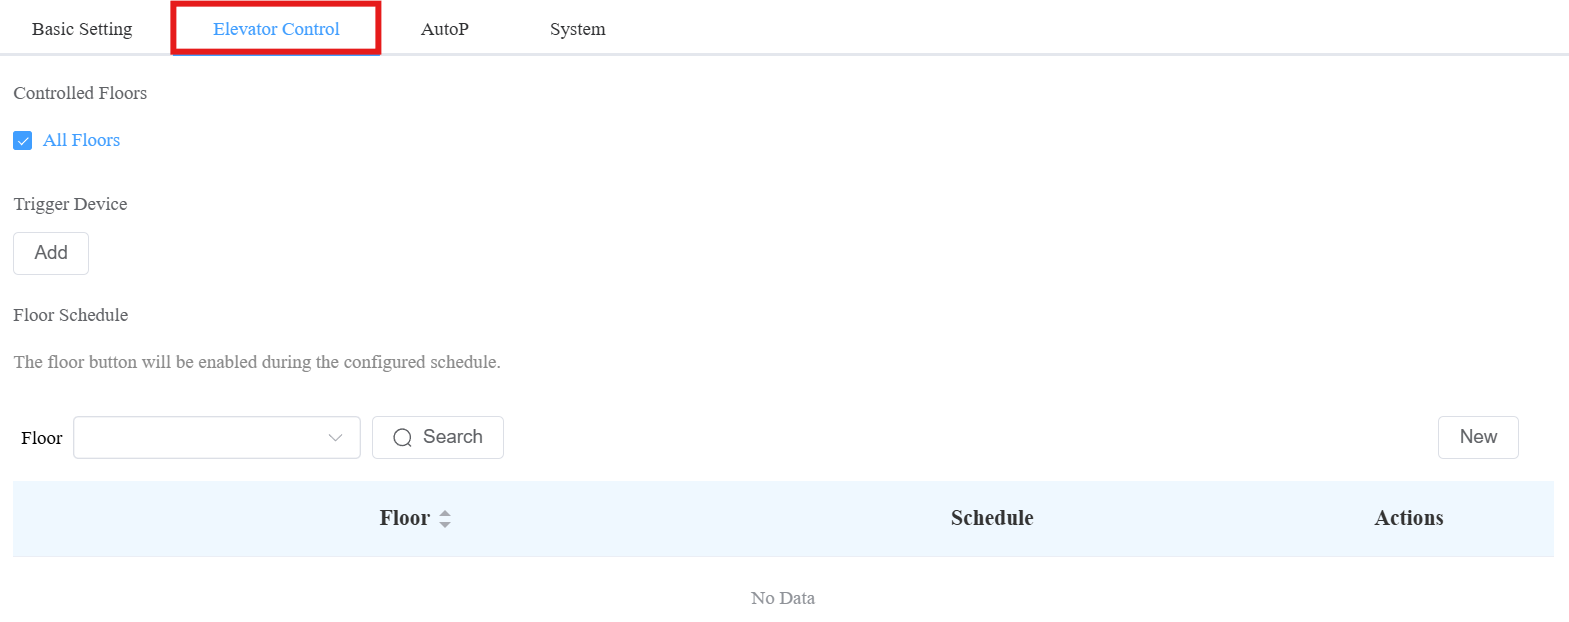
For EC33(Elevator Control Device), configure additional elevator control settings when editing it.
Click here to view the setting details.
Remote Configuration and Maintenance
You can provide residents with remote maintenance in terms of device data transmission type configuration, device reboot, device web interface remote control, and device provisioning, etc., for the device on the community, building, and public area levels.
Click on Community.
Click Intercom Devices, then
 .
.
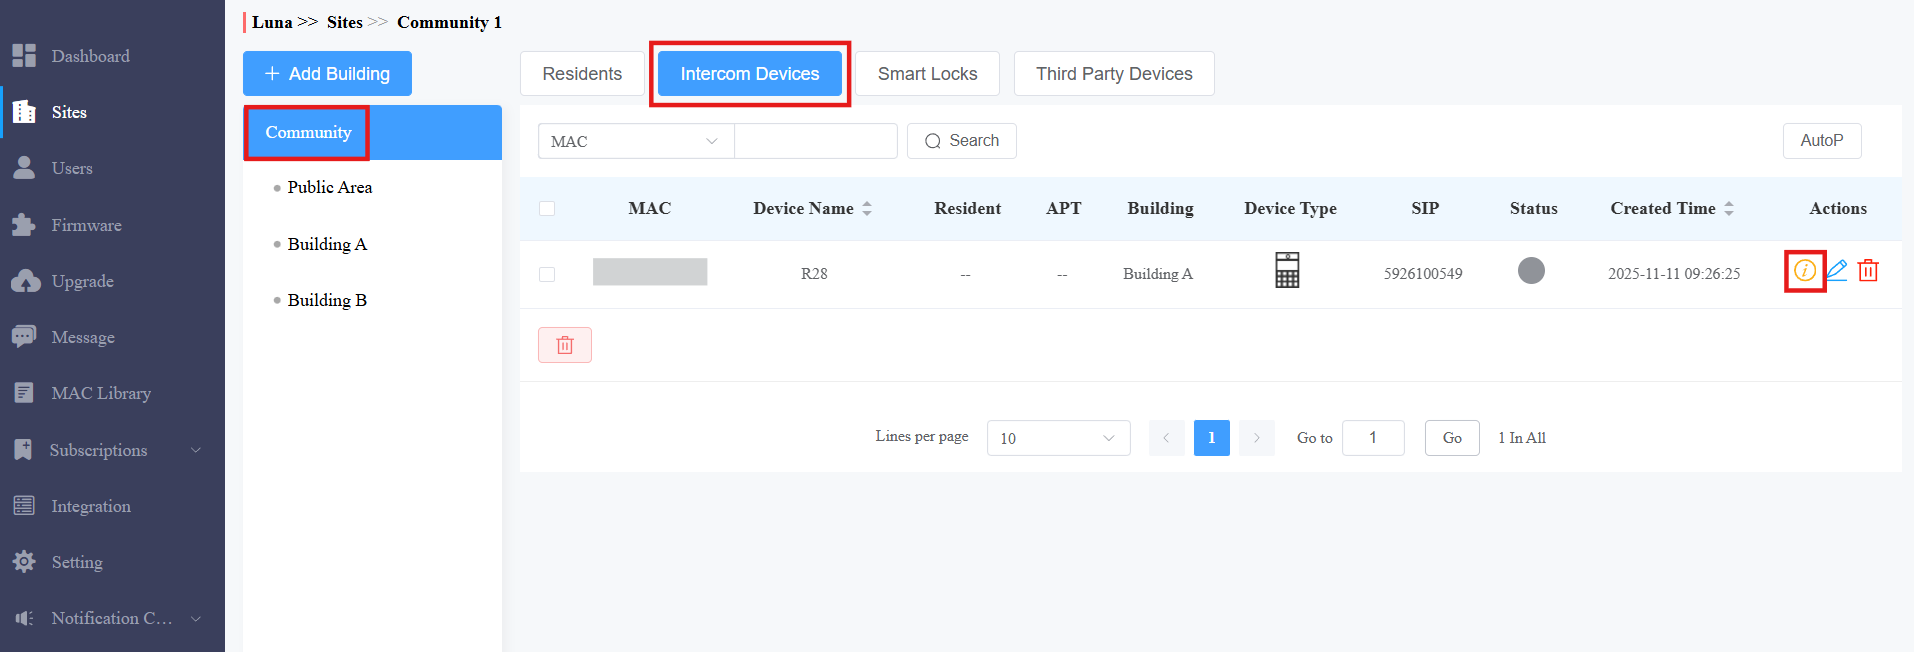
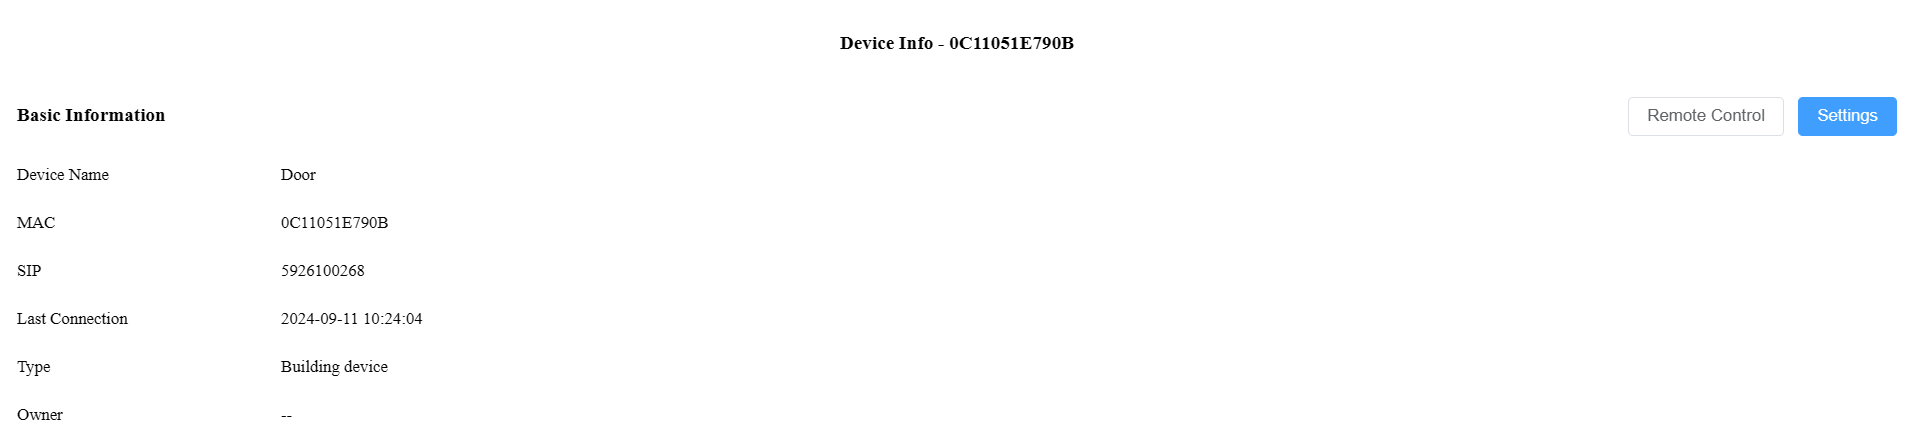
Click Remote Control to access the device's web settings.
Click Settings to set up the device further.
Note
If the device model is R20K or R20B and connected to an expansion module(MD06/MD12), a Push Button Setting option will be available for you to set up the expansion module.
Click here to view the details of setting up the expansion unit.
Reboot or reset the device.
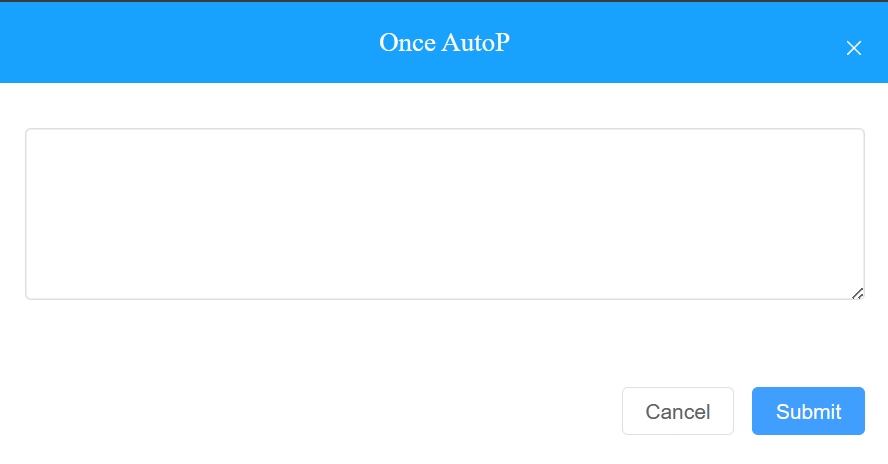
Enter the commands for the Auto-provisioning, then click on Submit.
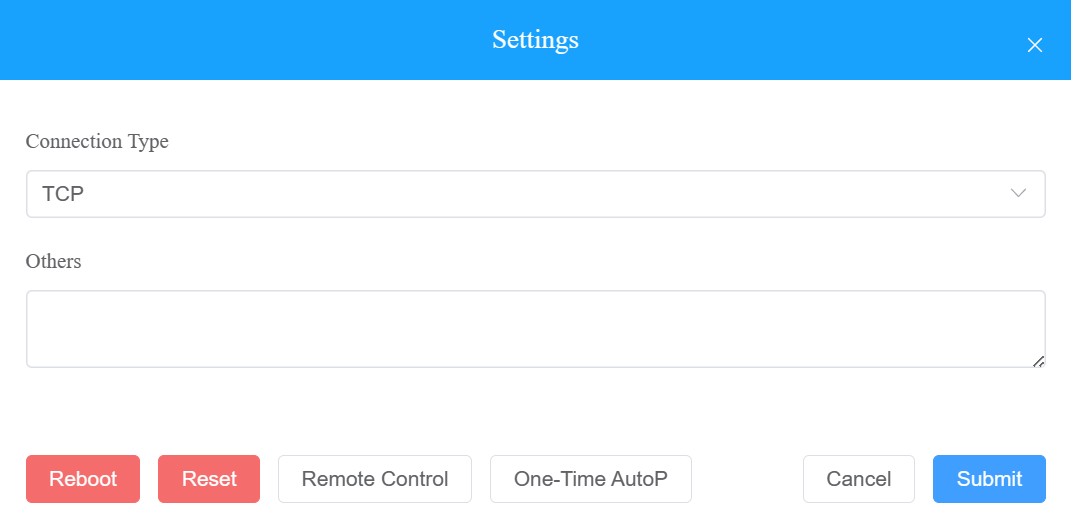
Click One-Time Autop if you want the Autop command(s) to be implemented only once.
Note
The auto-provisioning commands can be exported from the devices. To check the commands, you can refer to the following articles:
Duplicate commands will not be retained.
Property Manager Account
As an installer, you can manage property manager accounts for communities.
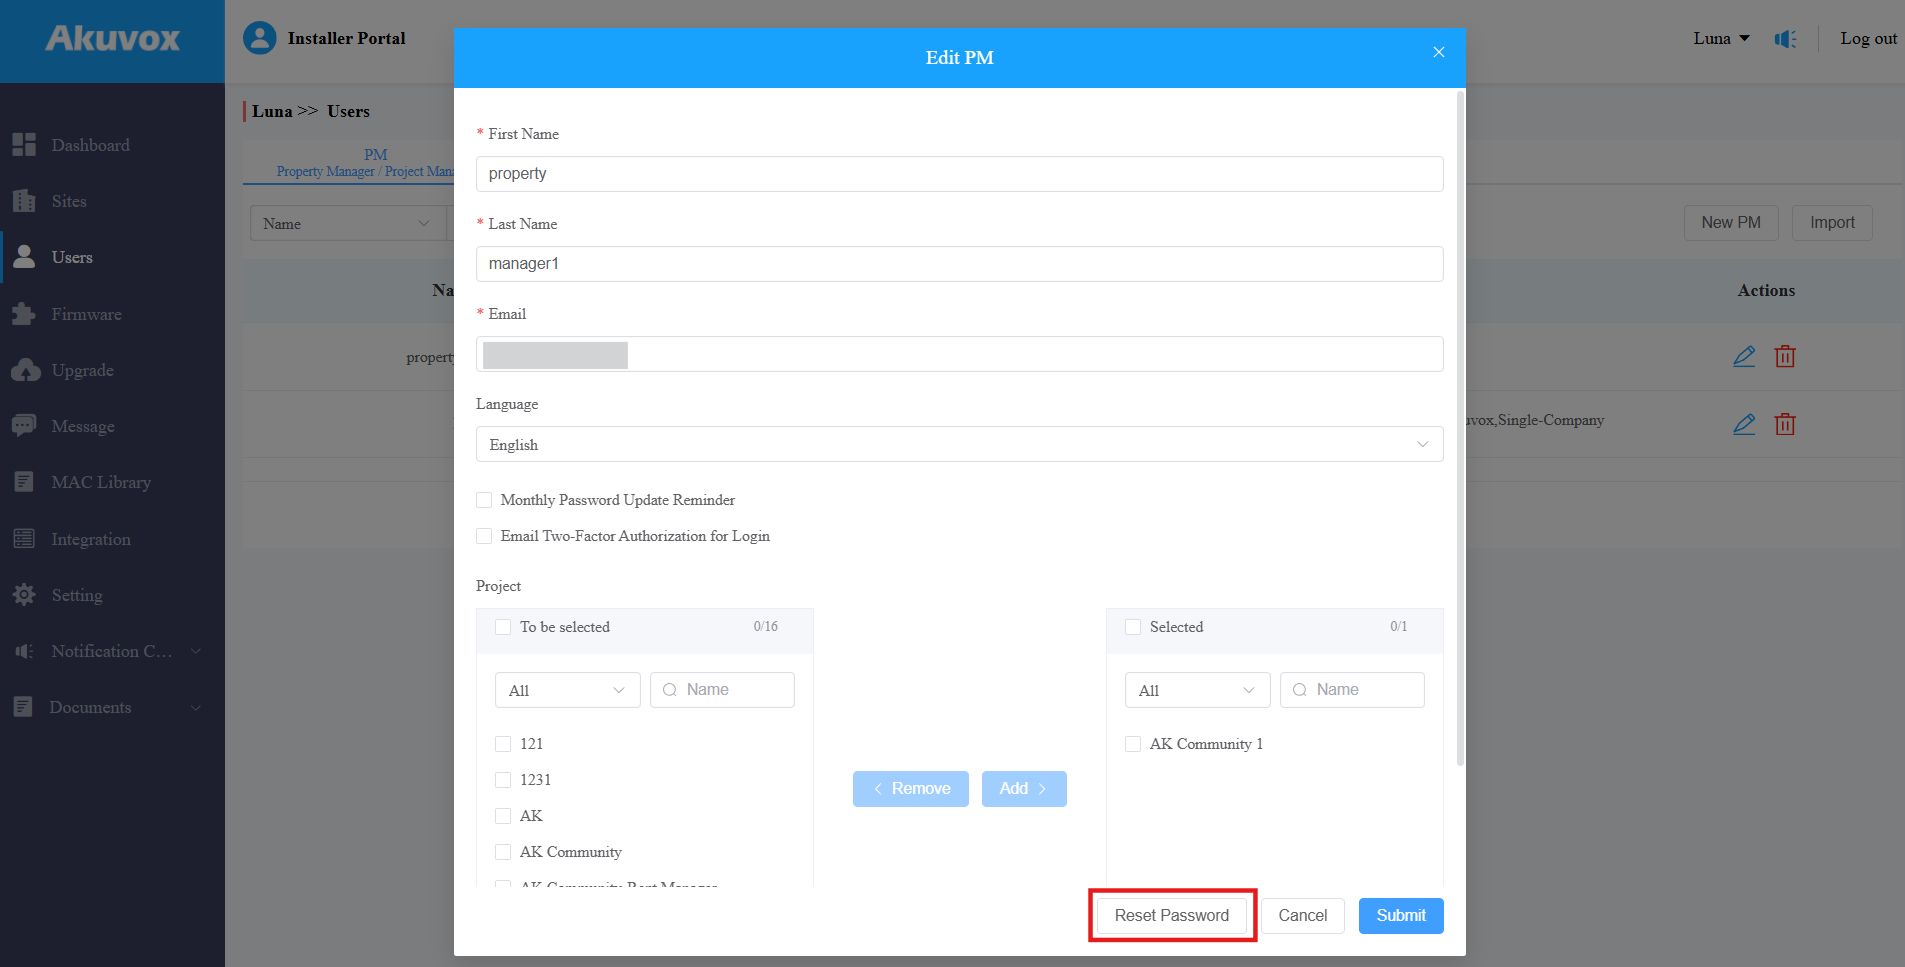
Add Property Manager Account
After a community is set up, you can create a property manager account and assign it to a specific community. Moreover, you can set up the SmartPlus App and landline service permission for property managers.
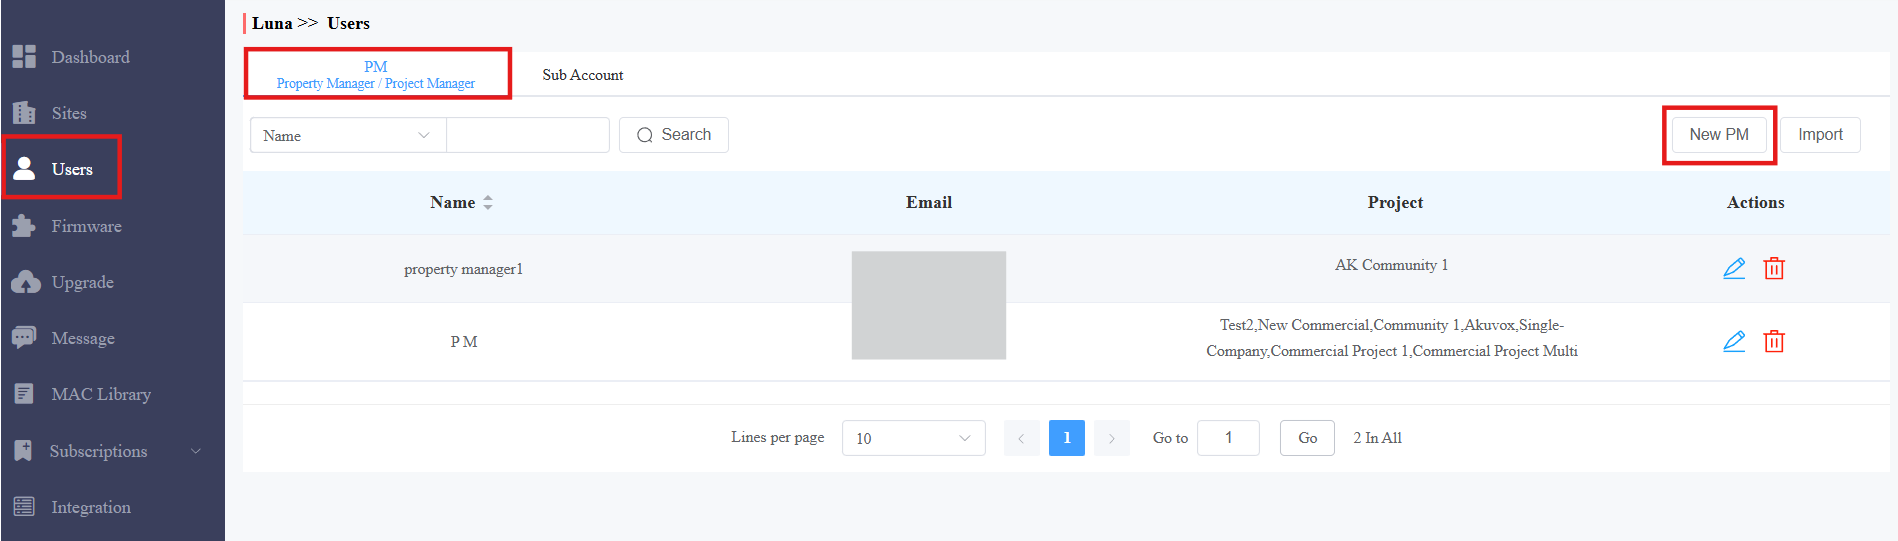
Click Users > New PM.
Fill in the property manager information and select the language of the email sent to the property manager.
Enable or disable the Monthly Password Update Reminder and Email Two-Factor Authorization for Login.
Monthly Password Update Reminder: If enabled, when property managers log into the SmartPlus Cloud platform, they will see a prompt every month reminding them to change their SmartPlus login passwords. This feature is used to enhance the security of property manager accounts.
Email Two-Factor Authorization for Login: If enabled, when property managers log in to the SmartPlus Cloud platform, they need to fill in a verification code for login.
Choose the project(s) that are managed by the property manager. Move them from the left to the right box.

You can also assign property managers to projects on the Sites interface.
Click
.png) of the desired community. A window will be displayed to select the property manager and set up permissions for the property manager.
of the desired community. A window will be displayed to select the property manager and set up permissions for the property manager.
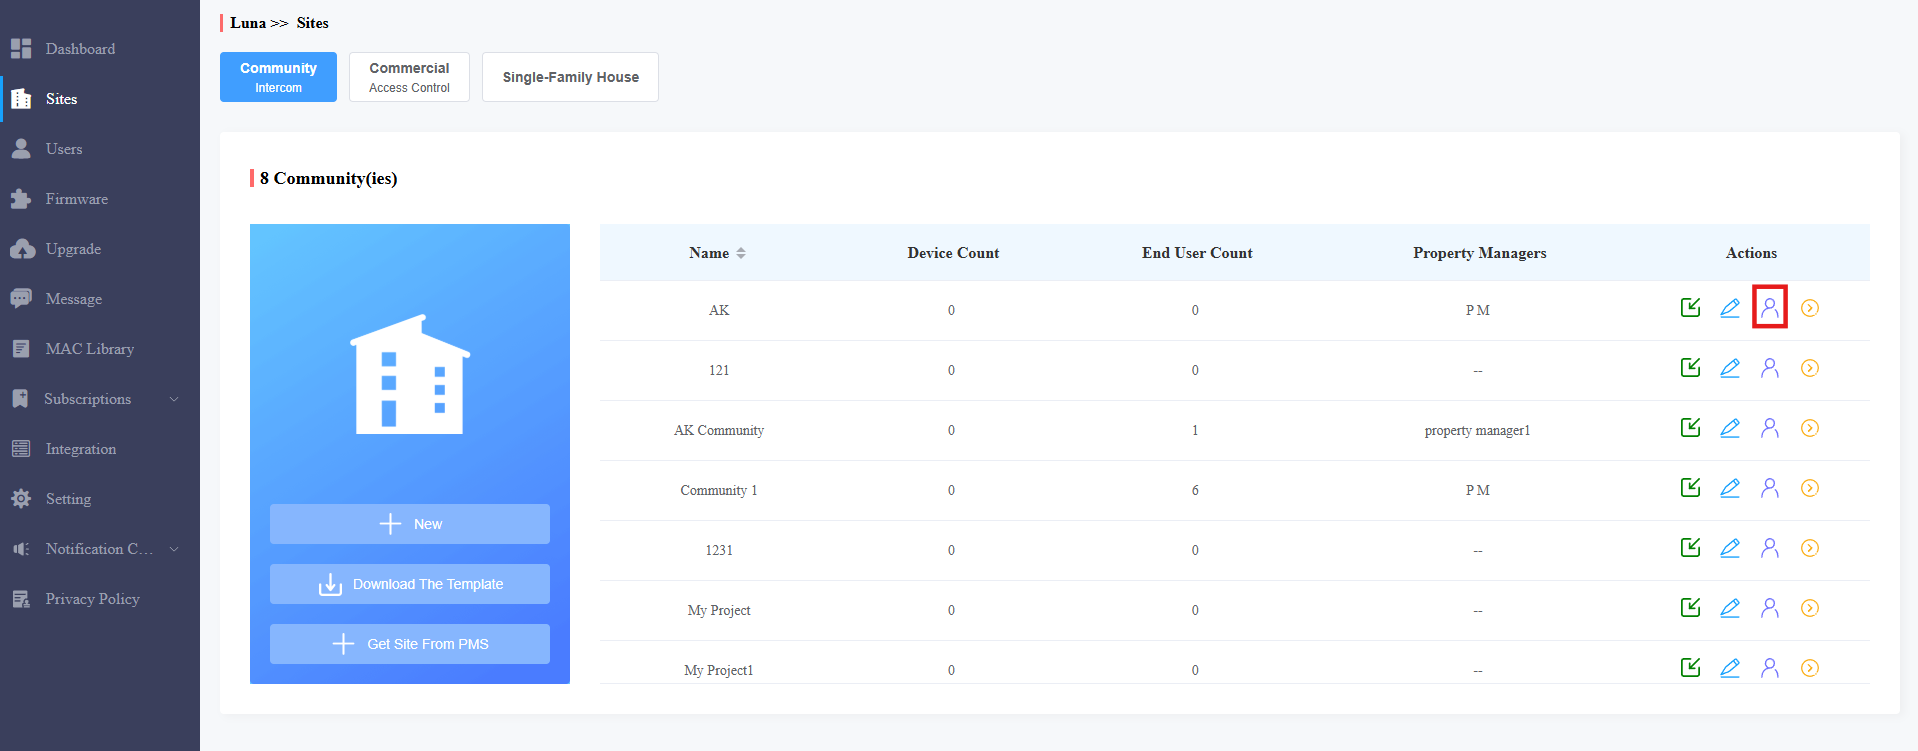
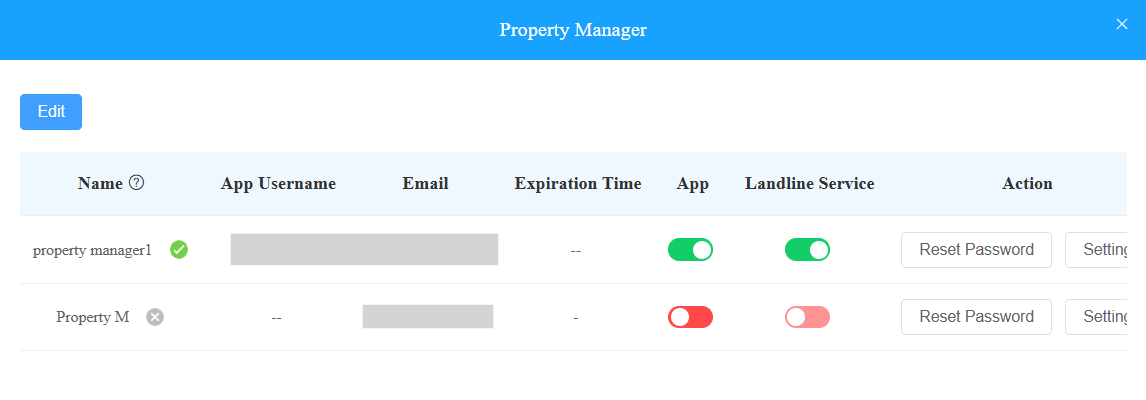
Click Edit, then select the property manager.

You can set up permissions for the property manager.
Enable App to allow the property manager to use the SmartPlus App(The service requires payment). You can also reset the SmartPlus App login password.
Enable/disable the Landline Service that allows communication between telephones/mobile phones and intercom devices.
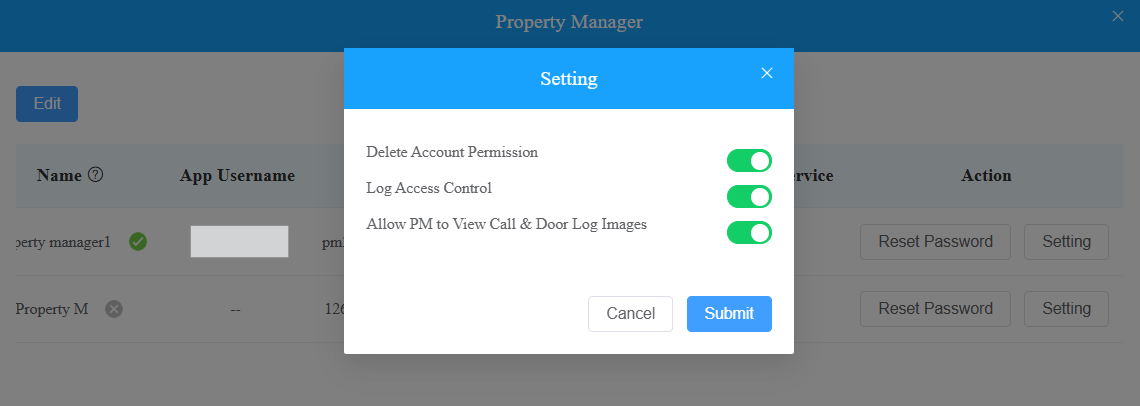
Click Setting and configure Delete Account Permission and log permissions.
With Delete Account Permission enabled, the property manager can delete resident accounts on the SmartPlus platform with a property manager account.
With Log Access Control enabled, the property manager can check door logs, call history, and captured images on the SmartPlus platform with a property manager account.
With Allow PM to View Call & Door Log Images enabled, the property manager can view the images captured during calls or door openings.
Edit/Delete Property Manager Account
You can edit and delete the property manager account if needed.
1. Go to the Users module and select Property Manager.
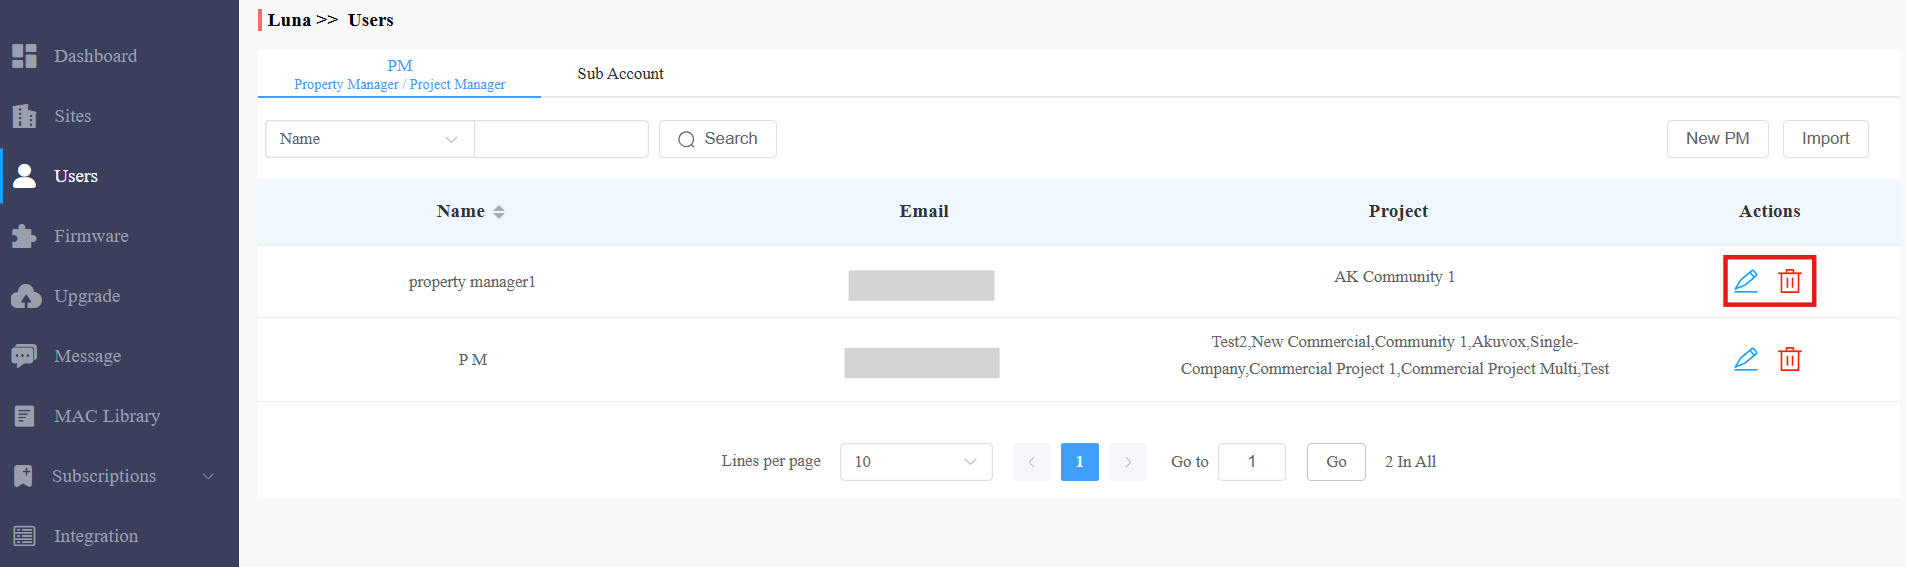
2. Click ![]() to set up the account settings.
to set up the account settings.
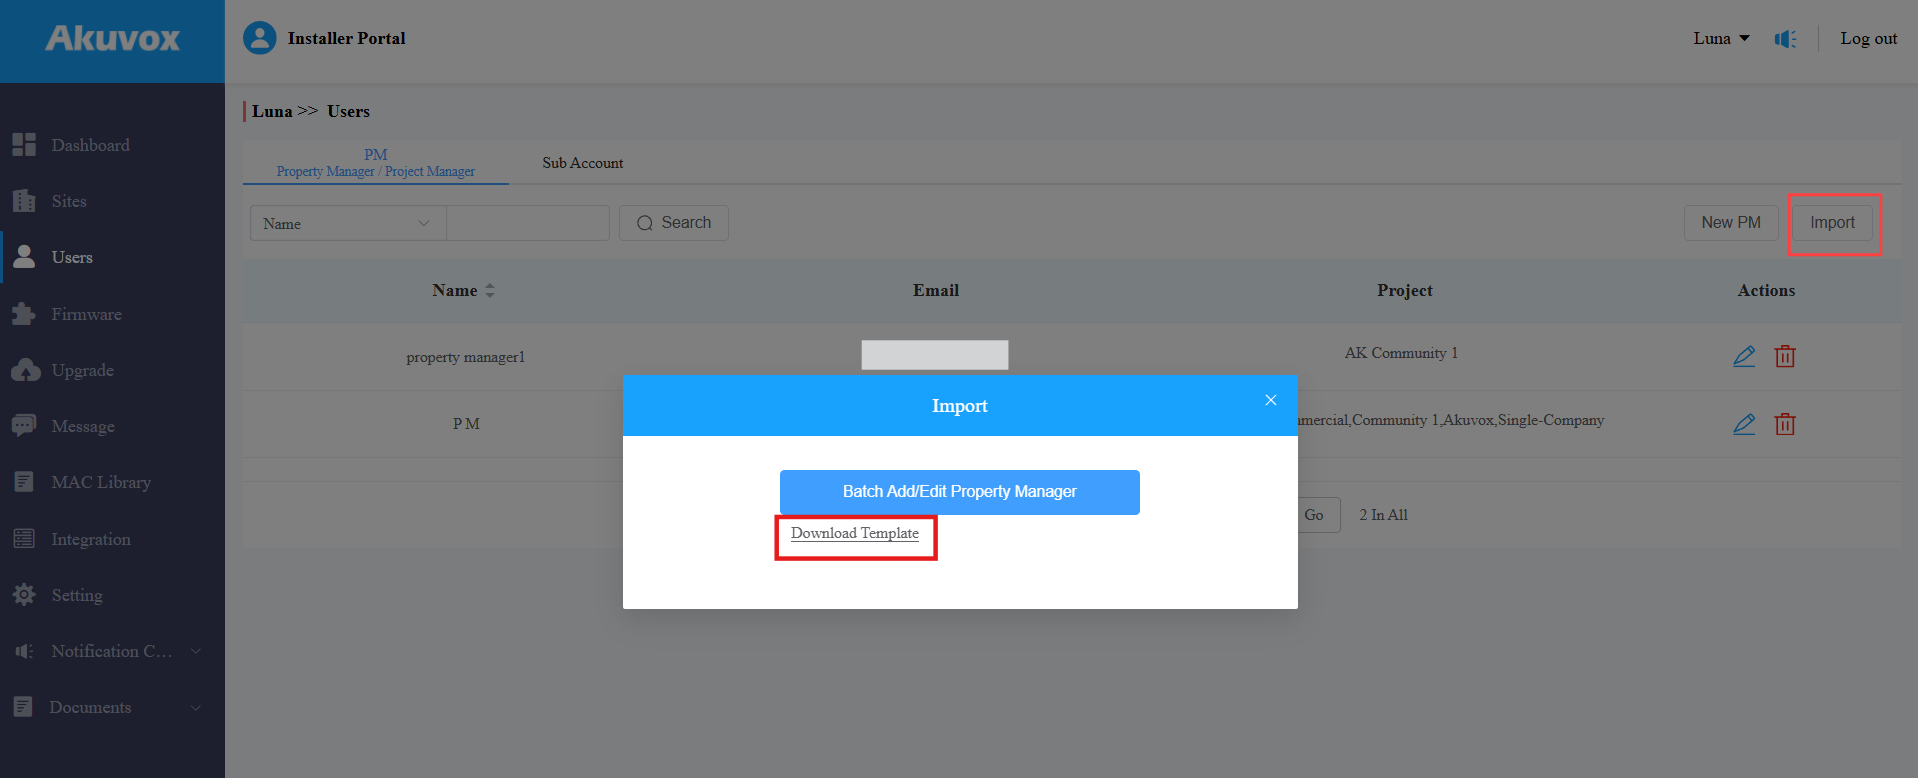
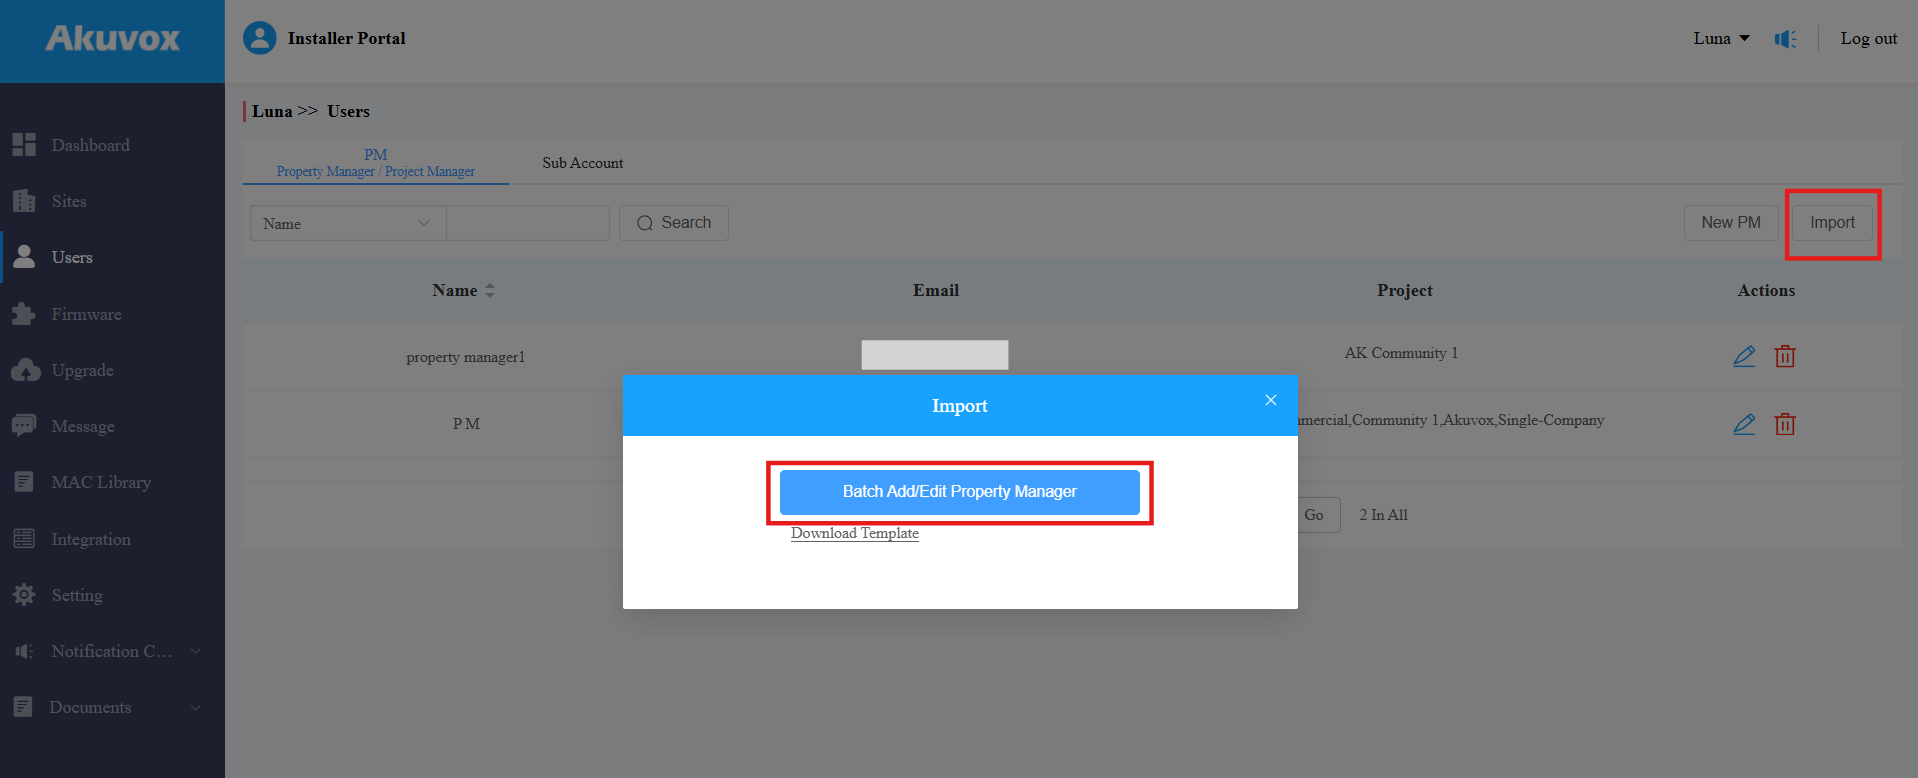
Batch Import Property Manager Accounts
You can add/edit property manager accounts in a batch to improve efficiency.
On the Users module, click Import on the right.
Click Download Template.
Note
The email is a credential corresponding to the existing PM account and cannot be modified.
For example, if you want to change the language of a certain account while keeping other items unchanged, select the target language in the file, enter the email of that account, and leave other items blank.
Edit the template. Enter the first name and last name of the property manager.
Enter the email address to receive the account activation email. It is mandatory and cannot be modified for the existing property manager.
Select the language of the email from the available options.
Enter the community and/or commercial project name(s) to be managed.
You can ONLY fill in one project name in one row. If the property manager manages multiple projects, use separate rows.
You can ONLY enter the project(s) that have been created.
You can check the instructions by moving your mouse cursor to the columns.

Click Batch Add/Edit Property Manager. The importing result will then display.
Firmware Management
You can check and update your device firmware version in the Firmware and Upgrade modules, respectively.
Check Firmware List
Before upgrading your device firmware, you can go to the Firmware module to check the latest available for uploading.
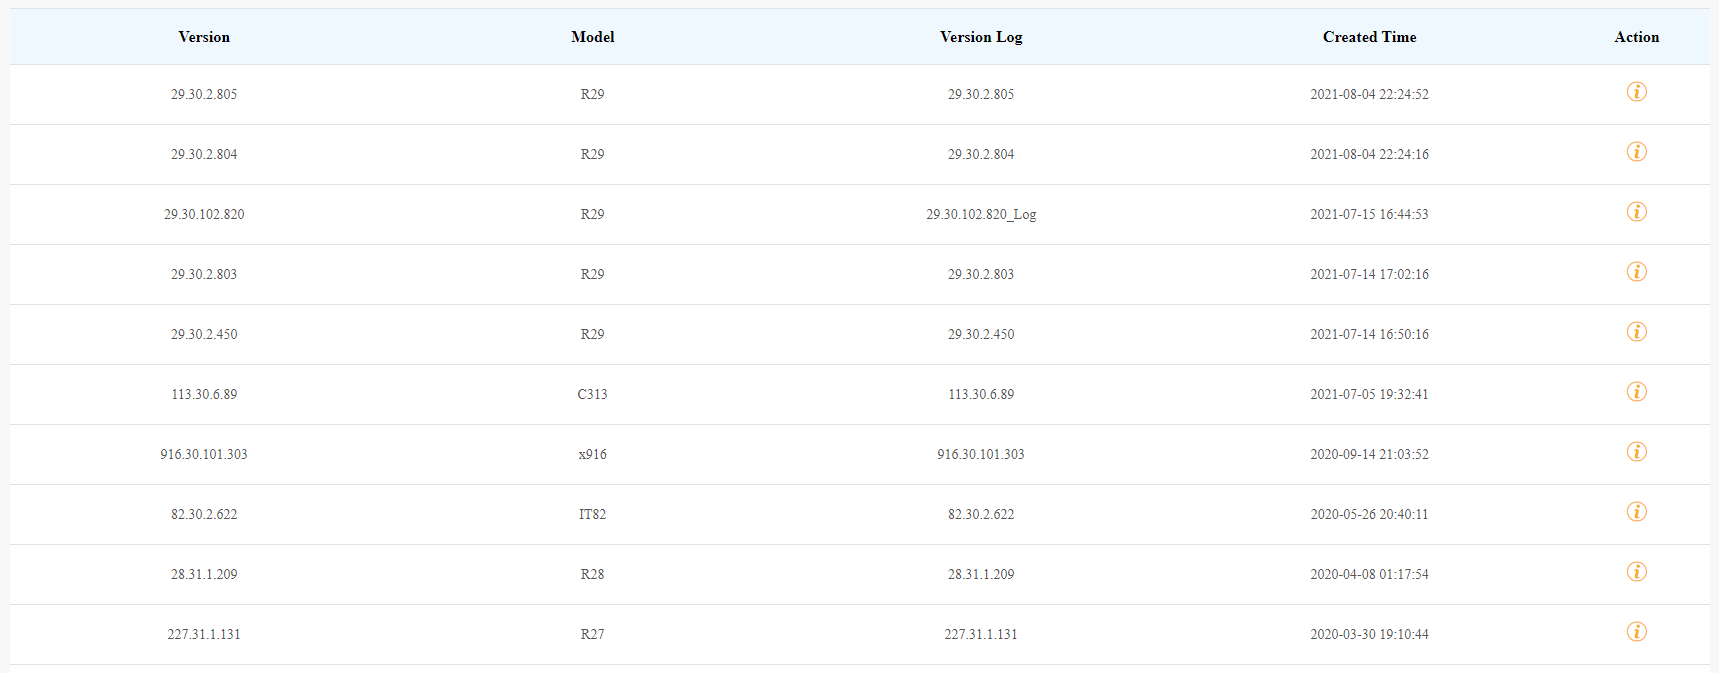
Firmware List Description
Field Name | Description |
Version | Displays the firmware version number. |
Model | Displays the device model. |
Version Log | Generally displays remarks on the version. |
Created Time | Displays when the firmware is uploaded. |
Action | Click to check the detailed firmware information. |
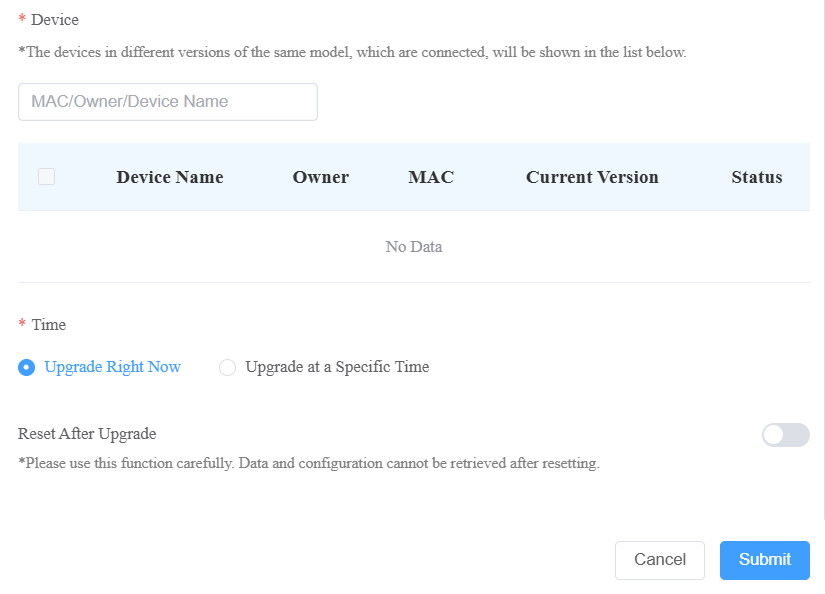
Upgrade Firmware
You can upgrade the device firmware to the selected version according to the update timing defined.
1. Go to Upgrade Module.
2. Click on Add.
3. Select Community as the project type and choose the site.
4. Select the firmware version and the device to be upgraded.
5. Select the time to upgrade the device.
6. You can check Reset After Upgrade to reset the device's configuration after upgrading finishes.

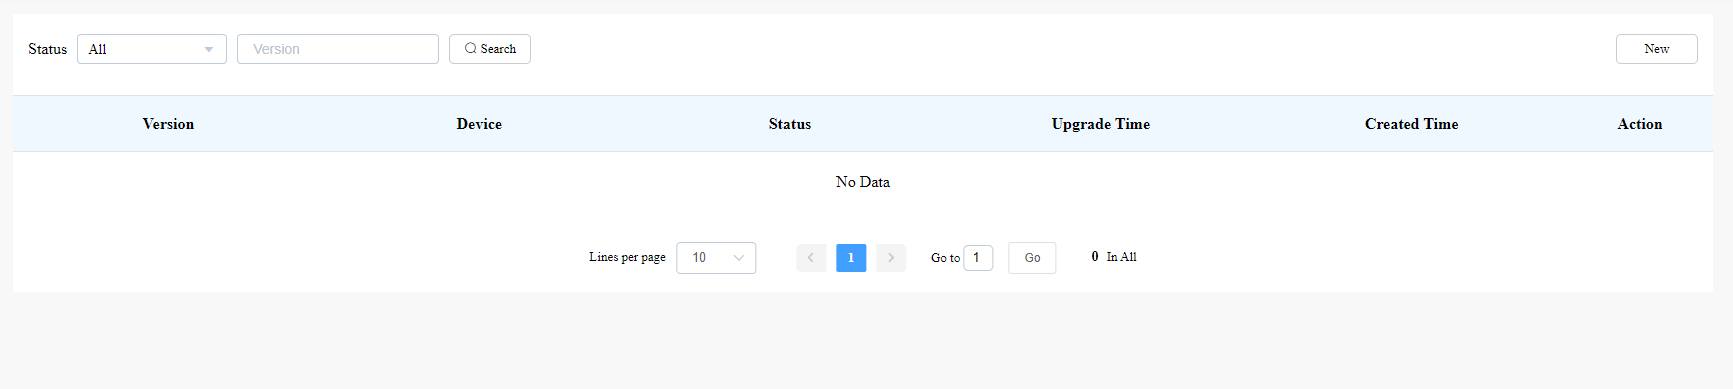
Check and Edit the Firmware Upgrade List
After you update your device firmware, you can not only check your firmware update status but also edit the update settings for devices pending the upgrade. And you can delete the specific record as well.
Search the firmware status by All, Pending, Processing, and Executed.
Edit the update set for the devices pending the update.
Delete the specific update record if needed.
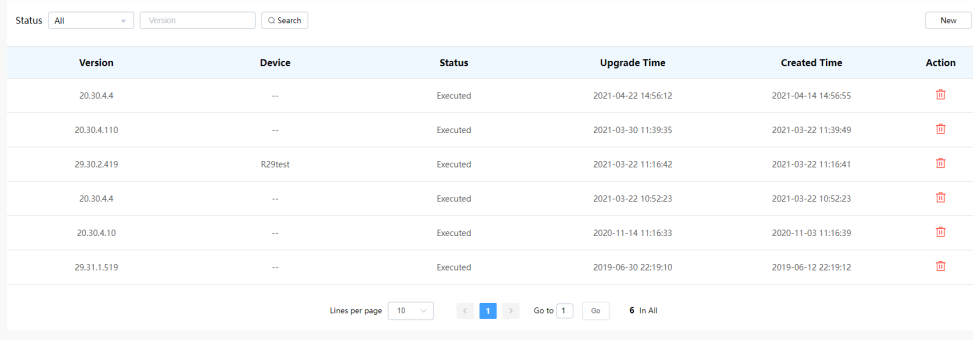
Update List Description
Field Name | Description |
Version | Displays the firmware version number in the update list. |
Device | Displays the device model in the update list. |
Status | Displays update status: Pending for the firmware that will be updated according to the updating timing. Executed for the firmware that has finished updating, and Processing for the firmware that is being updated. |
Update Time | Displays when the firmware is updated. |
Created Time | Displays when the update setting is created. |
Action | The action involves the update setting alteration and the update record removal. |
Note
After you initiate the specific firmware update, refresh the window to update the firmware list.
Installer Account Management
You can change the account password, time zone, billing information, etc.
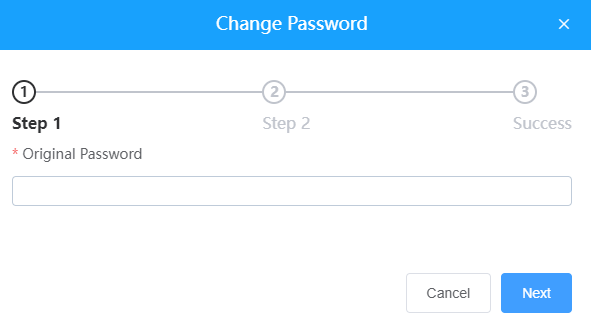
Change Installer Account Password
1. Click on your account name in the upper right corner.
2. Click on Change Password.

3. Change the password.
Change Time Settings
Click Setting > Time to set up the time settings.

Set Account Access Permission
You can grant permission to your distributor to log in to your account without a password. With permission, distributors can switch to your account from their web portal to give you support or assistance. The account settings will be displayed in the drop-down list once the distributor enables the account access feature.
You can turn on or off the permission whenever you need.
1. Click Setting and select Account Setting.
2. Disable/enable the permissions.
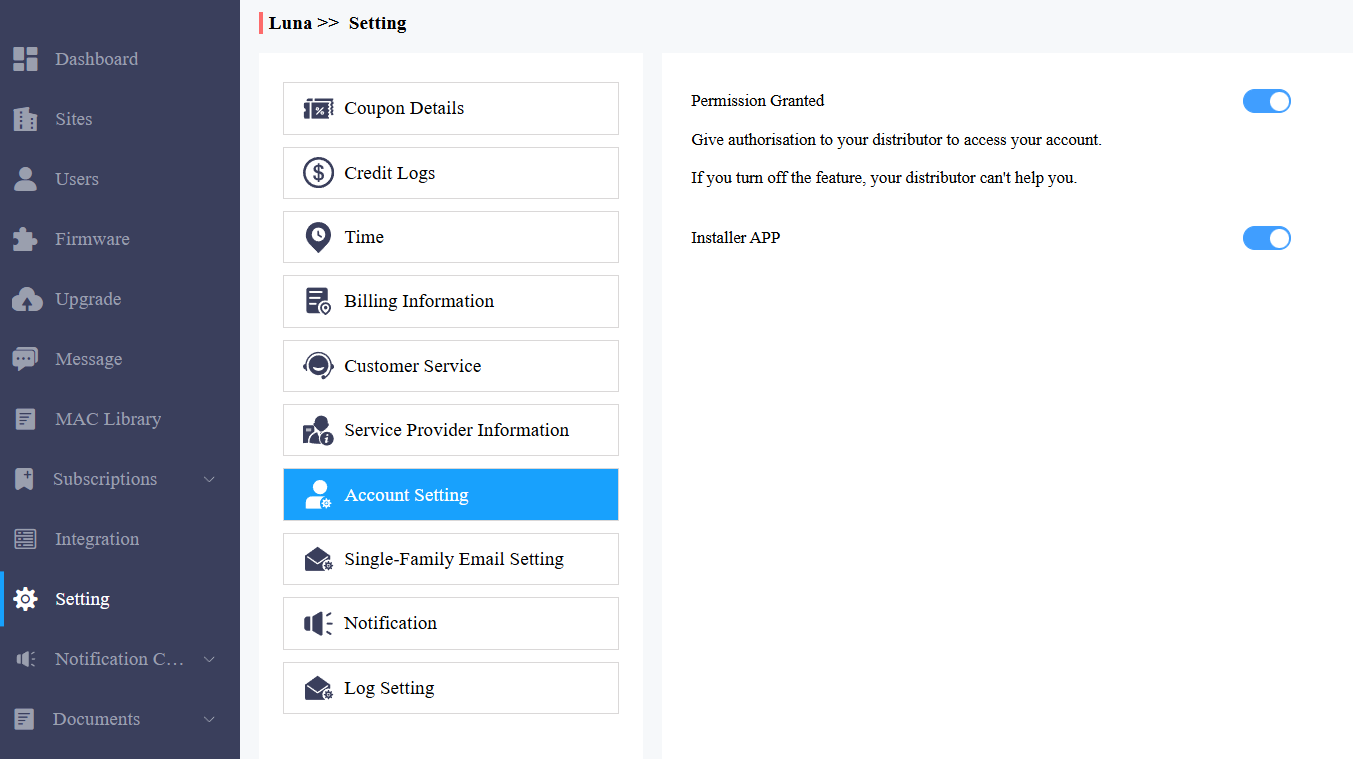
Note
The account setting will only appear once your distributor enables the account access feature. By default, the Permission Granted feature is turned off.
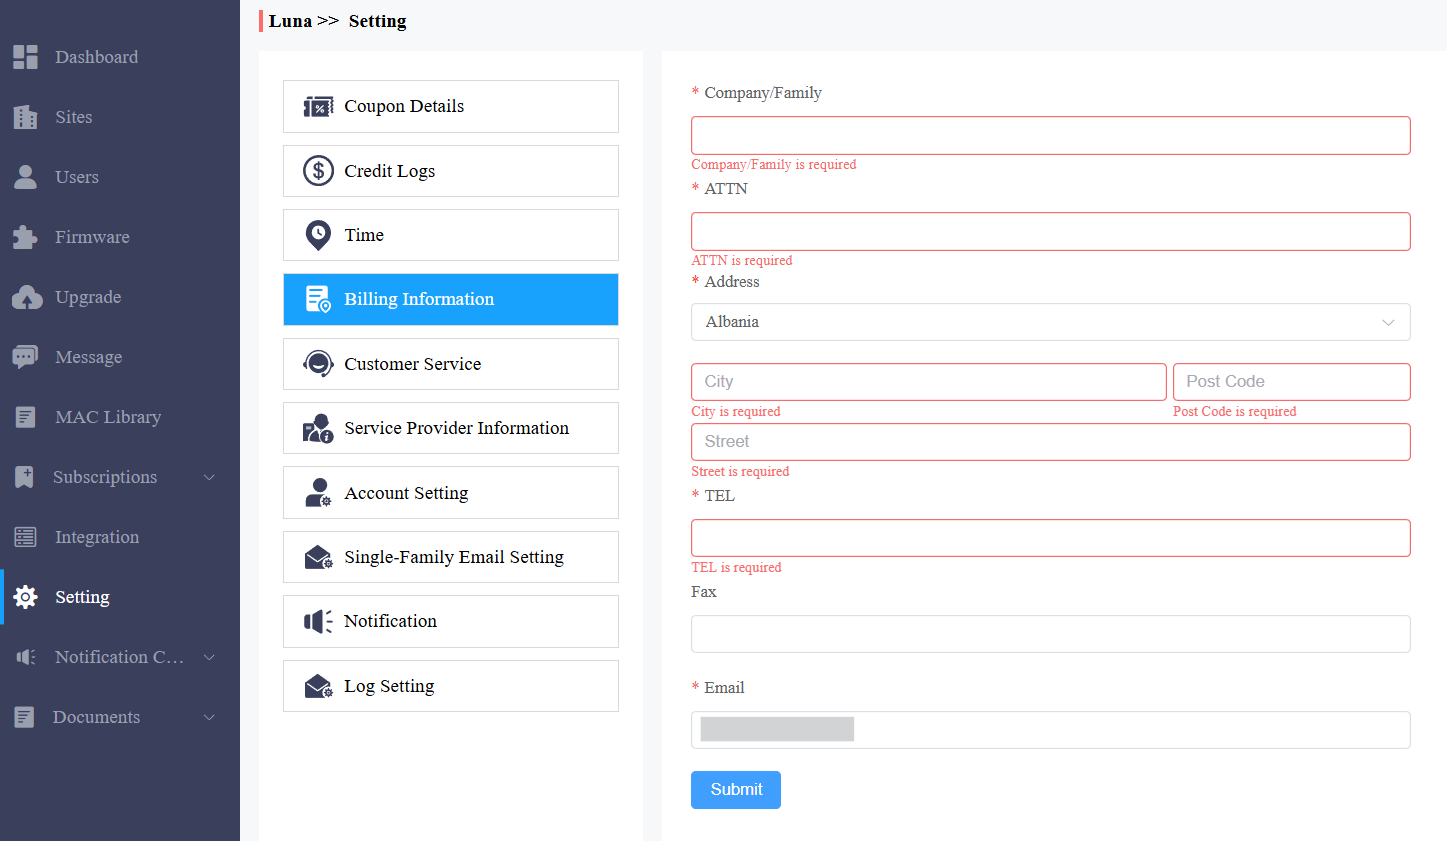
Billing Information
You are required to fill in your billing information so that your distributor will be able to send you the bill according to the information you filled in.
Click Setting > Billing Information and enter the information.
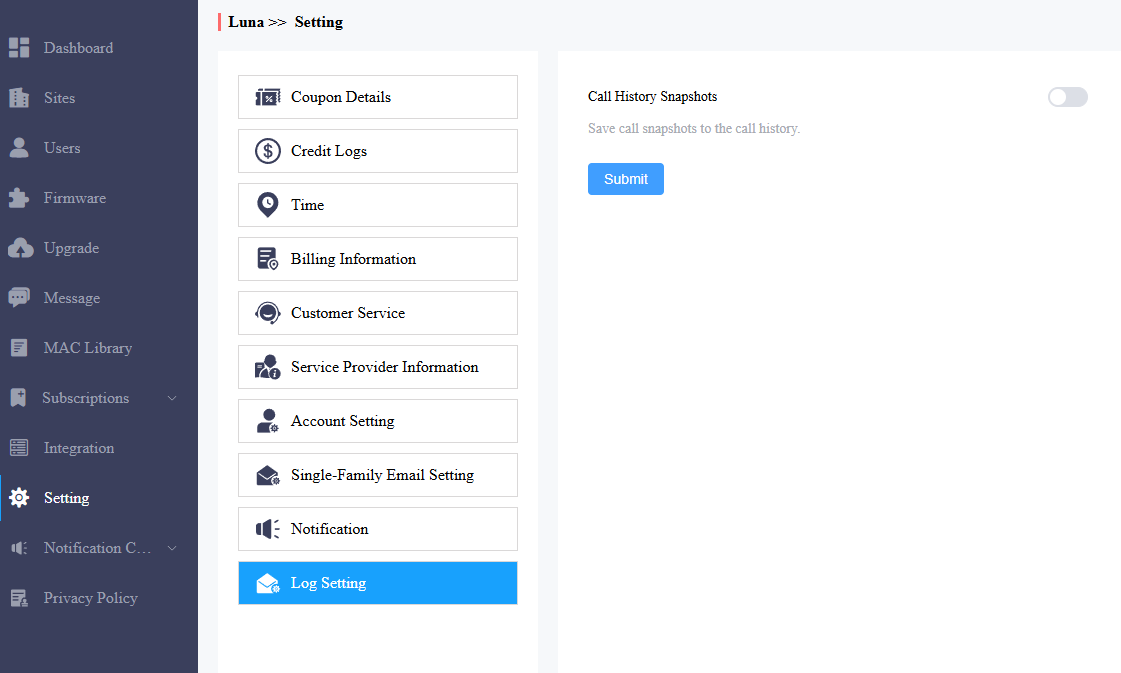
Log Control
You can control whether to display captured images or recorded videos in call logs.
Click Setting > Log Setting. Enable/disable Call History Snapshots. It is enabled by default.
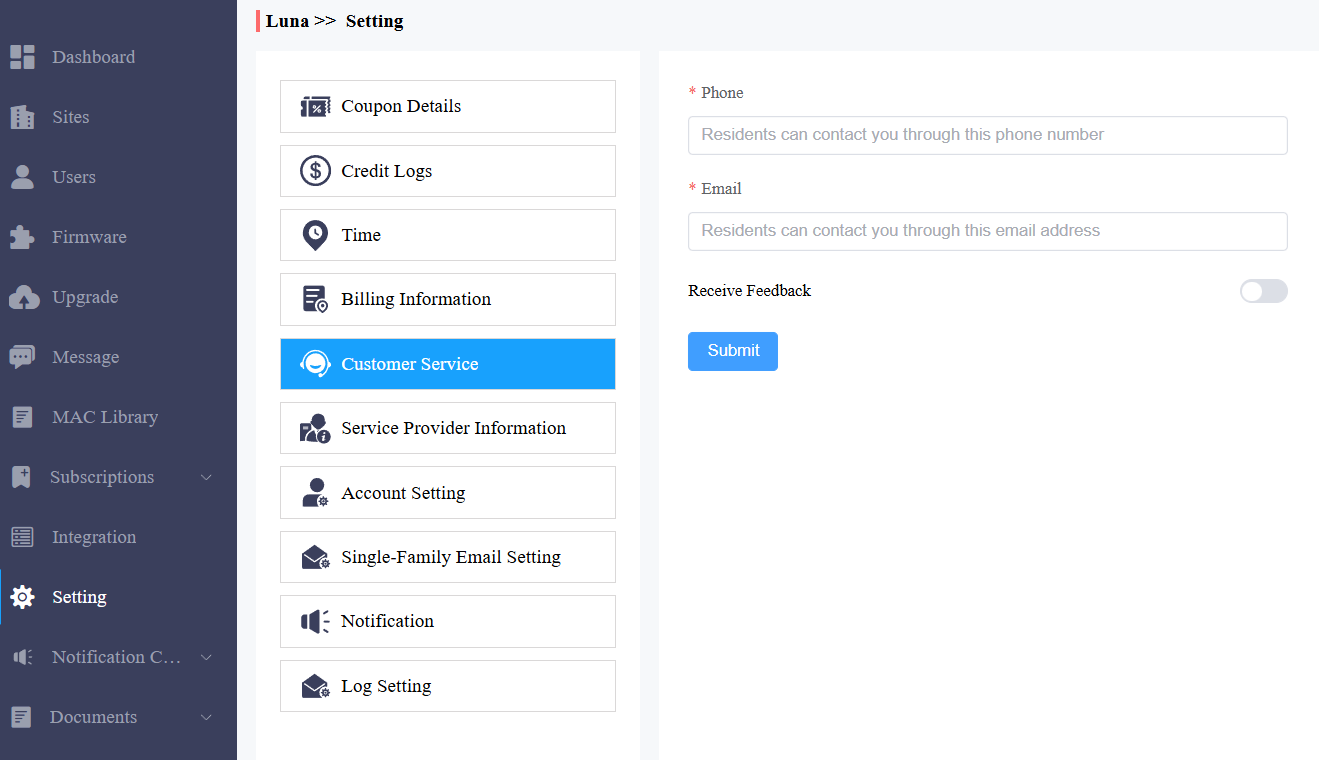
Customer Service
Customer service allows customers to contact you through the information you entered on the SmartPlus installer portal.
1. Click Setting and select Customer Service.
2. Enter or modify your phone number and email address.
3. Enable Receive Feedback if needed, and end users' feedback will be sent to the email address that you fill in.
Technical Support & Service
Support&Service module offers you the link to the Akuvox ticket system, in which you can not only get access to a variety of technical information, such as feature guides, FAQ, etc., but also log in to the system where you can raise your questions that will be taken care of by Akuvox technical support team.
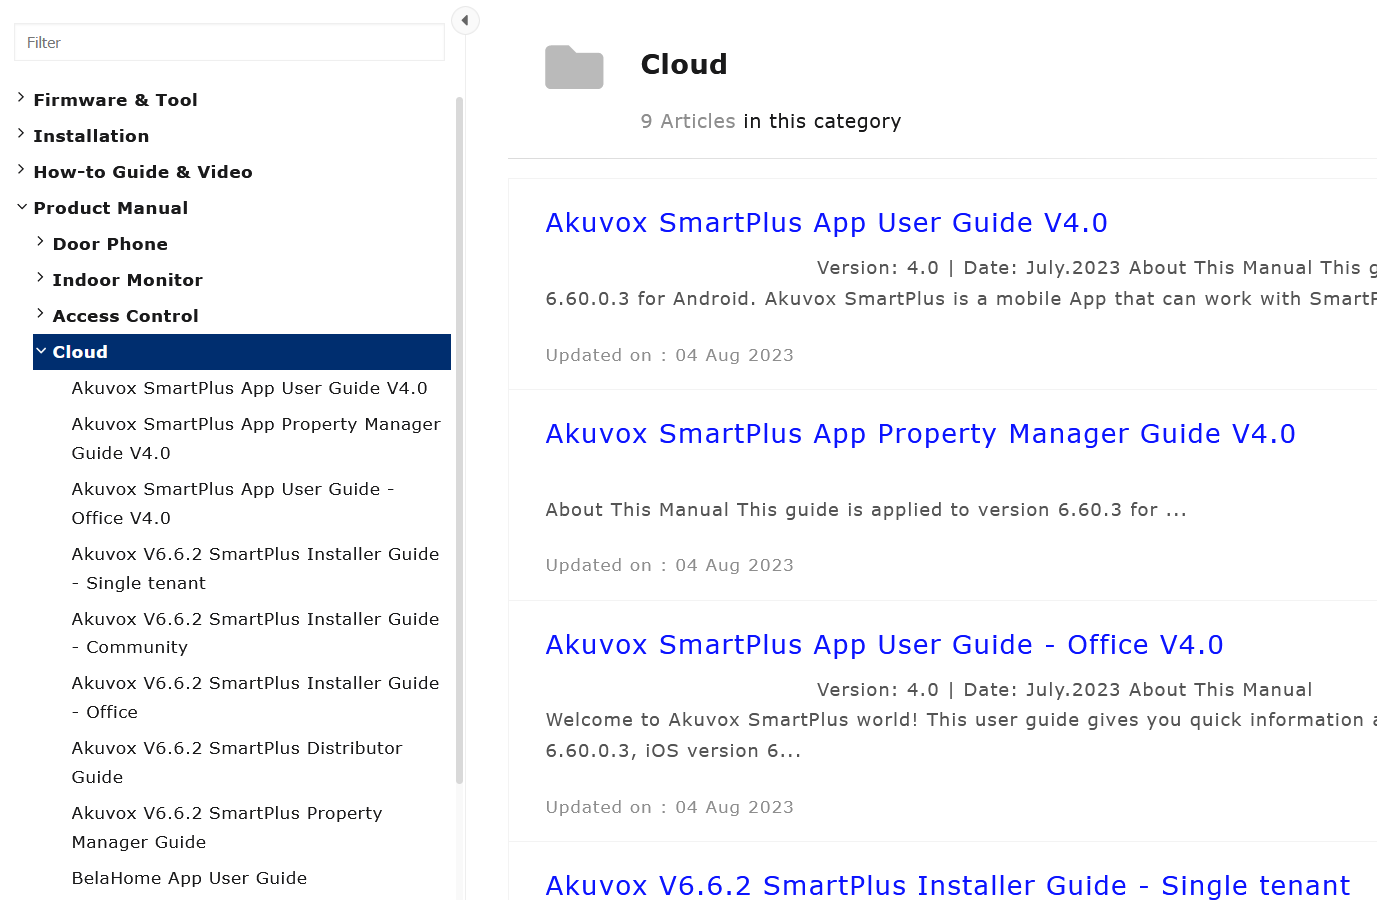
View SmartPlus User Guide
Click on Support&Service Module.
Click on Knowledge Base sub-module.
Click on Product Manual and then Cloud.
.png)
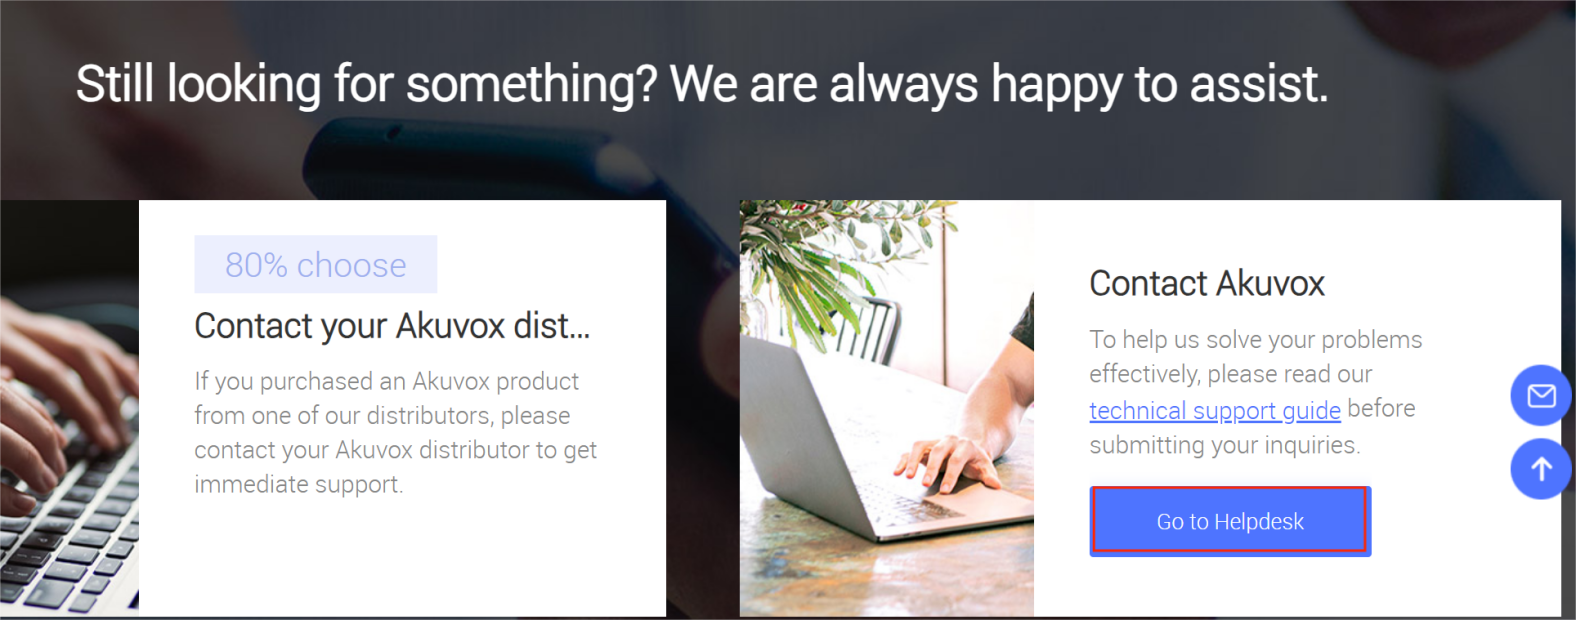
Ticket System
Click on the Technical Support sub-module.
Click on Go to Helpdesk to enter the Akuvox ticket system page.
Sign up and log in to the Akuvox ticket system for technical information and support.
CAP System
Click on CAP sub-module for information about how to become a certified Akuvox Partner.
Sign up and log in to the Akuvox CAP system for sales and technical information and support.

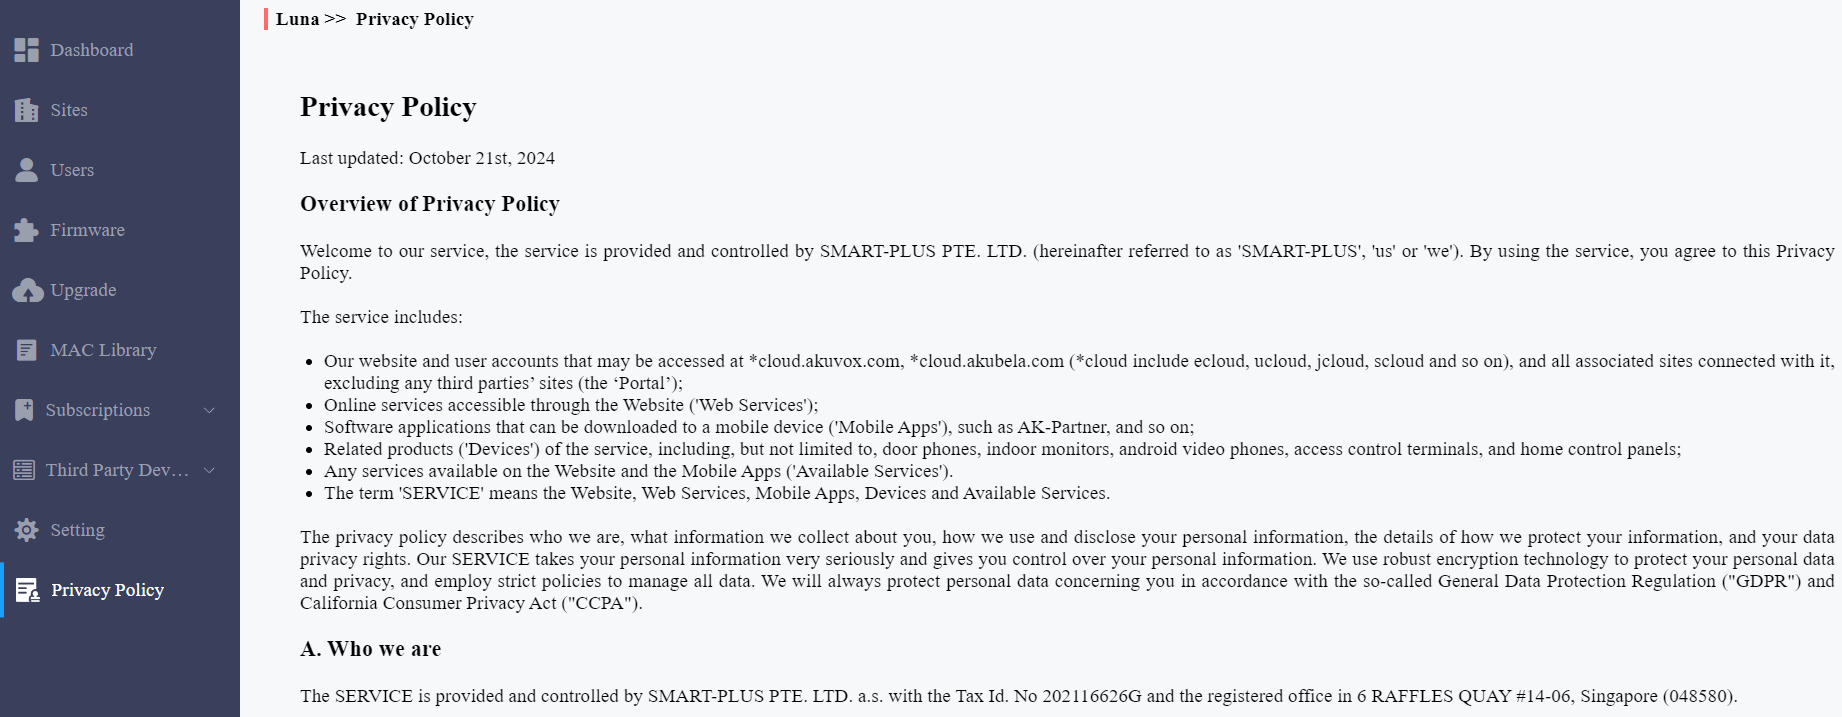
Privacy Policy
You will see the Privacy Policy window when you log into the platform for the first time.
The Privacy Policy tells you how the user data is collected, used, and protected.
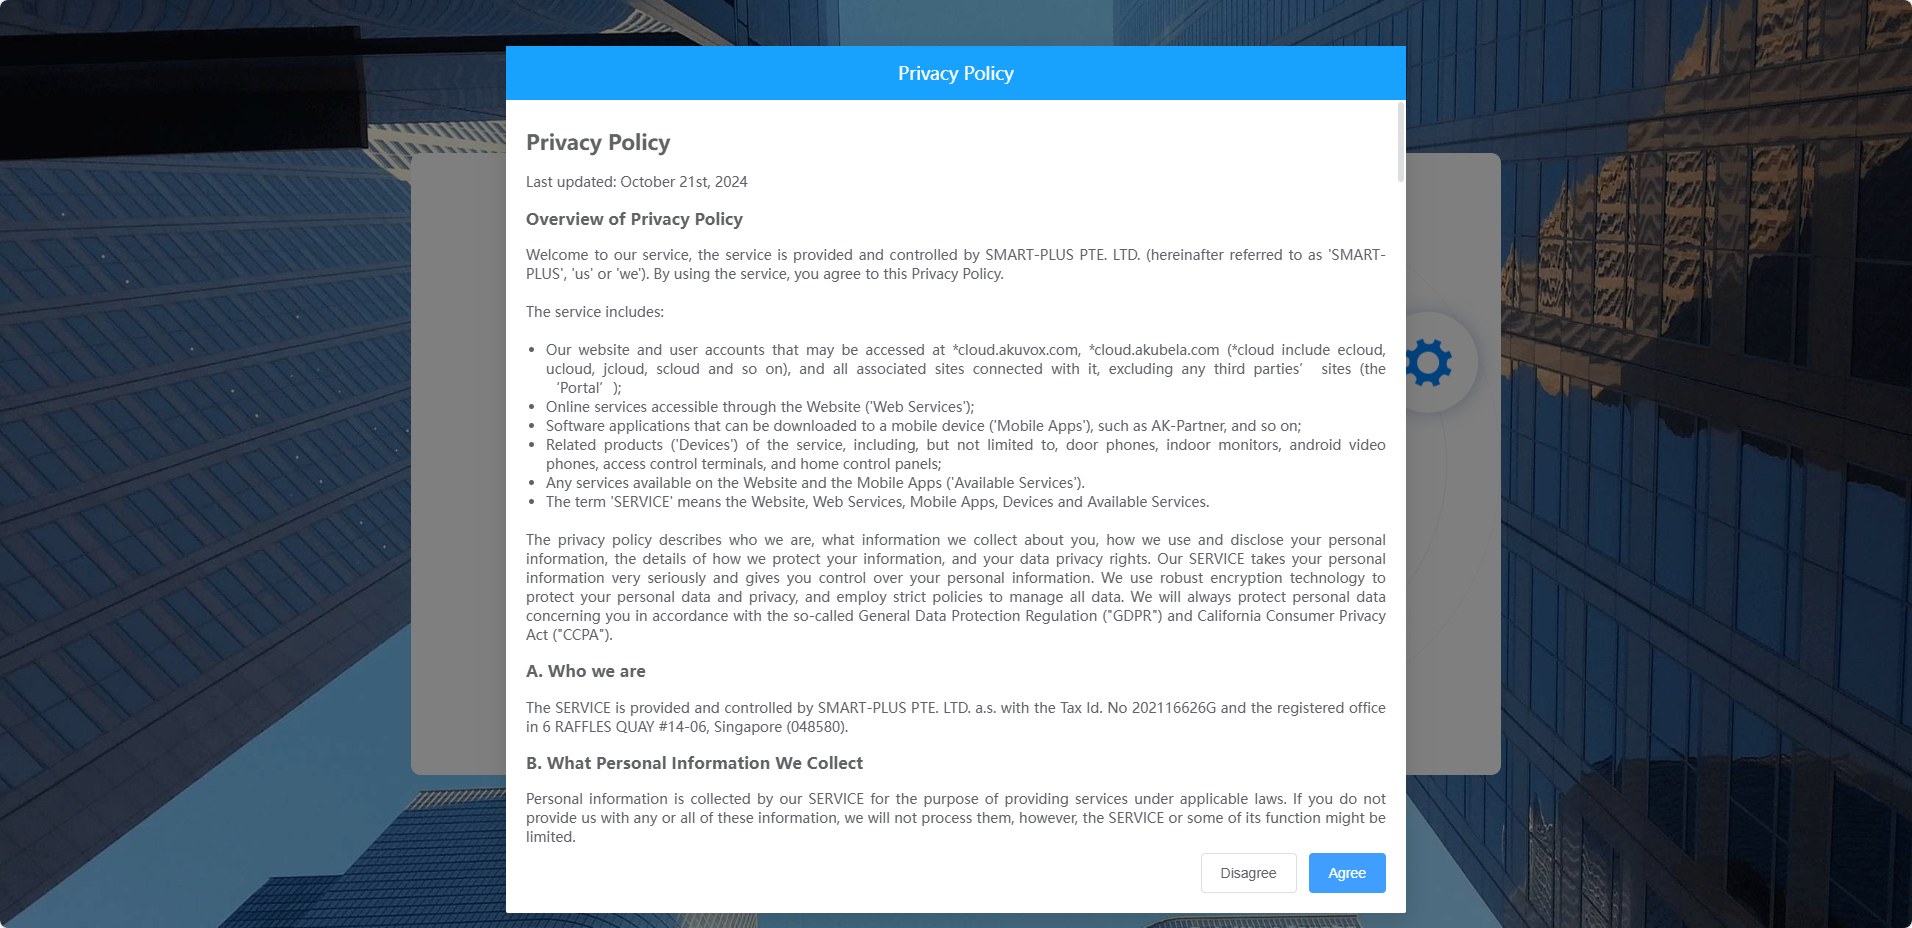
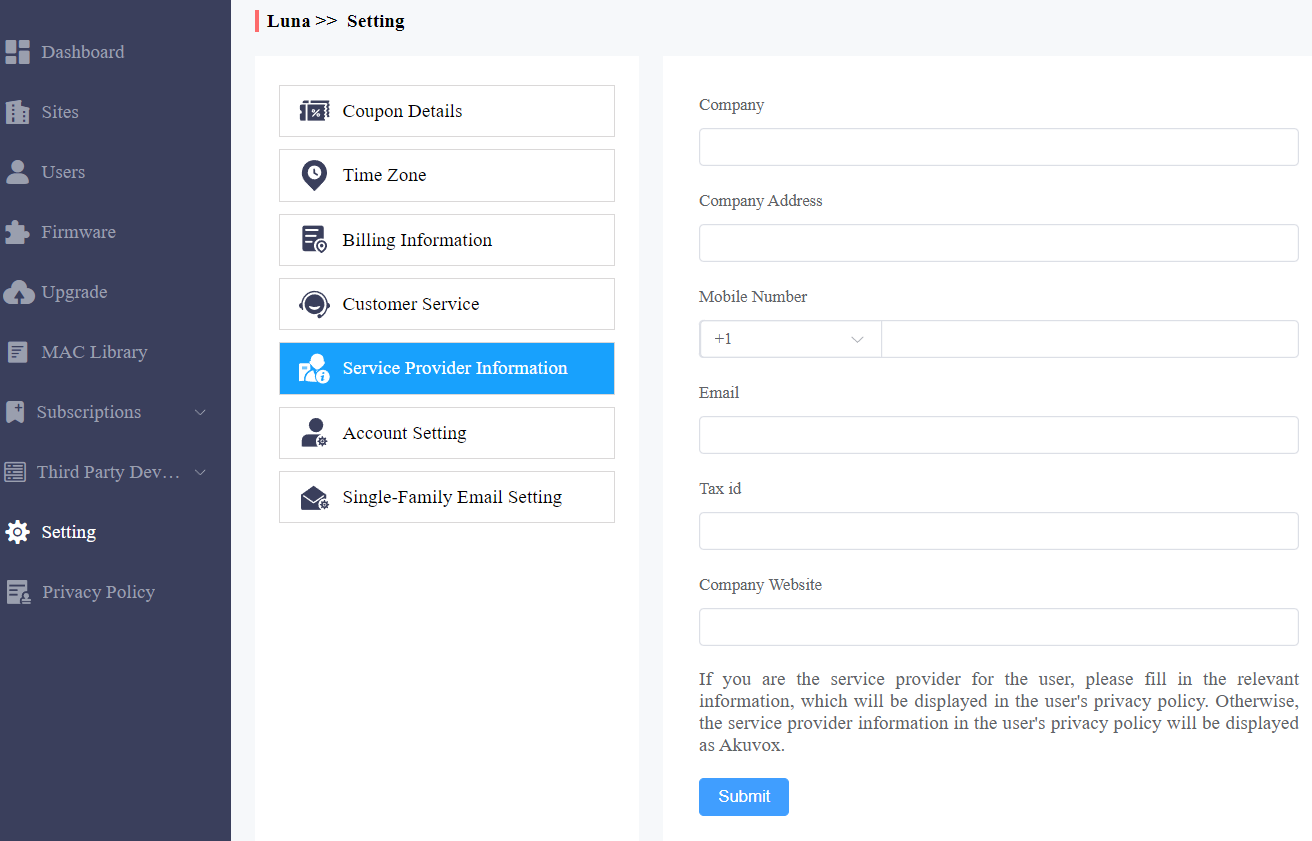
When you click Agree, you will be guided to the Service Provider Information interface to fill in your information. The information will be displayed in the privacy policy for end users. It is not mandatory to fill it out. Not filling it in will not affect your use of SmartPlus cloud services.
When you click Disagree, you cannot log in to the SmartPlus platform.
You can also click Privacy Policy on the left column to view the agreement again.
Contact Us
For more information about the product, please visit us at www.akuvox.com, or feel free to contact us by
Sales email: sales@akuvox.com
Technical support email: support@akuvox.com
Telephone: +86-592-2133061 ext.7694/8162
We highly appreciate your feedback about our products.